
HP Systems Insight Manager 7.3 Installation and Configuration Guide for Microsoft Windows
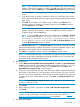

NOTE: If you click Next without adding any certificates to the list, and no certificates
exist from a previous installation, a message appears, indicating that if you do not
specify any trusted certificates, Systems Insight Manager cannot access the Insight
Management Advisor on this system. Click OK if you do not want Systems Insight
Manager to access the Insight Management Agents on this system, or click Cancel
to close the window and add the trusted certificates to the list.
NOTE: The Trust By Certificates option enables the HP System Management
Homepage system and the Systems Insight Manager system to establish a trust
relationship by means of certificates. This mode is the strongest method of security
because it requires certificate data and verifies the digital signature before enabling
access.
3. Click to continue to the Summary Panel.
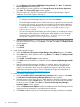
Option 2
1. Click Import. The Import Server Certificate window appears.
2. Enter the name or IP address of the server whose certificate you want to import.
3. Click Get Cert. The certificate information appears.
4. Verify the certificate information. If you want to add this certificate to the Trusted
Certificate List, click Accept and the certificate is added to the Trusted Certificate List,
or click Cancel if you do not want to add it to the Trusted Certificate List. The Trusted
Certificate List appears. Click Next.
NOTE: You can add an unlimited number of trusted certificates.
NOTE: To delete a certificate, select the certificate, and click Delete. The selected
certificate is removed.
5. From the IP Binding window, select the Enable IP Binding checkbox if you would like
to bind to IP addresses that match a specific subnet and mask. Click Next.
6. From the IP Restricted Logins window, select the Enable IP Restricted Logins checkbox
if you would like to include or exclude specific IP addresses or IP address ranges.
Click Next, and the Summary Panel appears.
7. Click to continue to the Summary Panel.
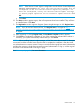
Trust By Name
1. Select Trust By Name. Click Next. The Trusted Server window appears. Enter the
names of the servers you want to trust.
Although the Trust By Name mode is a slightly stronger method of security than the
Trust All mode, it still leaves your system vulnerable to security attacks. The Trust By
Name mode sets up the HP System Management Homepage to only accept certain
requests from servers with the Systems Insight Manager names designated in the
Trust By Name field. The Trust By Name option is easy to configure and can prevent
non-malicious access. For example, you might want to use the Trust By Name option
if you have a secure network, but your network has two groups of administrators in
two separate divisions. The Trust By Name option would prevent one group from
installing software to the wrong system. This option does not verify anything other
than the Systems Insight Manager server name submitted.
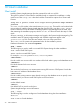
NOTE: The server name cannot contain the following characters:
~ ! ` @ # $ % ^ & * ( ) + = " : ' < > ? , | ;
2. Click Add to add the name of a server you want to trust. Click Next.
Custom install 73