
Systems Insight Manager 6.2 Installation and Configuration Guide for MS Windows


more information about HP Insight Remote Support Advanced, see Chapter 5 “Installing HP Insight
Remote Support Advanced”.
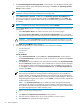
9. Install the HP Version Control:
a. When the HP Version Control Setup window appears, click Install. The HP Version Control
Setup Repository Directory window appears.
b. Select the directory from which HP Version Control will retrieve support pack information using the
Browse button. This directory must be manually created later if it does not exist. Click OK. Click
Next. The HP Version Control Automatic Update window appears.
c. Select the Enable Automatic Update checkbox to enable automatic downloading of ProLiant
Support Packs and components at a specified interval and time.
d. Click Finish. Installation of HP Version Control proceeds and completes.
NOTE: If the HP Version Control Agent is configured to use the HP Version Control, warning
appears: "At least one HP Version Control Agent must be configured to use
the HP Version Control." If none are configured, verify the HP Version
Control Agent settings to ensure proper operation of the automatic update
feature. Click OK.
e. Click Close.
10. The Status window appears again, after all components have been installed, they will have an installed
status. Click Next.
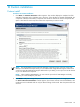
11. The Registration window appears. Register HP Systems Insight Manager or click Register Later.
NOTE: If you do not have Internet access, click Register Later or navigate to http://
h20293.www2.hp.com/portal/swdepot/displayProductInfo.do?productNumber=HPSIM-LIC to register.
12. After registering or clicking Register Later, the Installation complete window appears.
13. Click Finish to complete the installation. If any of the components indicated that a reboot is necessary,
your system automatically reboots after you click Finish.
NOTE: When installing HP Systems Insight Manager, a CMS host name that exceeds 15 characters is
truncated, and the truncated name must be used to complete the installation. After the install, two administrator
accounts are created. One account includes the original host name\administrator and the other account
includes the truncated host name\administrator. To log in, use the original host name in the Domain field
on the Sign in page.
See "“Next steps”" for more information.
60 Custom installation