Data Migration of an Existing Microsoft Windows CMS to a new Insight Software 6.3 system White Paper Table of Contents Introduction....................................................................................................................................................................... 3 Migration support matrix ..................................................................................................................................................
Cluster CMS with remote database example .......................................................................................................... 23 Non-Cluster CMS example .................................................................................................................................... 23 Step 6: Configure Insight Dynamics Global Workload Manager property file........................................................... 27 Step 7: Post-Import HP Insight Orchestration Configuration .......
Introduction The Insight Software data migration tools (DMT) provide an easy mechanism to migrate an existing Insight Software central management server (CMS) from one system environment to another. These tools are designed to relocate a CMS to a new hosted environment when there is a need to change the underlying hardware or operating system of the CMS, without losing any of the customized data located on the CMS.
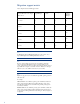
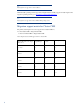
Migration support matrix Table 1: Insight Software 6.3 DMT support matrix Supported Versions HP Systems Insight Manager HP Insight Control HP Virtual Connect Enterprise Manager 5.3.1 6.3 No No No No 6.0 6.3 No No No No 6.1 6.3 Yes No No Yes 6.2 6.3 Yes No No Yes 6.3 6.3 Yes Yes Yes Yes Note: For HP Insight Control and HP Insight Dynamics, the source version of 5.3.1 maps to HP Insight Control or HP Insight Dynamics version 3.
Migration support matrix for workgroup/domain Table 2: Insight Software 6.3 DMT support matrix for workgroup/domain Source CMS System Target CMS System Supported * In Domain * In Domain Yes In Workgroup In Domain No In Domain In Workgroup No In Workgroup In Workgroup No * Note: Data migration is supported only when source and target CMS are in same domain. Example: source CMS [ASIAPAC/sourcecms] to target CMS [ASIAPAC/targetcms]. Table 3: Insight Software 6.
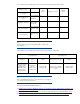
Note: Data migration is not supported for Oracle® databases. All Windows® operating systems supported by Insight Software are fully supported in data migration. For supported operating systems, go to http://www.hp.com/go/insightsoftware/docs. Note: Data migration is not supported for Linux or HP-UX CMS operating systems.
Table 5: Insight Software 6.
HP Insight Orchestration support matrix From 6.3, federated CMS is enabled by default in every new installation. Even a single CMS is installed and configured, federation may be enabled. Thus, when planning the migration of IO data, make sure to review table 7 carefully. In order to check whether Federated CMS is enabled in your environment: • In CMS, open hpio.properties file located at \conf and search for federated.io property.
• The source CMS with Insight Software 3.x/6.0 installed and the target CMS with standalone Systems Insight Manager installed. • The source CMS with standalone Systems Insight Manager and the target CMS with Insight Control or Insight Dynamics 3.x/6.0 installed. • The source CMS as a 64-bit system and the target CMS as a 32-bit system. • The target CMS system is managed by the source CMS. • The source and target systems are members of different Windows domains.
Before you begin The data migration process enables the target CMS to be hosted on a new system in the infrastructure or on the existing system after an OS upgrade. In either instance, critical OS-level information must be configured on the target CMS. HP recommends for the target CMS to be hosted on a different system.
Before Export: 1. Sign in to the source CMS with operating system-level administrative privileges. Be sure this is the same user that installed the Insight Software. 2. Open a command prompt: a. Navigate to Start menuRun. b. Type cmd, and then click OK. The command prompt window appears. 3. Navigate to \tools directory. 4.
Step 4: Creating space for new target CMS system • Ensure at least 20GB free disk space exists for the export file on both the source and target CMS if Insight Dynamics is installed. The file size might vary, depending on the number of discovered systems and on the Insight Software products that are installed. The file can be much smaller, 50MB, if only Systems Insight Manager is installed with several hundred systems.
Step 2: Installing and pre-configuring the target CMS 1. Install a supported version of Windows operating system that meets Insight Software requirements on the target CMS. The target system must not have the UTC system time set earlier than the source. For example, ensure the system time is synchronized for the source and target CMS. The target CMS OS must be the same locale as the source CMS. For more details refer notes at “Migration support matrix”.
Note: If import cannot be completed and the source CMS must be used again, steps 2, 3, and 4 must be undone. See steps 9 and 12 in the post import operations section. Step 1: Backing up your CMS and database This step only applies when the target CMS is the same system as the source CMS. HP recommends making a new system separate from the source CMS available for the import.
1. In the deployment console, select the jobs for export. 2. Right-click the mouse and then select Export… 3. Specify a name for the exported job file. 4. Copy the exported job file and any customized script files to a safe location. Note: The deployment job history for managed computers cannot be migrated. Be sure to select the desired operating systems when installing server deployment on your target CMS.
mxexport [–f ] [-p password] Where the parameters are listed: -f—Optional. Can be used to specify a different filename or path for the export archive. The default file name is Products.zip and is placed in the \data\configdata-export directory p—Optional. Enables the password to be passed in on the command line for non-interactive operations such as a script. This is the password that will be used to encrypt the exported file, Products.zip.
recommends setting the auto start mode for the services to manual. For the list of services, see Appendix B: Stop order of services table column Service Display Name. After a successful export operation, the default export file, Products.zip, is created in folder “\data\configdate-export”. For an example of a successful export operation, see Figure 1.
---------------------------------------------------------Product Name : HP Application Discovery [HP Insight Dynamics] Product Version : 6.3 Status : Successful ---------------------------------------------------------Product Name : Logical Server Management [HP Insight Dynamics] Product Version : 6.3 Status : Successful ----------------------------------------------------------Product Name : HP Insight Capacity Advisor [HP Insight Dynamics] Product Version : 6.
Product Name : HP Insight Recovery software Product Version : 6.3 Status : Successful ---------------------------------------------------------Product Name : HP Operations Orchestration software [HP Insight Dynamics infrastructure orchestration] Product Version : 6.3.0 Status : Successful ---------------------------------------------------------Export is successful. The exported data file is C:/Program Files/HP/Systems Insight Manager/data/configdata-export\Products.
Step 2: Configuring remote database access for the import operation to the target CMS The following steps must be performed only if the target CMS is configured with a remote SQL server database. This configuration enables the remote SQL server to have access to import the database information that is embedded in the export file with the SQL server BCP tools. When the import operation is complete on the target CMS, remove or disable this file sharing.
Note: The CLI console displays the import operation steps performed for remote SQL server as shown in Figure 2. Step 3: Copying saved files to the target CMS 1. Copy the zip file created during the export operation on the source CMS to the target CMS folder located at \data\configdata-import. If the export file is placed in a different location in custom folder (for example, c:\dmt), the location can be specified on the command line when the import operation is done. 2.
Prerequisite steps are: 1. The Insight Software and SQL cluster applications must be running on the node where the import utility will run. Ensure that the other node in the cluster is powered off before running the import utility. 2. Use Failover Cluster Manager to take the Insight Software cluster application offline. Then bring only the disk, file server, network name, and IP address resources in the Insight Software application online.
Cluster CMS with remote database example mximport –f –p –v -n -r For example, mximport –f c:\export.zip –p somepassword –v {IP address} –n hpcluster –r true Non-Cluster CMS example mximport –f –p For example, mximport –f c:\export.zip –p somepassword In both examples, the export archive file is read from the root directory of the C: drive and is called export.zip.
:-:-:-:-:-:-:-:-:-: :-:-:-:- HP Insight Software Data Import Tool Launcher :-:- :-:-:-:-:-:-:-:-:-:-:-:-:-:-: :-:-:-:-:-:-:-:-:-::-:-:-:-:-:-:-:-:-::-:-:-:-:-:-:-:-:-::-:-:-:-:-:-:-::-::-::-:-:-:-:-:-:-: Lookup HPSIM InstallPath (x86) HPSIM InstallPath: C:\Program Files\HP\Systems Insight Manager Lookup succeeded Data encryption password: * * Is database remote (y/n) ? y The following steps are needed to perform only if the target CMS is configured with a remote SQL server database. 1.
Extracting the zip file C:/Program Files/HP/Systems Insight Manager/data/configdata-import\Products.zip Importing data.. Product Name : HP Systems Insight Manager Product Version : 6.3 Status : Successful ---------------------------------------------------------Product Name : HP Insight Control power management Product Version : 6.3 Status : Successful ---------------------------------------------------------Product Name : HP Insight managed system setup wizard Product Version : 6.
Product Version : 6.3 Status : Successful ---------------------------------------------------------Product Name : HP Operations Orchestration software [HP Insight Dynamics infrastructure orchestration] Product Version : 6.3.0 Status : Successful ---------------------------------------------------------Product Name : HP Application Discovery [HP Insight Dynamics] Product Version : 6.3 Status : Successful ---------------------------------------------------------Start Vcem postImport process.
Step 6: Configure Insight Dynamics Global Workload Manager property file This step can be skipped if you are not using the CMS to manage gWLM nodes. Users of Insight Dynamics Global Workload Manager must perform several additional steps. For complete information, see the Insight Dynamics Global Workload Manager 6.3 Users Guide. 1. In multi homed networks, ensure gWLM property com.hp.gwlm.security.virtualLocalHostName= in file ~\Virtual Server Environment\conf\gwlmagent.
- o o o PORT - Database server port number The port from the database server. Default value is 1433. INSTANCE - Database instance o The name of the database instance containing the IO database. USERNAME - Database username o Username to be used to connect to the database. PASSWORD - Database password o Username password On successful execution of the script , the following message will be displayed: Sysprep references fixed.Fixing sysprep references.
Table 9: Start order of services Start order HP Insight software component Service display name 1 HP Systems Insight Manager HP Systems Insight Manager 2 HP Insight Control virtual machine management HP Insight Control virtual machine management 3 HP Insight Control server migration HP Insight Control server migration Web Service 4 HP Insight Control server migration HP Insight Control server migration Application Service 5 HP Insight Dynamics – VSE Workload Management for HP Integrity serv
Step 3: Verifying SMTP settings on the target CMS After a migration to a new host, it is possible that the SMTP configurations might need to be updated. Log into the CMS console, select OptionsEventsAutomatic Event HandlingE-mail settings, and then verify that the SMTP server is correct. If these settings are incorrect, automatic event handling and the emailing of reports might fail. Step 4: Post-migration steps for Cluster CMS This step is applicable only for Cluster CMS. 1. 2. 3. 4.
ii. The Microsoft Distributed Transaction Coordinator virtual server IP address of the target cluster (a public network IP address). iii. The private network IP address of the target cluster primary node. iv. The private network IP address of the target cluster secondary node. HP recommends that the balance of the private network IP address range also be entered. The private network exists to facilitate the cluster heartbeat.
10. 11. 12. 13. 32 c. Verify that no system of System Type Management Processor is associated with either the Failover Cluster virtual server or the Systems Insight Manager virtual server. Navigate to OptionsDiscovery. The Systems Insight Manager discovery page appears. Create or update the discovery task for the primary and secondary physical servers. a. If the source CMS is a Cluster CMS and a Discover physical cluster nodes discovery task is already configured: ii.
Figure 3: Two node ProLiant cluster after Systems Insight Manager discovery 14. Click the virtual server name of the Failover Cluster. In Figure 3, it is cms-c2-cluster. The Cluster Monitor appears. Browse through the tabs and verify the consistency with the same data as shown by Windows Failover Cluster Manager. 15. To verify that the HP SIM Group resources can be moved between both systems, as in a failover, perform the following steps from either one of the cluster systems: a.
Step 6: Running managed system setup wizard on the target CMS If the source and target systems are running version 6.0 or later of Insight Control or Insight Dynamics, create a new task, and then run Manage System Setup against all systems. Note: MSSW might take a while to run. Step 7: Updating the IP address of CMS in managed blade enclosures Virtual Connect Enterprise Manager (VCEM) must update the Virtual Connect Domains with the IP address of the target CMS. 1.
3. Add the Insight Orchestration Architect users to the HPIO_Architects group. 4. Add the Insight Orchestration regular users to the HPIO_Users group. Step 10: If using Insight Dynamics recovery management, perform the following operations 1. From the Insight Recovery user interface on the target and remote site CMS, navigate to the Sites tab, ensure that the CMS name of the target CMS is properly reflected in either the local or remote site after migration.
Step 12: Reinstalling and reconfiguring Insight Remote Support Insight Remote Support Advanced must be reinstalled and reconfigured on the target CMS. For more information, see the HP Systems Insight Manager 6.3 Installation and Configuration Guide for Microsoft Windows. Step 13: Updating bookmarks 1. Notify users that bookmarked URLs to the source CMS will no longer be valid after migration to the target CMS. 2. Provide new links to the target CMS, for example https://:50000.
For more information Insight Dynamics troubleshooting guides at www.hp.com/go/insightdynamics/docs Backing up and restoring HP Insight Software v6.3 Central Management System (Windows) white paper at www.hp.com/go/insightsoftware/docs. LSM troubleshooting information is included in the HP Insight Manager 6.3 Software with Logical Server Management: User Guide. This and other ID docs are available at www.hp.
Appendix A: Quiescing services on Source CMS Prior to stopping the HP Insight Software services and backing up your environment, you must quiesce Insight Software components. The following actions only need to be performed for components that are installed and currently in use in your environment. Note: The steps might vary slightly depending on the version of software installed on your system. See the product documentation for your release for additional information. 1.
Appendix B: Stop order of services The export utility stops services automatically in the following order.
Appendix C: Quick reference of export/import commands for Cluster CMS Export parameters are same as for non-cluster CMS setups. Export: The export command-line (CLI) command and syntax is: mxexport [–f ] [-p password] Where the parameters are listed in the following: -f—Optional. Can be used to specify a different filename or path for the export archive. The default file name is Products.zip and is placed in the \data\configdata-export directory -p—Optional.
Appendix D: Partner Services Tool The partnerservice tool is a batch script located in the Systems Insight Manager installation directory. Before executing any of the following commands, open a command prompt window and set your directory to the Systems Insight Manager installation directory.
FAQ’s 1. How do I migrate data from HP Insight Software 5.3.1 to HP Insight Software 6.3? – Answer: Before the migration process begins, the source CMS must be upgraded to HP Insight Software 6.3. For more details about the upgrade process, refer to Upgrading to version 6.3 or installing migration software. 2. How do I selectively migrate components to a target CMS machine from a source 6.
XML files to be present at [HPSIM]\config\migration Component name Component XML Required depended component XML’s HP Systems Insight Manager hpsim_migrate.xml HP Insight Control virtual machine management vmm_migration.xml HP Insight Control performance management PMP_Migration.xml HP Insight Control power management ipm_migration.xml hpsim_migrate.xml vmm_migration.xml hpsim_migrate.xml HP Insight Managed System Setup Wizard MSSW_migration.xml hpsim_migrate.
Troubleshooting Scenario 1: Out of memory error When does this happen? In rare occasions, CMSs with a large amount of data, you may observe an Out of Memory error. Solution Edit the mxexport.bat/mximport.bat file to increase the memory allocated to the export/import processes in the Systems Insight Manager installation bin directory. For example, C:\program files\HP\Systems Insight Manager\bin edit mxexport.bat with any text editor. Change the line that starts with java and add –Xmx1024m or larger value.
SLEEP_TIME_BETWEEN_RETRIES=30000 Those configurations may increate the time to execute the export operation but will increase the success chance to get a valid database connection. Scenario 3: An export error for one or more plugins occurs c:\mxexport Warning! Export is not completely successful. Some errors are bypassed forcibly. The exported data file is C:/Program Files/HP/Systems Insight Manager/data/configdata-export\Products.zip. Solution: Save the console output to a *.txt file and call support.
Scenario 7: Import failure: gWLM service fails to stop When does this happen? The gWLM property com.hp.gwlm.security.virtualLocalHostName=SIMvirtualserverIP in ~\Virtual Server Environment\conf\gwlmagent.properties has incorrect SIMvirtualserverIP IP Address, where SIMvirtualserverIP is “virtual server IP address of HPSIM” (also known as MSCS cluster virtual server IP address). Error observed during this scenario 1. Import fails on the target machine with console error: Extracting the zip file c:\export.
Scenario 8: Logical servers not activated after import By default, the migration process activates any logical servers that were activated on the source CMS. Other appropriately configured logical servers can be activated post migration. If you encounter problems activating logical servers after migration is complete, see the logical servers troubleshooting information in the HP Insight Virtualization Manager Software with Logical Server Management: User Guide.