
Deploying HP SIM 5.x on MSCS clusters on Windows 2008 with SQL Server 2005 536992-001, 02/2009
21
vi.
Click
Finish
to close the
Setup
–
OpenSSH Services for HP Systems Insight
Manager
wizard window.
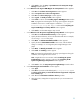
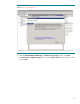
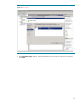
b.
A new
Welcome to the Pegasus WMI Mapper V2.4 Setup Wizard
window appears.
i.
Click
Next
. The
End
-
User License Agreement
window appears.
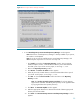
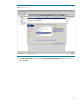
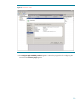
ii.
Select
I accept the terms
in the License Agreement
.
iii.
Click
Next
. The
Choose Setup Type
window appears.
iv.
Select
Typical
. The
Ready to Install
window appears.
v.
Click
Install
to continue to the
Installing
Pegasus WMI Mapper v2.4
window.
Note
: A progress bar indicating files are being co
pied appears during the
installation of this service. WMI Mapper is installed in
c:
\
Program
Files
\
The Open Group
\
WMI Mapper
. At the end the
Completing the
Pegasus WMI Mapper v2.4 Setup Wizard
window appears.
vi.
Click
Finish
to exit the WMI Mapper setup wizard
.
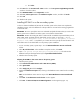
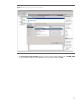
c.
A new
Welcome to the HP Systems Insight Manager Setup Wizard
window appears.
i.
Click
Next
. The
Select
Destination Directory
window appears.
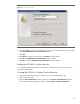
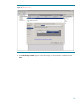
ii.
Specify the desired directory to be in the desired shared disk. For example,
we are using
F:
\
HPSIM
in this paper.
iii.
Cl
ick
Next
. The
Select Start Menu Folder
window appears.
iv.
Specify the desired
Start Menu Folder
name or stay with the default
setting. For example, we are using HP Systems Insight Manager in this
paper.
v.
Click
Next
. The
Ready to Install
window appears.
vi.
Click
I
nstall.
The
Installing
window appears.
Note
: A progress bar indicating files are being copied appears during the
installation, which might take a few minutes.
Note
: It might take a few more minutes with the
Initializing HP Systems
Insight Manager
window ap
pears. At the end, the
Completing the HP
Systems Insight Manager Setup Wizard
window appears.
vii.
Click
Finish
to close the
Setup HP Systems Insight Manager
wizard window.
d.
A new
Remote Support Pack Installation
window appears
i.
Click
Agree
.
ii.
Click
Next
to proceed
with the default path (
c:
\
Program Files
\
hp
) on
the
Please specify where you would like the Remote Support Pack component
to be installed
page
.
iii.
Click
Yes
in the
Confirmation installation directory
window.
iv.
Select the privacy settings that are appropriate fo
r your environment and
click
Next
.