Deploying HP SIM 6.x on MSCS clusters on Windows 2008 with SQL Server 2008 SP1 White Paper Table of Contents Abstract.............................................................................................................................................. 2 Introduction......................................................................................................................................... 2 System infrastructure ...........................................................................
Abstract This white paper is intended to assist IT professionals in installing HP Systems Insight Manager (HP SIM) 6.x in a Microsoft Cluster Server configuration. Microsoft Windows 2008 Enterprise Server with HP SIM 6.x can be a simple way of obtaining redundancy and failover capability from this powerful management software. Introduction HP SIM 6.
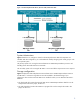
Figure 1: The relationship between HP SIM 6.x, SQL Server 2008, and the cluster disks System infrastructure Figure 1 details how to configure a cluster for enhanced performance after all components are installed. With this configuration, you can distribute the load by designing each virtual group to work on a separate system. The primary system is for running the Microsoft SQL Server 2008 Enterprise Edition processor and handling remote Microsoft SQL Server commands.
Note: If you already practice separating your transaction log from your data files, you can enhance performance by specifying that the HP SIM 6.x transaction log be installed to a separate disk. IP addresses Microsoft Cluster Services (MSCS) requires that all virtual servers in a cluster have a unique static IP address. For the configuration described in this paper, five unique IP addresses are required. 1. HP SIM 6.x virtual server IP address and name.
– Basic clustering concepts – Basic Windows 2003 services – Basic Windows 2008 services – Advanced TCP/IP and Domain Name System (DNS) network concepts In addition, readers must be familiar with installing and administering these products: – Microsoft Windows 2008 Enterprise Server and Windows 2008 Failover Clustering – Microsoft SQL Server 2008 Enterprise Server, particularly named instances Hardware and software requirements This paper discusses configuring and administrating a cluster using the followin
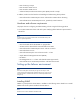
1. Insert the Microsoft Windows 2008 Enterprise Server CD into the CD-ROM drive of the target server. 2. Select StartSettingsControl Panel. 3. Click Add/Remove Programs. 4. Click Add/Remove Windows Components. 5. Select Management and Monitoring Tools in the Windows Component Wizard window. 6. Click Details. Then select Simple Network Management Protocol if it is not selected by default. 7. Click OK. The Windows Component Wizard window appears. 8. Click Next.
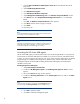
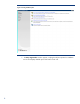
Installing HP SIM on Windows 2008 failover cluster with SQL Server 2008 If you are installing HP SIM 6.x into an environment without a Microsoft SQL Server 2008 Enterprise Edition instance already installed, go to for steps to install a clustered named instance of Microsoft SQL Server 2008 Enterprise Edition. This named instance can host the HP SIM 6.x databases and any other production databases you might require in your environment.
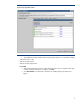
Figure 3: Selecting installation option 4. 8 The Setup Support Rules window appears, verifying that all pre-requisites for installation are met and displays detailed report of the status of each rule.
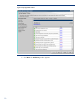
Figure 4: Setup Support Rules window 5. The Installation Wizard installs SQL Server prerequisites if they are not installed, including: – .NET Framework 3.5 SP1 – SQL Server Native Client – SQL Server Setup Support Files Click Install. 6. The System Configuration Checker verifies the system status of your computer before setup continues. After this verification is complete, click Next. 7. Click View Details to verify that all components are installed properly and that errors appear.
Figure 5: Setup Support Rules window 8. 10 Click Next. The Product Key window appears.
Figure 6: Product Key window 9. Select Specify a free edition or Enter the product key. If you gave a PID key for a production version of the product, then enter the information, and click Next. The License Term window appears.
Figure 7: License Terms window 10. Accept the licensing terms and conditions, and then click Next. The Feature Selection page appears. To end setup, click Cancel. 11. Select the components for installation. A description for each component group appears after you select the feature name. You can select any combination of components, but only the Database Engine and Analysis Services support failover clustering. Other components run on a single failover cluster node.
Figure 8: Feature Selection window Note: To specify a custom directory for shared components, enter the path in the Shared feature directory field. To change the installation path for shared components, update the path name in the field, or click Browse to navigate to the installation directory. The default installation path is c:\Program Files\Microsoft SQL Server\. 12. Click Next. The Instance Configuration window appears.
Figure 9: Instance Configuration 13. Specify whether to install a default or a named instance: – Instance ID suffix—By default, the instance name is used as the Instance ID suffix. This is used to identify installation directories and registry keys for your instance of SQL Server. This is the case for default instances and named instances. For a default instance, the instance name and instance ID suffix is MSSQLSERVER. To use a non-default instance ID suffix, select Instance ID suffix and provide a value.
Figure 10: Disk Space Requirements window 15. The Cluster Resource Group window appears. From the Cluster Resource Group window, specify the location that the SQL Server virtual server resources will be located. To specify the SQL Server cluster resource group name, select one of the following: – Specify an existing group from the SQL Server cluster resource group name box. – Enter the name of a new group to create. The name Available storage is not a valid group name.
Figure 11: Cluster Resource Group window 16. Click Next. The Cluster Disk Selection window appears.
Figure 12: Cluster Disk Selection window Select the shared cluster disk resource for your SQL Server failover cluster. The cluster disk is location where the SQL Server data will be placed. Only one disk can be specified. Quorum disk cannot be used because it is already in use. If you select the group containing the cluster quorum resource, a warning appears. HP recommends that you do not install the cluster quorum resource.
Figure 13: Cluster Network Configuration window – SQL Server Failover Cluster Network Name—This is the name used to identify your failover cluster instance on the network. – Network—Specify the IP type and IP address for your failover cluster instance. Disable the IPV6 IP Type. Select IPV4 address, clear DHCP, and then enter the valid IP address and subnet mask for the SQL Cluster Service. 18. Click Next. The Cluster Security Policy window appears.
Figure 14: Cluster Security Policy window From this page, specify global or local domain groups for clustered services. Service SID is recommended. All resource permissions are controlled by domain-level groups that include SQL Server service accounts as group members. On Windows Server 2008, specify domain groups for SQL Server services.
Figure 15: Server Configuration window – Service Accounts tab—Specify login accounts for SQL Server services. The actual services that are configured here depend on the features you selected to install. You can assign the same login account to all SQL Server services or you can configure each service account individually. You can also specify whether services start automatically, start manually, or are disabled.
Figure 16: Database Engine Configuration window 21. On the Account Provisioning tab, in the Authentication Mode section, select Windows Authentication or Mixed Node Authentication for your instance of SQL Server. If you select Mixed Node Authentication, you must provide a strong password for the built-in SQL Server system administrator account. After a system establishes a successful connection to SQL Server, the security mechanism is the same for both Windows Authentication and Mixed Node. 22.
Figure 17: Data Directories tab Note: Select the root directory as the shared SQL cluster disk. 24. On the FILESTREAM tab, enable FILESTREAM for your instance of SQL Server. 25. Click Next. The Analysis Services Configuration window appears.
Figure 18: Analysis Services Configuration window 26. On the Account Provisioning tab, specify users or accounts that will have administrator permissions for Analysis Services. You must specify at least one system administrator. To add the account that is running SQL Server Setup, click Add Current User. To add or remove accounts from the list of system administrators, click Add or Remove and then edit the list of users, groups, or computers that will have administrator privileges for Analysis Services.
Figure 19: Error and Usage Reporting window Specify the type of reporting services installation to create. Options include: – Native mode default configuration – SharePoint mode default configuration – Unconfigured Reporting Services installation Click Next. The Cluster Installation Rules page appears. 28. The System Configuration Checker runs an additional set of rules to validate the computer configuration with the SQL Server features you have specified. Click Details to verify that all conditions pass.
Figure 20: Ready to Install window 29. Click Install. The Installation Progress window appears and provides installation status of each component on any node in the cluster by selecting the node from the list.
Figure 21: Installation Progress window 30. After installation, the Complete window provides a link to the summary log for the installation and other important notes. To complete the SQL Server installation process, click Close.
Figure 22: Complete window If a reboot is required, it will be noted on the screen and the nodes are rebooted one at a time. Installing SQL Server 2008 on the secondary system The SQL Server Installation Wizard enables you to install an SQL Server failover cluster on a single node. Setup operations for SQL Server failover clustering have changed for SQL Server 2008. To install or upgrade an SQL Server failover cluster, you must run the setup program on each node of the failover cluster.
On the IA-64 platform, the .NET Framework 3.5 is not supported, and the .NET Framework 2.0 SP2 is required. You must install the .NET Framework 2.0 SP2 from the source media because it is not available from the Microsoft Download Center. The .NET Framework 2.0 SP2 is located in the drive_letter:\ia64\redist\2.0\ folder and the filename is NetFx20SP2_ia64.exe. On x86 and x64 platforms, you must install the .NET Framework 3.5 SP1. This includes SQL Server 2008 Express Edition.
Figure 23: SQL Server Installation Center screen 3. Click Installation in the left pane. 4. Click Add node to a SQL Server failover cluster.
Figure 24: Adding a node to a SQL Server failover cluster 5. 30 The Setup Support Rules window appears, which checks that all pre-requisites for installation are met and displays detailed report of the status of each rule.
Figure 25: Setup Support Rules window 6. The Installation Wizard installs SQL Server pre-requisites if they are not installed, including: – .NET Framework 3.5 SP1 – SQL Server Native Client – SQL Server Setup Support Files Click Install. 7. The System Configuration Checker verifies the system status of your computer before setup continues. After this check is complete, click Next. 8. Click View Details to verify that all components are installed properly and no errors appear.
Figure 26: Setup Support Rules window 9. 32 Click Next. The Product Key window appears.
Figure 27: Product Key window 10. Select Specify a free edition or Enter the product key. If you gave a PID key for a production version of the product, then enter the information, and click Next. The License Term window appears.
Figure 28: Product Key window 11. Accept the licensing terms and conditions ,and click Next. The Cluster Node Configuration window appears. To end setup, click Cancel.
Figure 29: Cluster Node Configuration window 12. Click Next. The Error and Usage Reporting window appears. 13. Click Next. The Add Node Rules window appears. 14. Click Next. The Ready to Add Node window appears. 15. Click Install. The Add Node Progress window appears, detailing the progress of adding the node.
Figure 30: Add Node Progress window 16. Click Finish. The new SQL node is added to the SQL Server failover cluster. Note: If the latest SQL Server 2008 patch is not installed on the Secondary Node, then you will get Window Popup asking for Installing Patch after completion of adding secondary node to SQL server.
Figure 31: Complete window Installing HP SIM 6.x on the cluster After completing the installation of a Microsoft SQL Server 2008 Enterprise Edition instance or verification of the availability of an existing Microsoft SQL Server 2008 instance, you are ready to proceed with the installation of HP SIM 6.x. If you already have a Microsoft SQL Server 2008 instance, which you would like to use to host the HP SIM 6.x database (for HP SIM 6.x), follow the instructions below for installing HP SIM 6.
4. Read the HP Systems Insight Manager Release Notes. Installing HP SIM 6.x on the primary system 1. On the primary system, log into Microsoft Windows as a user with administrator rights. Note: Be sure to log in with the same user name that you used to install the Microsoft SQL Server 2008 Enterprise Edition instance. 2. Download the latest version of System Management Homepage (SMH) from http://h20000.www2.hp.com/bizsupport/TechSupport/SoftwareDescription.
11. After completing the system inspection, the Database Configuration window appears. 1. The Username field displays the user name that is logged in. 2. Enter the password in the Password field. 3. The Domain field displays the user domain used to log into the system. 4. In the database Host Name field, by default, current node name will be there. Change it with the Host Name of the created database. 5. Enter the name of the Microsoft SQL Server 2008 Enterprise Edition instance that you created.
i. Click Next. The Select Destination Location window appears. ii. Specify the desired directory to be on the local drive of the current system. In this paper, the default C:\Program Files\OpenSSH. iii. Click Next. The OpenSSH Service Log on as User window appears. 1. The Username field displays the user name that is logged in. 2. Enter the password in the Password field. 3. The Domain field displays the user domain used to log into the system. iv. Click Next. The Ready to Install window appears. v.
Note: A progress bar indicating files are being copied appears during the installation, which might take a few minutes. Note: It might take a few more minutes with the Initializing HP Systems Insight Manager window appears. At the end, the Completing the HP Systems Insight Manager Setup Wizard window appears. vii. Click Finish to close the Setup HP Systems Insight Manager wizard window. 4. A new Remote Support Pack Installation window appears i. Click Agree. ii.
vi. Click Next. The Automatic Update window appears. vii. Make the appropriate selections for automatic download of latest support packs directory from the HP website. viii. Click Finish. The HP ProLiant Setup: Version Control Repository Manager window appears. ix. Click Close. Note: HP Performance Management Pack (PMP) is not bundled with HP SIM 5.2 or greater. If installing manually, complete the following steps. 6.
paper) and PMP is installed. When this is complete, the Completing the HP Performance Management Pack setup Wizard window appears. iii. Click Finish to exit the setup. Note: HP Virtual Machine Management Pack is not bundled with HP SIM 5.2 or greater. If installing manually, complete the following steps. 7. From the Management CD, select the Product tab, and then click HP Virtual Machine Management Pack Install. 8. The Welcome to the HP Virtual Machine Management Pack Setup Wizard appears.
Installing HP SIM 6.x on the secondary system To have a clustered installation of HP SIM, the secondary system in the cluster must complete the installation process, with a few differences in the procedure to account for the existing program files on the cluster disk. Important: Be sure to specify the same user credentials and path information that you used on the primary system. Be sure that the secondary system owns all of the clustered disks. Important: Rename the existing HP SIM 6.
Figure 32: ODBC Data Source Administrator 5. Update the Database Description field, referring to the database name created on the secondary system. Note: Use the database name noted in step 2 of the Installing HP SIM 6.x on the secondary system section. 6. Click Next. The Authentication mode selection window appears. 7. Click Next. The Microsoft SQL Server DSN Configuration window appears (Figure 5). 8. 9. Select the database, which is created by the secondary system.
Figure 33: Adjusting the HP SIM 6.x data source name on the primary system 13. Go to the Adding the HP SIM 6.x cluster resources section. To complete the installation of HP SIM 6.x to the cluster, several cluster resources must be created using Cluster Administrator. Adding the HP SIM 6.x cluster resources To complete the installation of HP SIM 6.x to the cluster, several cluster resources must be created using Cluster Administrator. Creating the HP SIM 6.x Generic Service Resource 1.
Figure 34: High Availability Wizard window 6. Click Next. The Select Service or Application window appears.
Figure 35: Select Service or Application window 48 7. Select Generic Service from the menu. 8. Click Next. The Select Service window appears.
Figure 36: Select Service window 9. Select HP Systems Insight Manager, and click Next. The Client Access Point window appears.
Figure 37: Client Access Point window 10. Enter the name of the HP SIM service, as HPSIM_2008 in this case, and the IP address of the HP SIM service of the cluster. Click Next. The Select Storage window appears.
Figure 38: Select Storage window 11. Select the storage on which HP SIM is installed. Click Next. The Confirmation window appears listing all the details you have selected in previous windows.
Figure 39: Confirmation window 12. Click Next. The Configure High Availability window appears, followed by the Summary window.
Figure 40: Summary window Creating the OpenSSH Services for HP SIM 6.x Generic Service Resource 1. 2. In the Failover Cluster Management software, right-click the HP SIM service under Services and Applications. Click Add a resourceGeneric Service.
Figure 41: Generic Service selection 3. 54 In the Select Service window, select OpenSSH Server.
Figure 42: Select Service window 4. Click Next. The Confirmation window appears and displays the default service name and parameters.
Figure 43: Confirmation window 5. 56 Click Next. The Summary window appears.
Figure 44: Summary window 6. Click on Finish. The OpenSSH service appears under HPSIM_2008. Creating the Pegasus WMI Mapper Services for HP SIM 6.x Generic Service Resource 1. In the Failover Cluster Management, right-click the HP SIM service under Services and Applications. 2. Click Add a resourceGeneric Service. The Select Service window appears. 3. Select Pegasus WMI Mapper.
Figure 45: Selecting Pegasus WMI Mapper 4. 58 Click Next. The Confirmation window appears.
Figure 46: Confirmation window 5. Click Next. The Summary window appears.
Figure 47: Summary window 6. Click Finish. Pegasus WMI Mapper appears under HPSIM_2008. 1. Right click the resource Pegasus WMI Mapper under the HP SIM Generic Service Resource and select Properties. 2. Select the General tab and delete the contents of the Startup Parameters that was added during the creation of the WMI Mapper Resource. Leave Startup Parameters blank. Creating the Version Control Repository Manager (VCRM) 6.x for HP SIM 6.
Figure 48: Select Service window 3. In the Select Service window, select HP Version Control Repository Manager.
Figure 49: Select Service window 4. 62 Click Next. The Confirmation window displays the default the service name as HP Version Control Repository Manager (cpqsrhmo) and parameters.
Figure 50: Confirmation window 5. Click Next. The Summary window appears.
Figure 51: Summary window 64 6. Click Finish. 7. Right-click HP Version Control Repository Manager, and select Properties.
Figure 52: Selecting Properties 8. 9. The HP Version Control Repository Manager properties page appears. Select the Dependencies tab and insert the dependency as the disk which you have selected for HP SIM installation. Click Apply, and then OK.
Figure 53: HP Version Control Repository Manager Properties window Bringing the virtual group containing the HP SIM 6.x resources online 66 1. In Failover Cluster Management, right-click the HP SIM service under Services and Applications. 2. Select Bring this service and application online from the menu. If configured properly, all resources should come online.
Figure 54: Bringing services and applications online window All the services (HP System Insight Manager, Open SSH Server, Pegasus WMI Mapper (WMI Mapper), HP Version Control Repository Manager) come online automatically.
Figure 55: Summary showing services and applications coming online The installation is now complete. Validating the installation To be sure that the HP SIM 6.x service can be moved between both systems, perform the following steps from either one of the cluster systems: 1. 68 Open the Cluster Administrator and connect to the cluster. 2. In the Cluster Administrator window, on the left pane, right-click on the disk group containing the HP SIM 6.x program files.
Note: You must always specify the port 280 in the URL of your Web browser to connect to the HP SIM 6.x service. To learn more about connecting to HP SIM 6.x, refer to the HP Systems Insight Manager 6.x Technical Reference Guide. Note: The HP SIM 6.x icon on the Windows desktop of each system was created by the installation of HP SIM 6.x as a handy shortcut for a regular standalone server only. This icon is no longer applicable at this point because the HP SIM 6.x is clustered.
Figure 56: The HP SIM 6.x home page Note: Navigate to OptionsDiscovery. Select System Automatic Discovery task and click Edit. The Edit Discovery page appears. Take a look at the Ping inclusion ranges list box (on the left side of the right frame, near the bottom of the screen). Note that HP SIM 6.x automatically generates a range for each of the IP addresses the current system has. Because one of these ranges is based on the cluster heartbeat IP address (generally of the form 10.0.0.
Note: These steps are to ensure HPSIM is working after failover. 10. You should be able to use the active system name to establish a command-line session to the cluster HP Systems Insight Manager service from a client system that has an OpenSSH client installed, using SSH. Note: The only exception is when the disk group containing the HP SIM program files (HP SIM Disk Group in this paper) has failed-over to the other system.
Troubleshooting Note: This section is applicable only if PMP has been installed manually. Problem: Error during MSA tool execution. Solution: Execution of MSA tools might fail due to SSH key mismatch. For proper execution of MSA tools, perform the following: 1. Make the primary system active and execute mxagentconfig to push the SSH key to primary system itself. 2. Make secondary system active and execute mxagentconfig to push the SSH key to secondary system itself.
For more information Refer to the following for more information regarding the topics referenced in this paper. Microsoft cluster services Clustering basics www.microsoft.com/windows2000/technologies/clustering/default.asp Steps to setting up a Microsoft cluster www.microsoft.com/windows2000/techinfo/planning/server/clustersteps.asp HP ProLiant clusters http://h18000.www1.hp.com/solutions/enterprise/highavailability/microsoft/index.