
HP Systems Insight Manager 5.3 with SP1 Installation and Configuration Guide for Microsoft Windows
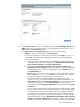
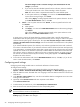
Table Of Contents
- HP Systems Insight Manager 5.3 with SP1 Installation and Configuration Guide for Microsoft Windows
- Table of Contents
- 1 Product overview
- 2 Installation overview and requirements
- 3 Installing HP SIM on the Central Management Server (CMS) for the first time
- 4 Configuring HP SIM using the First Time Wizard
- Using the First Time Wizard
- Configuring the managed environment
- Enabling automatic system discovery
- Configuring System Automatic Discovery task sign in credentials
- Configuring managed systems
- Configuring the WMI Mapper Proxy
- Configuring privilege elevation
- Configuring e-mail settings
- First Time Wizard summary
- Finishing the First Time Wizard
- Operating-system-specific collections, reports, and tools
- 5 Configuring HP SIM using the Options menu
- 6 Setting up and configuring managed systems
- 7 Initializing the Remote Support Software Manager
- 8 Upgrading HP Systems Insight Manager
- 9 Uninstalling HP Systems Insight Manager
- 10 Using the graphical user interface
- 11 Using the command line interface
- 12 Configuration options
- 13 Troubleshooting
- glossary
- Index

not track changes. If this collection changes, the authorization will not
change is preselected.
c. If you want to select all individual systems from the collection, select the checkbox
at the top of the table view in the column heading to select all systems.
Note: This action creates a separate authorization for each selected system.
d. To save system selections, click Apply, or to return to the New Authorizations
section without saving changes, click Cancel.
After clicking Apply, a message appears based on the options selections. To return
to the New Authorizations section, click OK.
ii. Search Enter a system name and click Search, or select a system from the list and
click Search.
a. Select systems.
b. Click Apply, or to return to the Ne w Authorizations section without saving changes,
click Cancel.
After clicking Apply, a message appears based on the options selections. Click
OK to return to the New Authorizations section.
A system group is a group of systems based on a system collection that is used for authorizations.
Authorizations that use system groups are updated automatically when a change is made to the system
collection that the system group is based upon. The option Do not track changes. If this collection
changes, the authorization will not change must not be selected for the authorizations to be updated
automatically.
If you selected individual systems of a collection, each selection populates the list box and is selected
for inclusion in the authorization. If you selected a collection and the collection has been used previously
in an authorization, a message appears stating that a system group for the collection exists and will be
updated with current source collection content. This condition affects all authorizations associated with
that collection. When a collection is used for the first time, no message appears. A system group with
the name of the collection followed by three numbers, usually (001) appears in the Select Systems
dropdown list and is selected.
4. To save the new authorization and close the New Authorizations section, click OK, or, if you do not
want to create the authorization, click Cancel.
Configuring email settings
Configuring email settings enables users to send email notification of certain events.
To configure email settings:
1. Access the SMTP host and CMS e-mail settings through the First Time Wizard or choose
Options→Events→A utomatic Event Handling→Email Settings. The Email Settings page appears.
2. Enter the SMTP host name. The SMTP host is the outgoing e-mail server that the CMS uses to send e-mail
notifications.
3. In the Sender's e-mail address box, enter the e-mail address that the management server uses when
sending e-mail notifications.
4. (Optional) Select Send test email and enter recipients e-mail address.
Click Send test email now.
5. To authenticate your SMTP server, select Server Requires Authentication.
6. Enter the account user name and password in the corresponding boxes.
NOTE: If you did not enter a valid SMTP host, HP SIM display an error message: The email could not
be sent: Could not connect to the SMTP host.
If you are changing the e-mail settings from the Options→Events→Automatic Event Handling→Email
Settings page, click OK to save changes.
58 Configuring HP SIM using the Options menu