Automating Failover Event Handling on Two HP Systems Insight Manager Servers White Paper Table of Contents Introduction......................................................................................................................................... 2 Creating a Custom Events List................................................................................................................ 4 Creating a Custom Systems List .............................................................................
Introduction In very large environments, one HP Systems Insight Manager (HP SIM) might not provide all the coverage needed for all the devices in disaster recovery. You might want two HP SIM servers covering each other. In this scenario, you can create a set of Event Handlers that allow two HP SIM servers to watch each other and take over coverage for the other’s Event Notification in the event of failure of one central management server (CMS).
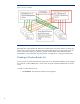
Figure 1 Normal operation When Server B fails, Server A processes events for Servers in B’s territory until Server B recovers. Because all agents are configured to send events to both servers, no changes are needed to agents.
Figure 2 Server B is unavailable Both CMS have a full population of all devices in both territories, events from CMS A are active only for A’s devices; likewise for B’s. All agents send events to both CMS. Events received by a CM S for devices in the other’s territory are ignored or purged until the partner CMS is determined to be unavailable. For more information on purging events, see Appendix C – Purging unwanted events.
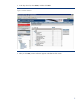
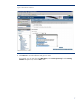
2. In the drop down list, select Events, and then click New. Figure 3 Customize Collections 3. After you click New, a New Collection appears at the bottom of the screen.
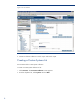
Figure 4 New Customize Collections 4. Select Choose members by attributes. 5. From where dropdown menus, select event type and is. 6. Select the events you want to view. 7. Click Add to add other event criteria.
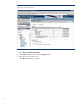
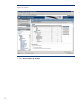
Figure 5 Add Customize Collections 8. Click Save As to save the Collection and give it a name. For example, you can enter the name MRO Events, select Events By Severity from the Existing Collection dropdown list, and click OK to save.
Figure 6 Save As Collection 9. Create two of these collections: one for City A and one for City B. Creating a Custom Systems List Use Customize link to create system collection. To create a custom system collection or list: 1. Click Customize. The Customize Collections screen appears. 2. From the dropdown list, select Systems and click New.
Figure 7 Create a Custom Systems List 3. After you click New, the New Collection appears at the bottom of the screen.
Figure 8 New Collection 4. Select Choose members by attributes.
Figure 9 System Name Starts With 11
5. From the dropdown menus under New Collection, select System Name and Starts With. 6. Enter your search criteria. In this example, you are looking for system names that start with the letters dc , so enter the letters dc. Fit the naming scheme to your environment or with any other system criteria. 7. Click Save As to save the collection and give it a name. In the example, use the name CITYB Systems. 8. Click OK to save the settings. You can use this collection to create a handler.
Figure 11 Customize Collections 3. After you click New, in the New Collection section, select Choose members from the existing event and system collections.
Figure 12 New Collection 4. From Select event collection, select MRO Events. 5. From Select system collection, select CITYB Systems.
Figure 13 New Collection 6. Click Save As to save the collection and give it a name. 7. In this example, use CITYB Event Combo. Click OK to save the settings.
Figure 14 Save As Collection You must have at least two of these collections, one for City A systems and one for City B systems. For devices in City A, you must create a normal event handler (use OptionsAutomatic Event HandlingNew menu options to set up this standard notification) for those devices in City A using the previous Event System combo collection and it is enabled all the time. Do the same for City B.
Figure 15 Custom Tools menu 2. From the New Custom Tool screen, select CMS tool.
3. Click Next. Figure 16 Select the tool to create Creating the tool definition Enter the required name (for example, AddHandler), command file, and parameters. The path names must be in DOS 8-dot-3 format. In this example, the command path is the location of the MXTASK command MXTASK is used to create a new event handler using and XML file for the rules.
Tip: The simplest way to retrieve the XML file is to use the GUI to create the event handler that you want and then use the mxtask -If myEventHandler >> cap.xml to capture the content and syntax of the event handler. For more information, see Appendix A – Event handler. After you have the syntax correct, delete the task using mxtask -r MyEventHandler (for this example, the event handler is named ClaudiasEvents).
4. Click OK to create the tool.
5. To test the new tool, select it and click Run Now/Schedule.
The following example illustrates a successfully created tool. Figure 20 Task results Removing event handler tool You must create a Remove Event Handler tool that executes when the partner CMS is available again. The following disables and removes the event handlers for the other CMS. 1.
Figure 21 Create Custom Task 2.
The parameters, –r ClaudiaEvents, remove the event handler task. Figure 22 Task Results Creating the Watch Dog event handler Now that you have created the Custom Event System combo collections, one set for City A and another for City B, and you have created Add and Remove Event Handlers Custom Tools, you can now create the Event Handler that provides the watch dog service. This watch dog service indicates that the partner CMS has failed and that the AddHandler event needs to be created and turned on.
Figure 23 Options menu 25
2. Name the event handler. For this example, Watcher Event Handler.
3. Select use event attributes that I will specify option, and then click Next. Figure 25 Use event attributes that I will specify 4. Select the events by Event Type where the type is a Systems Insight Management Event of System is unreachable, and then click Next.
Figure 26 System is unreachable 28
5. Select the other HP SIM server to watch where System Name is the device name of the other HP SIM server.
6. Select the Event Tool created earlier. In this example, the tool-A Custom Tool. 7. Create an email notification so that you know when the event occurs.
8. Click Next. Time filters are optional.
9. Review and finish. Figure 30 Review and finish 10. Repeat these steps for the Remove Event Handler, by selecting the status of the other CMS as Available and selecting the Remove Event Handler Custom Tool.
Appendix A – Event handler Creating an event handler Using Custom Event System combo Collections created for City A and another for City B, you can now create the Event Handler that is enabled when CITYB CMS is unreachable. This Task is created by the Custom tool. To get tool definition of this task in a XML format, you must create the following event handler and then run the command mxtask -If . Create an event handler to manage CITYB Systems by CITYA CMS when CityB CMS is unreachable.
2. Enter a name. For example, use ClaudiasEvents.
3. Select newly created Event-System combo Collection CITYB Event combo collection, and then click Next.
4. Assign it to CMSB SYSTEMS, and click Next.
5. Click Next. Time filters are optional. Figure 5 No time filters 6. Review and finish. Figure 6 Review and finish 7. Repeat these steps for the other CMS.
Appendix B – Sample event handler XML file Here is the XML extracted using mxtask -lf. Note it uses queryname CITYB Event combo. For this example, you can cut and paste from this document. The XML file in the previous example is named C:\Docume~1\Administrator\cap.xml. Edit the queryname to match the queries you have created. You can create the Event Handler Task using the GUI (same steps are for creating the Watch Dog Event Handler above). Then export it using the CLI tool.
false
true CMS-A false false
Appendix C – Purging unwanted events from HP SIM 1. Click OptionsEventsDelete Events menu selection.
2. Select the Event Collection. For this example, use MRO Events.
3. Click Apply and Schedule.
4. Enter a name for the task. For this example, name the task Delete MRO Events and schedule it to run once a week. HP recommends scheduling all events on a weekly or monthly basis to keep the CMS database cleaner and more responsive. Scheduling also allows you to keep a back log of a week’s worth of events.
For more information http://www.hp.com/go/hpsim Technology for better business outcomes © 2010 Hewlett-Packard Development Company, L.P. The information contained herein is subject to change without notice. The only warranties for HP products and services are set forth in the express warranty statements accompanying such products and services. Nothing herein should be construed as constituting an additional warranty. HP shall not be liable for technical or editorial errors or omissions contained herein.