
Deploying HP SIM 6.x or greater on MSCS clusters on Windows 2003 with SQL Server 2005


33
enabled on the p
rimary system, go to
D:
\
autorun.exe
. If this is the first time you are installing
from this version of the HP Management CD, you must first accept the license agreement for the HP
Management CD.
12.
Select the
Products
tab.
13.
Click
HP SIM 6.x Windows Install
. Th
e
HP
Systems Insight Manager Setup
window appears.
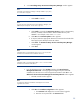
14.
After completing the system inspection, the
Database Configuration
window appears stating
“Incompatible plug
-
in versions detected”. Click
Close
. Another window appears with only the
Use
SQL
option selected
.
a.
The
Username
field displays the user name that is logged in.
b.
Enter the password in the
Password
field.
c.
The
Domain
field displays the user domain used to log into the system.
d.
Enter the name of the Microsoft SQL Server 2005 Enterprise Edition instance that
you
created. See
In
stalling the Microsoft SQL Server 2005 Enterprise Edition
The Microsoft SQL Server 2005 Enterprise Edition is required for the installation of HP SIM 6.x to be
highly available. If you already have an instance of Microsoft SQL Server Enterprise Edition ins
talled,
then you can create the HP SIM 6.x database and attach it to the existing server.
Note:
This section assumes that you already have a working two
-
system cluster
with at least two free logical drives, one for the Microsoft SQL Server 2005
data files
and another for the HP SIM 6.x program files.
e.
. For this paper,
HP
-
SIM
-
SQLSVR
\
HP_SIM_INSTANCE
is used.
Note:
You must use valid credentials; otherwise, a message appears indicating
th
e credentials cannot be valid. The installation cannot continue until the
account information is validated.
Note:
Be sure to close any running applications, such as Microsoft SQL Server
Enterprise Manager, that connect to the Microsoft SQL Server 2005
Enterprise Edition instance being referenced (HP
-
SIM
-
SQLSVR
\
HP_SIM_INSTA
NCE in this paper). Otherwise, this step might
hang.
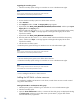
15.
Select
Custom
and then click
Next
in the
Select Installation Type
window.
16.
Click
Custom
. The
Custom Install
–
Software Selection
window appears.
Note:
The
Custom Install
option enables you t
o specify installing on the desired
shared disks (F: and I: in this paper).
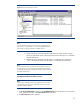
17.
Click
Next
. The
Service Account Credentials
window appears.
a.
The
Username
field displays the user name that is logged in.