
ISS Technology Update, Volume 6 Number 8 - Newsletter


ISS Technology Update Volume 6, Number 8
4
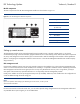
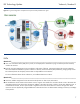
Module components
The main components of the HP UPS Management Module are shown below in Figure 2-1.
Figure 2-1. HP UPS Management Module components
Item Description
1 Serial device connectors
2 Environmental connector
(for future use)
3 Power LED
4 Error LED
5 Reset button
6 Network connector
7 Config/Pass-Thru connector
Setting up remote access
The management module can be accessed remotely through a Web browser or through a Telnet session; it can also be
accessed locally through a terminal emulation program. Remote access involves making certain that the UPS system components
are set up and configured to suit the needs of your environment and to take full advantage of the module’s remote capabilities.
(Refer to “Configuring the management module for remote access” in the HP UPS Management Module User Guide for step-by-
step procedures.)
UPS management card
Initial remote installation requires extra care with regards to setting up the IP address; this is where the UPS management card
comes in. To ensure that the initial remote installation runs smoothly, it is important to establish correct IP addressing on both the
UPS management card and the server agent (sort of a two-way trust). Note that this two-way trust is a significant, yet easy-to-
miss aspect of the remote set-up procedure because it is not required by other HP management products.
Initially, the IP address can be set up through the bootp server (if available). Otherwise, each module has to be configured with
a static IP address through the serial config port.
NOTE
If you have questions about setting up IP addressing for remote access, contact your HP
Technical Client Consultant.
For UPS environments with several remote sites, you can make required setting changes between the management module and
any attached devices (server agents), on an as-needed basis.