
HP Systems Insight Manager 5.3 Technical Reference Guide

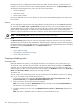

4. Select Add to new rack from the Add to Rack dropdown list and click Go. The Edit Rack page
appears. When a new rack is created from an enclosure view, the enclosure is automatically added to
the Selected enclosures section.
Note: The Add to Rack dropdown list also lists the racks that you previously created. To add an enclosure
to an existing rack, select the rack name and click Go.
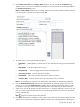
5. To create a rack, you must add the following details:
• Rack Name. (Required) Enter a name for the new rack and select the rack type from the dropdown
list.
• Rack Height. Enter the height of the new rack.
• Data Centre ID. Select the height of the rack from the dropdown list.
• Data Centre Location Enter the data centre location.
• Row Number. Enter the row number where the enclosure is located.
• Position in Row. Enter the position in the row where the enclosure is located.
Note: If you are adding an enclosure to an existing rack, these details are automatically populated.
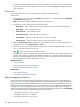
6. From the Available Enclosures dropdown list, select the filter by which you want to view the list of
enclosures. You can select All Enclosures or Class. You can filter the collection by entering a class.
For example, if you enter
p-Class
, then all p-Class enclosures are available to be added to the rack.
7. Select one or more of the relevant enclosures and click the >> symbol to add them to the rack. You can
click << to remove enclosures from the rack. You can also drag and drop the enclosure in the desired
position within the rack.
Note: indicates enclosures that are daisy chained.
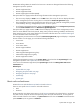
8. Click Save. The enclosure is added to the rack, and the picture of the new rack with the added enclosure
appears. If an enclosure has already been added to another rack, a message appears indicating the
System table view page 223