
HP UPD - Using Managed Printer Lists with HP Web Jetadmin (WJA) (for use with Active Directory Administrator Template)


9
CONFIGURING THE ADMINISTRATIVE TEMPLATES
Please refer to the HP Universal Print Driver System Administrators Guide for instructions on how to
install and use the HP Administrative Template to create group policy.
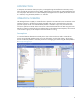
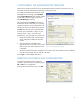
To configure the Administrative Template, select
Managed Printer List Settings. Select Enabled.
Under Custom MPL Count, enter the total number
of MPLs that you have configured. Be sure to
leave HP MPL Only unchecked.
HP recommends that the Name is the same as
the HP WJA device Group name, but it may be
changed to whatever you want displayed in the
HP UPD user interface to identify this printer list.
The Path is the network path or URL that points
to the file you saved earlier. In Figure 10, the
example used is: “http://192.168.1.99/
hpmpl/bonus_room_upd_mpl.xml”. Please note:
• The protocol used is HTTP. If the directory is
secure and requires HTTPS, the MPL load
will fail.
• Use the IP address of the HTTP server.
Alternatively, the server name can be used if
DNS or some other name resolution service
is available.
• The name of the file follows the IP address or server name. The network path to the file is different
from the local drive path that you entered in HP WJA.
Set the Type to “Web Jetadmin XML MPL”.
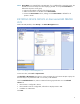
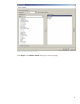
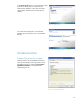
VERIFYING SUCCESSFUL MPL CONFIGURATION
To verify that the MPL has been configured
correctly in Active Directory Group Policy, select
File > Print from any application.
Select the HP Universal Print Driver. Click OK.
Figure 10—Managed Printer List settings
Figure 11—Printing from the HP Universal Printing Driver