
NetWare Client for DOS and MS Windows User Guide


9-11
Setting Up Client Workstation Printing
Using NetWare Utilities to Set Up Network Printing
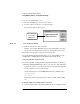
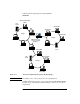
Figure 9-3 “NetWare Printer Connections” Window
d Choose the same port from the “Ports” list that you selected in Step 4b.
e Choose a print queue name from the “Resources” list.
If you don’t know the queue name, use the browser to see available print
queues.
f Choose “Capture.”
g Exit the “NetWare Printer Connections” window by choosing the “Exit”
button (the left-most button of the upper menu bar).
You return to the “Connect” dialog you were in at Step 4a.
h Choose “OK.”
You return to the “Printers” dialog you were in at Step 2a.
i Choose “Close” to exit the “Printer” dialog.
You return to the Control Panel.
5 Close the “Control Panel” window.