
Migrating an Integrity HP-UX 11iv3 Instance to New Hardware


5
swcopy command from the system containing the serial depot. See swcopy (1M) for more
information.
Once the target software has been included in accessible depots, install it to the clone. If one of the
depots contains an entire new Operating Environment, the first installation should be run using “drd
runcmd update-ux” with the Operating Environment depot as a source:
drd runcmd update-ux –s <OE_depot_location>
Other depots can be installed after the update using drd runcmd swinstallas follows:
drd runcmd swinstall –s <directory_depot_location> <software_selection>
(Note that the command drd runcmd does not support serial depots.)
Step 4: Determine additional kernel content that is needed on the
target
Once all the required software is installed on the clone of the source system, a kernel can be created
that contains all drivers that are needed on the target. The following procedure can be used to
identify drivers needed in the kernel for the target. This step makes minimal use of Ignite-UX, but does
not require that an Ignite-UX server be available.
1. Login to the console of the target system with an X-windows interface that supports cut and paste.
2. Initiate an install of HP-UX from media by booting from an installation DVD. Alternatively, initiate
the installation from an Ignite-UX server that can be accessed across the network from the target
system. In either case, the version of Ignite-UX used must support the target hardware. The
simplest way to ensure that this is the case is to use the latest version of Ignite-UX, or use install
media supplied for the target hardware.
3. From the install menu on the target, select Run an Expert Recovery Shell.
4. If you are using install media, select n to the prompt to start networking; otherwise select y.
5. Select “l” to load a file.
6. Enter the list by issuing the command:
/usr/bin/sort /usr/bin/rm /sbin/date /usr/lbin/sysadm/create_sysfile
7. Confirm the list, then press enter <return> to continue, and chose x to exit to a shell.
8. Issue the command:
# /usr/lbin/sysadm/create_sysfile /RAMFS1/system_new_hw
# cat /RAMFS1/system_new_hw
9. Cut and paste the contents of /RAMFS1/system_new_hw to a convenient location on the
source system (or its clone), such as /stand/system_new_hw.
Step 5: Build a kernel on the clone suitable for the target
1. On the source system, mount the clone:
drd mount
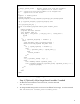
2. In a convenient location on the source system, such as
/usr/local/bin/merge_system_files, create the script shown in Figure 1, which is used
to merge the system file needed for the new hardware to the system file on the clone of the source
system.
3. Merge the system file for the new hardware to the system file for the source system clone:
/usr/local/bin/merge_system_files /stand/system_new_hw
4. Build the kernel on the source system clone to include drivers for the target hardware:
drd runcmd mk_kernel –o /stand/vmunix