VERITAS 4.1 Installation Guide HP-UX 11i v2 Fifth Edition Manufacturing Part Number: 5991-5346 June 2006 Printed in the United States © Copyright 2006 Hewlett-Packard Development Company L.P.
Legal Notices Confidential computer software. Valid license from HP required for possession, use or copying. Consistent with FAR 12.211 and 12.212, Commercial Computer Software, Computer Software Documentation and Technical Data for Commercial Items are licensed to the U.S. Government under vendor’s standard commercial license. The information contained herein is subject to change without notice.
Contents System Requirements for Installing VERITAS 4.1 Disk Space Requirements . . . . . . . . . . . . . . . . . . . . . . . . . . . . . . . . . . . . . . . . . . . . . . . . . . . . . . . . . . . . . 9 Patch Requirements . . . . . . . . . . . . . . . . . . . . . . . . . . . . . . . . . . . . . . . . . . . . . . . . . . . . . . . . . . . . . . . . . 10 Required Packages for VERITAS Enterprise Administrator (VEA) . . . . . . . . . . . . . . . . . . . . . . . . . . . 11 Cluster Volume Manager (CVM) Support .
Contents Installing Cluster Volume Manager . . . . . . . . . . . . . . . . . . . . . . . . . . . . . . . . . . . . . . . . . . . . . . . . . . . . . Installing CVM 4.1 in the Non-Interactive Mode . . . . . . . . . . . . . . . . . . . . . . . . . . . . . . . . . . . . . . . . Installing CVM 4.1 in the Interactive Mode . . . . . . . . . . . . . . . . . . . . . . . . . . . . . . . . . . . . . . . . . . . . Verifying CVM 4.1 Installation . . . . . . . . . . . . . . . . . . . . . . . . . . . . . . . . . . . . .
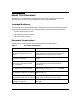
About This Document The VERITAS 4.1 Installation Guide describes how to install, upgrade, and remove the VERITAS 4.1 File System,Volume Manager and Cluster Volume Manager. Intended Audience This document is for system administrators, responsible for installing and configuring UNIX systems with the VERITAS suite of products. Readers are expected to have knowledge of: • System administration concepts • UNIX operating system concepts • UNIX File system concepts Document Organization The VERITAS 4.
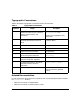
Typographic Conventions Table 2 describes the typographic conventions used in this document. Table 2 Typographic Conventions Typeface Usage Examples Computer output, files, directories, software elements such as command options, function names, and parameters Read tunables from the /etc/vx/tunefstab file. italic New terms, book titles, emphasis, variables replaced with a name or value See the VERITAS 4.1 Installation Guide for details.
• VERITAS Volume Manager 4.1 Hardware Notes • VERITAS Volume Manager 4.1 Release Notes • VERITAS Volume Manager 4.1 Troubleshooting Guide • VERITAS Volume Manager 4.1 Migration Guide • VERITAS Volume Manager 4.1 Administrator’s Guide • VERITAS Enterprise Administrator (VEA 500 Series) Getting Started • VERITAS Storage Foundation 4.
For latest information on available patches visit: • http://itrc.hp.com For technical support visit: • http://welcome.hp.com/country/us/en/support.html HP Encourages Your Comments HP encourages your comments concerning this document. We are committed to providing documentation that meets your needs. You can send comments to: netinfo_feedback@cup.hp.
1 System Requirements for Installing VERITAS 4.1 This chapter discusses the system requirements and patch requirements for installing Base-VXFS 4.1 and Base-VXVM 4.1 on HP-UX 11i v2 or later. Base-VXFS 4.1 requires Base-VXVM 4.1 for VxFS to work with VxVM and vice versa. NOTE Do not upgrade the operating system and the VERITAS products simultaneously. HP recommends that you first upgrade the operating system and later upgrade the VERITAS products. NOTE Ignite-UX version C.6.
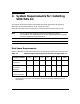
System Requirements for Installing VERITAS 4.1 Table 1-2 describes the disk space requirements for installing the Base-VXVM 4.1 SD-Bundle. Table 1-2 Minimum Space Requirement per Directory for Base-VXVM 4.1 Package/Contents Base-VXVM /home - /opt /usr 431MB 129MB /stand 10MB /var 1MB Total 570MB Patch Requirements The required patches for the Base-VXFS 4.1 SD-Bundle and Base-VXVM 4.1 SD-Bundle are part of the FEATURE11i bundle.
System Requirements for Installing VERITAS 4.1 Required Packages for VERITAS Enterprise Administrator (VEA) Table 1-3 Patches required for CVM 4.1 (Continued) Patch Description PHCO_33509 11.23 VxVM 4.1 Command Patch 01 PHKL_33510 11.23 VxVM 4.1 Kernel Patch 01 PHCO_34038 11.23 VERITAS VM Provider 4.1 Patch 01 Table 1-4 Patches required for CVM 4.
System Requirements for Installing VERITAS 4.1 • VERITAS Volume Manager Service Provider (VRTSvmpro) • VERITAS File System Service Provider (VRTSfspro) • VERITAS Enterprise Administrator (VRTSobgui) The minimum memory requirement for the VEA client is 64MB. The above packages are installed as part of Base-VXVM 4.1 SD-Bundle. Cluster Volume Manager (CVM) Support CVM3.5 will not be available for releases post December 2005. Also, future CVM versions will not have support for the HFS file system.
2 Software Depot Contents This chapter discusses the contents of the VERITAS 4.1 software depot. Base-VXFS 4.1 SD-Bundle Table 2-1 lists the packages included in the Base-VXFS 4.1 SD-Bundle: Table 2-1 Base-VXFS Packages Package Description VRTSvxfs VERITAS File System VRTSfsman VERITAS File System Manuals VRTSvlic VERITAS License Utilities NOTE The licensing package VRTSvlic is installed as part of Base-VXVM 4.1 SD-Bundle. Base-VXVM 4.
Software Depot Contents Table 2-2 Base-VXVM Packages (Continued) Package Description VRTStep VERITAS Task Exec Provider VRTSddlpr VERITAS Device Discovery Layer Services Provider VRTSvxmsa VxMS Application Deployment Package Licensing Packages • OnlineJFS (B3929EA): HP OnlineJFS (Server) • Full VxVM (B9116BA): VERITAS Volume Manager 4.
2 Upgrading to Base-VXFS 4.1 and Base-VXVM 4.1 This chapter discusses how to upgrade from VxFS 3.5 and VxVM 3.5 to Base-VXFS 4.1 and Base-VXVM 4.1 respectively. Upgrading to Base-VXFS 4.1 from VxFS 3.5 The installation of Base-VXFS 4.1 replaces the functionality provided by the VxFS 3.5 bundle in the Core OS on HP-UX 11i v2. For more information on installing Base-VXFS 4.1 see “Installing Base-VXFS 4.1” on page 16. NOTE The VxFS 4.1 default disk layout is version 6. If you remove VxFS 4.1, the VxFS 3.
Upgrading to Base-VXFS 4.1 and Base-VXVM 4.1 NOTE The patches PHCO_34273, PHKL_34274 must be installed to address the following error while upgrading VxFS 3.5 to VxFS 4.1: Error When Updating from VxFS 3.5 to VxFS 4.1 When updating from VxFS 3.5 to VxFS 4.
3 Installing Base-VXFS 4.1, Base-VXVM 4.1 This chapter describes how to install Base-VXFS 4.1 and Base-VXVM 4.1 with the swinstall(1M) command. Mounting the HP-UX Serviceguard and Storage Management Products Media To mount the media complete the following procedure: Step 1. Insert the media into the drive and log in as root: $ su root Step 2.
Installing Base-VXFS 4.1, Base-VXVM 4.1 Installing Base-VXFS 4.1 You can install Base-VXFS either in the non-interactive mode, or in the interactive mode. Installing Base-VXFS 4.1 in the Non-Interactive Mode To install Base-VxFS 4.
Installing Base-VXFS 4.1, Base-VXVM 4.1 Installing Base-VXFS 4.1 command "swjob -a log ”. ======= 08/29/05 13:26:59 IST END swinstall SESSION (non-interactive) (jobid=fslab02-0066) Installing Base-VXFS 4.1 in the Interactive Mode To install Base-VXFS 4.1 in the interactive mode, complete the following procedure: 1. To install Base-VXFS 4.1, run the following command: # swinstall -x autoreboot=true -s Figure 3-1 is displayed. You must mark the Base-VXFS 4.
Installing Base-VXFS 4.1, Base-VXVM 4.1 The system reboots automatically after the installation is complete. You can monitor the installation process for warnings and notes. See the log file /var/adm/sw/swagent.log for information on installation. NOTE During the first reboot of the system, the following error message may be observed: UX:vxfs fstyp: ERROR: V-3-20012: not a valid vxfs file system unknown_fstyp (no matches) Root check done You can ignore this error message.
Installing Base-VXFS 4.1, Base-VXVM 4.1 Installing OnlineJFS (B3929EA) (jobid=) Installing OnlineJFS (B3929EA) To get full VxFS 4.1 functionality, you must install OnlineJFS (B3929EA). You can install OnlineJFS (B3929EA) either in non-interactive mode, or in the interactive mode. NOTE Base-VxVM is a prerequiste for OnlineJFS (B3929EA). NOTE Installing OnlineJFS 4.1 will remove OnlineJFS 3.5.
Installing Base-VXFS 4.1, Base-VXVM 4.1 + FSLibEnh.FS-CORE2-64SLB,r=B.11.23.01,a=HP-UX_B.11.23_IA/PA,v=HP,fr=B.11.23.01,fa=HP-UX _B.11.23_IA + FSLibEnh.FS-CORE2-SLB,r=B.11.23.01,a=HP-UX_B.11.23_IA/PA,v=HP,fr=B.11.23.01,fa=HP-UX_B .11.23_IA . . * Analysis and Execution succeeded. NOTE: More information may be found in the agent logfile using the command "swjob -a log :/".
Installing Base-VXFS 4.1, Base-VXVM 4.1 Installing OnlineJFS (B3929EA) Figure 3-2 SD Install Window 2. Mark the B3929EA package. 3. Select Actions, and click Install. Follow the on-screen instructions to complete the installation.
Installing Base-VXFS 4.1, Base-VXVM 4.1 + DiskQuota-Enh.DQUOTA-ENH,l=/,r=B.11.23.01,a=HP-UX_B.11.23_IA/PA,v=HP,fr=B.11.23.01,fa= HP-UX_B.11.23_IA + FSCmdsEnh.FS-CMDS-ENH,l=/,r=B.11.23.01,a=HP-UX_B.11.23_IA/PA,v=HP,fr=B.11.23.01,fa=HPUX_B.11.23_IA + FSLibEnh.FS-CORE2-64SLB,l=/,r=B.11.23.01,a=HP-UX_B.11.23_IA/PA,v=HP,fr=B.11.23.01,fa=H P-UX_B.11.23_IA . . * The analysis phase succeeded for ":/". * Verification succeeded.
Installing Base-VXFS 4.1, Base-VXVM 4.1 Installing Base-VXVM 4.1 + FEATURE11i,r=B.11.23.0507.025,a=HP-UX_B.11.23_IA/PA,v=HP +PHKL_31500.CORE2-KRN,r=1.0,a=HP-UX_B.11.23_IA/PA,v=HP,fr=1.0,fa=HP-UX_B.11.23_I A VRTSalloc.VRTSALLOC,r=4.1,a=HP-UX_B.11.23_IA/PA,v=HP,fr=4.1,fa=HP-UX_B.11.23_IA /PA VRTSap.VRTSAP-FILESET,r=2.00.025.005,a=HP-UX_B.11.23_IA/PA,v=HP,fr=2.00.025.005, fa=HP-UX_B.11.23_IA/PA . . * Analysis and Execution succeeded.
Installing Base-VXFS 4.1, Base-VXVM 4.1 Figure 3-3 SD Install Window Step 2. Mark the Base-VXVM package. Step 3. Select Actions, and click Install. Follow the on- screen instructions to complete the installation. The system reboots after the installation is complete. Verifying Base-VXVM Installation To verify that the Base-VXVM 4.
Installing Base-VXFS 4.1, Base-VXVM 4.1 Installing the Full VxVM (B9116BA) * Software selections: Base-VXVM,r=B.04.10.010,a=HP-UX_B.11.23_IA/PA,v=HP +Networking.NET2-KRN,l=/,r=B.11.23,a=HP-UX_B.11.23_IA/PA,v=HP,fr=B.11.23,fa=HP-U X_B.11.23_IA +OS-Core.C-KRN,l=/,r=B.11.23,a=HP-UX_B.11.23_IA/PA,v=HP,fr=B.11.23,fa=HP-UX_B.11 .23_IA . . * The analysis phase succeeded for ":/". * Verification succeeded.
Installing Base-VXFS 4.1, Base-VXVM 4.1 Figure 3-4 SD Install Window 2. Mark the B9116BA package. 3. Select Actions, and click Install. Follow the on-screen instructions to complete the installation. NOTE The B9116BA bundle contains a license for the full VxVM 4.1 functionality.
Installing Base-VXFS 4.1, Base-VXVM 4.1 Installing Base-VXVM 4.1 on a System with LVM Volume Groups * Software selections: B9116BA,r=4.1.002,a=HP-UX_B.11.23_IA/PA,v=HP +Networking.NET2-KRN,l=/,r=B.11.23,a=HP-UX_B.11.23_IA/PA,v=HP,fr=B.11.23,fa=HP-UX_B.11.23_ IA +OS-Core.C-KRN,l=/,r=B.11.23,a=HP-UX_B.11.23_IA/PA,v=HP,fr=B.11.23,fa=HP-UX_B.11.23_IA +OS-Core.CORE-KRN,l=/,r=B.11.23,a=HP-UX_B.11.23_IA/PA,v=HP,fr=B.11.23,fa=HP-UX_B.11.23_IA/ PA +OS-Core.CORE2-KRN,l=/,r=B.11.23,a=HP-UX_B.11.23_IA/PA,v=HP,fr=B.11.
Installing Base-VXFS 4.1, Base-VXVM 4.1 b. To remove any LVM volumes using the disk, run the following command: # lvremove c. To erase the LVM disk headers, run the following command: # pvremove NOTE If the disk to be removed is the last disk in the volume group, you must use vgremove to remove the volume group and pvremove to erase the LVM disk. If the disk is not currently in use by any volume or volume group but has been initialized by pvcreate, you must use pvremove to remove LVM disk.
Installing Base-VXFS 4.1, Base-VXVM 4.1 Installing Base-VXFS 4.1 and Base-VXVM 4.1 using Ignite-UX Server a. Set the variable src to the location of the existing September 2005 OE media: src=:/release/0505.1123/HPUX11i-OE-MC.DVD b. Set the variable src_VERITAS-4.1 to the location of the VERITAS-4.1 bits: src_VERITAS-4.1=:/release/VERITAS-4.1.1123/software c. Set the variable des to the location of the VERITAS-4.1 depot to be created: des=:/release/VERITAS-4.1.
Installing Base-VXFS 4.1, Base-VXVM 4.1 Cold Installing Base-VXFS and Base-VXVM To install Base-VXFS and Base-VXVM, complete the following procedure: • Boot the VERITAS-4.1 install kernels provided with the VERITAS-4.1 version of Ignite-UX. • Select the configuration that was added to the server in step 7. Base-VXVM 4.1 will be automatically selected. • Select the software (either Base-VXFS or Base-VXVM) from the Ignite-UX selection dialog box.
5 Setting Up Base-VXFS 4.1 and Base-VXVM 4.1 This chapter discusses how to set up Base-VXFS 4.1 and Base-VXVM 4.1. Setting Up New File System with Base-VXFS 4.1 After installing Base-VXFS 4.1, you can create a file system on a VERITAS Volume Manager 4.1 volume or on an HP Logical Volume Manager (LVM) volume. To set up new file systems using Base-VXFS 4.1, complete the following procedure: Step 1.
Setting Up Base-VXFS 4.1 and Base-VXVM 4.1 /opt/VRTS/vxfs4.1/man directory is automatically added to the /etc/MANPATH. Make sure that /opt/VRTS/vxfs4.1/man appears before /usr/share/man in your MANPATH environment variable to display the latest version of the Base-VXFS 4.1 manpages. Upgrading the Base-VXFS Disk Layout Base-VXFS 4.1 enables you to mount the following file system disk layouts: • Disk Layout Version 4 • Disk Layout Version 5 • Disk Layout Version 6 The default layout for Base-VXFS 4.
Setting Up Base-VXFS 4.1 and Base-VXVM 4.1 To upgrade an existing Base-VXFS 4.1 disk layout to Disk Layout Version 6 while the file system remains online, run the following command: # vxupgrade -n 6 /mount_point The -n option is used to specify the disk layout version number to which to upgrade. You can use the vxfsconvert command to upgrade file systems, while they are offline, from Disk Layout Version 3 to Disk Layout Version 4.
Setting Up Base-VXFS 4.1 and Base-VXVM 4.1 VxVM uses license keys to control access. If you have not yet installed a VxVM license key on your system, you will need to do so if you want to use the full functionality of the product. Licensing information: System host ID: Host type: Are you prepared to enter a license key [y,n,q] (default: n) n Step 2.
Setting Up Base-VXFS 4.1 and Base-VXVM 4.1 required in VxVM 4.1. However, you may find it convenient to create a system wide default disk group. For operations that require a disk group, the system wide default disk group is used if the VxVM command is not specified with the -g option. The main advantage of creating a default disk group is that VxVM commands default to the default disk group, and you do not need to use the -g option. Step 4.
Setting Up Base-VXFS 4.1 and Base-VXVM 4.1 Setting Up a VEA Client To run VEA and administer a local or remote system, ensure that you have sufficient privileges. Also, ensure that the VxVM and the VEA server are installed on the same machine to be administered and that the vxconfigd daemon and the VEA server are running.
4 Removing Base-VXFS 4.1 and Base-VXVM 4.1 This chapter discusses how to remove the Base-VXFS 4.1 SD-Bundle and Base-VXVM 4.1 SD-Bundle from your system. Removing the Base-VXFS 4.1 This section describes how to remove Base-VXFS 4.1. The new tunables for Base-VXFS 4.1, such as inode_aging_size, inode_aging_count, fcl_maxalloc, fcl_keeptime, fcl_winterval, and oltp_load, must be removed from the tunefstab file. The OnLineJFS/JFS 3.5 vxtunefs command does not recognize the Base-VXFS 4.1 tunables.
Removing Base-VXFS 4.1 and Base-VXVM 4.1 VRTSvxfs.VXFS-RUN,l=/,r=4.1,a=HP-UX_B.11.23_IA/PA,v=HP,fr=4.1,fa=HP-UX_B.11. 23_IA VRTSvxfs.VXFS-RUN-PALIB,l=/,r=4.1,a=HP-UX_B.11.23_IA/PA,v=HP,fr=4.1,fa=HP-UX _B.11.23_A *Selection succeeded. * Beginning Analysis * Session selections have been saved in the file "/.sw/sessions/swremove.last". * The analysis phase succeeded for ":/". * Analysis succeeded. * Beginning Execution * The execution phase succeeded for ":/". * Execution succeeded.
Removing Base-VXFS 4.1 and Base-VXVM 4.1 Removing OnlineJFS VRTStep 1.20.028.007 VERITAS Task Exec Provider VRTSvlic 3.02.006c.009 VERITAS License Utilities VRTSvmdoc 4.1.010 VERITAS Volume Manager Documentation VRTSvmpro 4.1.010 VERITAS Volume Manager Management Services Provider VRTSvxmsa 4.2.1.224 VxMS Application Deployment Package VRTSvxvm Base VERITAS Volume Manager 4.1 for HP-UX 4.1.010 After removing Base-VXFS 4.
Removing Base-VXFS 4.1 and Base-VXVM 4.1 * Beginning Execution * The execution phase succeeded for "fslab02:/". * Execution succeeded. NOTE: More information may be found in the agent logfile using the command "swjob -a log fslab02-0021 @ fslab02:/". ======= 08/24/05 16:06:02 IST END swremove SESSION (non-interactive) (jobid=fslab02-0021) Removing Base-VXVM 4.1 Base-VXVM 4.1 can be removed from systems only where the root disk is under HP Logical Volume Manager (LVM) control.
Removing Base-VXFS 4.1 and Base-VXVM 4.1 Removing Base-VXVM 4.1 • Data from any volume that was created from multiple regions of storage, including striped or spanned volumes, must be moved to a single disk or to an appropriate LVM logical volume. See “Moving Base-VXVM 4.1 Volumes to LVM Volumes” on page 35. • Base-VXVM 4.1 must be shut down. See “Shutting Down Base-VXVM 4.1” on page 37. Removing Plexes To remove plexes, complete the following steps: Step 1.
Removing Base-VXFS 4.1 and Base-VXVM 4.1 a. Evacuate as many disks as possible. Evacuation moves sub-disks from the source disks to target disks. The evacuated disks provide the initial free disk space for volumes to be moved to LVM volumes. Disks can be evacuated in one of the following ways: • Using the vxdiskadm command with the remove disk option. • Using the vxevac script. b. Remove the evacuated disks from Base-VXVM 4.
Removing Base-VXFS 4.1 and Base-VXVM 4.1 Removing Base-VXVM 4.1 # vxdg rmdisk diskname # vxdisk rm devname If the output is not 0, remove sub-disks from the disk and then remove the disk. j. Copy the data in the next volume to be removed to the newly created free space. k. Reboot the system after all volumes have been converted successfully. l. To verify that no open volumes remain on the system, run the following command: # vxprint -Aht -e v_open m. If any volumes remain open, repeat steps a to l.
Removing Base-VXFS 4.1 and Base-VXVM 4.1 * Software selections: Base-VXVM,r=B.04.10.010,a=HP-UX_B.11.23_IA/PA,v=HP VRTSalloc.VRTSALLOC,l=/,r=4.1,a=HP-UX_B.11.23_IA/PA,v=HP,fr=4.1,fa =HP-UX_B.11.23_IA/PA VRTSap.VRTSAP-FILESET,l=/,r=2.00.025.005,a=HP-UX_B.11.23_IA/PA,v=H P,fr=2.00.025.005,fa=HP-UX_B.11.23_IA/PA . . * Analysis and Execution succeeded. NOTE: More information may be found in the agent logfile using the command "swjob -a log :/".
Removing Base-VXFS 4.1 and Base-VXVM 4.1 Removing Full VxVM (B9116BA) * Software selections: B9116BA,r=4.1.002,a=HP-UX_B.11.23_IA/PA,v=HP VxVM-LIC.VXVM-B9116BA,l=/,r=4.1.002,a=HP-UX_B.11.23_IA/PA,v=HP,fr=4.1.002,fa= HP-UX_B.11.23_IA/PA VxVM-LIC.VXVM-FULL-LIC,l=/,r=4.1.002,a=HP-UX_B.11.23_IA/PA,v=HP,fr=4.1.002,fa =HP-UX_B.11.23_IA/PA * Selection succeeded. * Beginning Analysis * Session selections have been saved in the file "/.sw/sessions/swremove.last". * The analysis phase succeeded for ":/".
Removing Base-VXFS 4.1 and Base-VXVM 4.
5 Cluster Volume Manager Cluster Volume Manager (CVM) enables the clustering functionality of VxVM. CVM supports exclusive and shared activation of volume groups, and it is used for managing Oracle Parallel Server (OPS) and non-OPS data. CVM 4.1 requires Base-VXVM 4.1 and Full VxVM 4.1 shipped with the December 2005 release. Full VxVM is required for CVM to work. If you have VxVM installation from releases before December 2005, the CVM 4.
Cluster Volume Manager Installing Cluster Volume Manager subproduct or fileset contained within a bundle). This item was successfully marked, but difficulties were encountered while marking some items that it depends on. The messages below show which software items encountered difficulties and exactly what these difficulties were: . NOTE: More information may be found in the agent logfile using the command "swjob -a log :/".
Cluster Volume Manager Installing Cluster Volume Manager Figure 5-1 SD Install Window 2. Mark the B9117BA package. 3. Select Actions, and click Install. Follow the on-screen instructions to complete the installation. The system reboots automatically after the installation is complete. You can monitor the installation process for warnings and notes. See the log file /var/adm/sw/swagent.log for information on installation related errors. Verifying CVM 4.1 Installation To verify that the CVM 4.
Cluster Volume Manager Removing the CVM 4.1 * Target connection succeeded for ":/". * Software selections: B9117BA,r=4.1,a=HP-UX_B.11.23_IA/PA,v=HP . . * Selection succeeded. * Beginning Analysis * Session selections have been saved in the file "/.sw/sessions/swverify.last". * ":/": There will be no attempt to mount filesystems that appear in the filesystem table. * Verification succeeded.
Cluster Volume Manager Removing the CVM 4.1 . . * Execution succeeded. NOTE: More information may be found in the agent logfile using the command "swjob -a log :/".
Cluster Volume Manager Removing the CVM 4.
A Files Added and Modified After Base-VXFS Installation Files Added After Base-VXFS Installation Table A-1 lists the files added after installing Base-VXFS and Base-VXVM. Table A-1 Files Added File Description /usr/conf/lib/libvxfs41.a Kernel library for Base-VXFS 4.1 /sbin/lib/mfsconfig.d/vxfs4.1 Base-VXFS 4.1 command configuration file /usr/lib/libxdsm.a DMAPI library /usr/lib/libvxfsutil.a Base-VXFS 4.1 APIs library /usr/conf/mod/fdd Quick I/O module /sbin/fs/vxfs4.
Files Added and Modified After Base-VXFS Installation Table A-1 Files Added (Continued) File /usr/sbin/ [fsclustadm, qiomkfile, qioadmin, Description Base-VXFS 4.1 commands and Quick I/O commands qiostat vxfsckd, vxgetmsg] /usr/lib/ [vxckptpriv.so, vxfspriv.so, vxfsutil.so, Dynamic libraries for Base-VXFS 4.1 APIs .libvxfsutil.so] /usr/lib/pa20_32/ [vxckptpriv.so, 32-bit dynamic libraries for Base-VXFS 4.1 APIs vxfspriv.so, vxfsutil.so, .libvxfsutil.so] /usr/lib/pa20_64/ [vxckptpriv.
Files Added and Modified After Base-VXFS Installation Table A-1 Files Added (Continued) File Description /opt/VRTS/vxfs4.1/include/ Header files for Base-VXFS 4.1 /opt/VRTSvxms/lib/map/libvxfs. 32-bit VxMS plugin for the VERITAS File System sl /opt/VRTSvxms/lib/map/pa20_64/ libvxfs.sl 64-bit VxMS plug-in for the VERITAS File System Files Modified After Base-VXFS Installation Table A-2 lists the files modified after installing Base-VXFS and Base-VXVM.