Veritas 5.0.1 Installation Guide HP-UX 11i v3 HP Part Number: 5900-2464 Published: September 2012 Edition: 1.
© Copyright 2009 Hewlett-Packard Development Company, L.P. Confidential computer software. Valid license from HP required for possession, use or copying. Consistent with FAR 12.211 and 12.212, Commercial Computer Software, Computer Software Documentation and Technical Data for Commercial Items are licensed to the U.S. Government under vendor’s standard commercial license. The information contained herein is subject to change without notice.
Contents About this Document......................................................................................7 Intended Audience....................................................................................................................7 Document Organization............................................................................................................7 Typographic Conventions...........................................................................................................
Disk Space Requirements for CVM.......................................................................................25 Database Requirements...........................................................................................................25 Mandatory Patch Required for Oracle Bug 4130116.....................................................................25 3 Installing the Veritas 5.0.1 Products.............................................................
Setting Environment Variables...................................................................................................44 Cluster Environment Requirements.............................................................................................44 Setting up Storage Management for Oracle...............................................................................45 5 Upgrading from Previous Versions of VxFS to VxFS 5.0.1...............................
Converting from QuickLog to Multi-Volume Support.....................................................................73 9 Removing Veritas 5.0.1 Products.................................................................74 Removing Storage Management for Oracle................................................................................74 Removing VxVM.....................................................................................................................74 Moving VxVM Volumes to LVM Volumes..
About this Document This document provides information on Veritas 5.0.1 suite of products on systems running HP-UX 11i v3. Veritas 5.0.1 suite of products include Base-VxFS, Base-VxVM, OnlineJFS, Full VxVM, HP Storage Management for Oracle (SMO), and Cluster Volume Manager (CVM). This document also includes a product overview, system requirements, installation, basic configuration, and removal steps for Veritas 5.0.1 suite of products on HP-UX 11i v3.
$ Bourne/Korn shell prompt # Superuser prompt (all shells) \ Continued input on the following line; you do not type this character [ ] In command synopsis, brackets indicates an optional argument. ls [ -a ] | In command synopsis, a vertical bar separates mutually exclusive arguments. mount [ suid | nosuid ] blue text An active hypertext link In PDF and HTML files, click on the links to move to the specified location.
Email: hplicense.na@hp.com ◦ (Asia Pacific) Phone: 0120.42.1231 or 0426-48-9310 (Inside Japan) +81.426.48.9312 (Outside Japan) Email: sw_codeword@hp.com • For latest information on the available patches, see: http://itrc.hp.com • For technical support, see: http://welcome.hp.com/country/us/en/support.html HP Welcomes Your Comments HP welcomes your comments concerning this document. HP is committed to providing documentation that meets your needs. Please send comments to: docsfeedback@hp.
1 Introduction This chapter introduces the Veritas 5.0.1 suite of products. It also describes the features of each product that is included within the Veritas 5.0.1 suite of products.
Veritas Volume Manager (VxVM) Introduction VxVM is a storage management subsystem that removes the physical limitations of disk storage so that you can configure, share, manage, and optimize storage I/O performance online without interrupting data availability. VxVM also provides easy-to-use, online storage management tools to reduce planned and unplanned system downtime, and online disk storage management for computing environments and Storage Area Network (SAN) environments.
• Volume Snapshot Volume Snapshots are point in time images of VxVM volumes. VxVM 5.0.1 does not support snapshots of RAID 5 volumes. • Dirty Region Logging Dirty Region Logging (DRL) keeps track of the regions that have been changed because I/O writes to a mirrored volume. The DRL uses this information to recover only those portions of the volume that need to be recovered, thereby speeding up recovery after a system crash.
• Support for LVM version 2 Volume Groups The LVM version 2 volume groups are now partially supported. VxVM now identifies and protects the LVM version 2 volume groups. However, the LVM version 2 volume groups cannot be initialized or converted. • Distributed Volume Recovery In a Cluster Volume Manager (CVM) cluster, upon a node failure, the mirror recovery is initiated by the CVM master. Prior to this release, the CVM master performed all the recovery I/O tasks.
VxVM Daemons VxVM relies on the following daemons for its operation: • vxconfigd – The VxVM configuration daemon maintains disk and disk group configuration information, communicates configuration changes to the kernel, and modifies the configuration information stored on the disks. • vxiod – The VxVM I/O daemon provides extended I/O operations without blocking the calling processes.
Volume Layouts in VxVM A volume layout is defined by the association of a volume to one or more plexes, each of which maps to a subdisk. VxVM supports two different types of volume layout: • Non-Layered • Layered Non-Layered In a non-layered volume layout, a subdisk maps directly to a VM disk. This enables the subdisk to define a contiguous extent of storage space backed by the public region of a VM disk. Layered Volumes A layered volume is constructed by mapping its subdisks to the underlying volumes.
RAID-5 (Striping with Parity) Although both mirroring (RAID-1) and RAID-5 provide redundancy of data, they use different methods. Mirroring provides data redundancy by maintaining multiple complete copies of the data in a volume. Data being written to a mirrored volume is reflected in all copies. If a portion of the mirrored volume fails, the system continues to use the other copies of the data. RAID-5 provides data redundancy by using parity.
Veritas File System (VxFS) Introduction The Veritas File System (VxFS) is a high availability, high performance, commercial grade file system that provides features such as transaction based journaling, fast recovery, extent-based allocation, and online administrative operations, such as backup, resizing, and defragmentation of the file system. It provides high performance and easy manageability required by mission-critical applications, where high availability is critical.
• ◦ Bypasses the system buffer cache for file I/O ◦ Specifies the expected access pattern for a file Extended Mount Options The extended mount options supported by VxFS include the following: • ◦ Enhanced data integrity modes ◦ Enhanced performance modes ◦ Temporary file system modes ◦ Improved synchronous writes ◦ Large file sizes Large File and File System Sizes File systems up to 40 TB and files up to 16 TB in size are supported on HP-UX 11i v3.
it. The SmartMove feature uses VxFS information to detect free extents and avoids copying them.
The intent log recovery feature is not readily apparent to users or a system administrator, except during a system failure. During system failure recovery, the VxFS fsck utility performs an intent log replay, which scans the intent log, and nullifies or completes file system operations that were active when the system failed. The file system can then be mounted without completing a full structural check of the entire file system.
2 System Requirements This chapter discusses the various system requirements for the Veritas 5.0.1 suite of products. This chapter addresses the following topics: • Software Dependency • OS Version • Patch Requirements • Required Packages for VEA • Software Depot Content • License Bundles • Disk Space Requirements Software Dependency • VxFS 5.0.1 works with both HP LVM and VxVM 5.0.1 on HP-UX 11i v3 • VxVM 5.0.1 works only when VxFS 5.0.
Table 3 Required and Recommended Patches Patch Available in HP-UX 11i v3 March 2009 OEUR Available in HP-UX 11i v3 September 2009 OEUR PHKL_38651 Yes Yes PHKL_38952 Yes Yes PHCO_38250 Yes Yes PHCO_38837 Yes Yes PHCO_39626 No Yes PHKL_39624 No Yes PHKL_39625 No Yes PHKL_38936 Yes Yes PHKL_38937 Yes Yes PHKL_38950 Yes Yes PHKL_38951 Yes Yes PHKL_39036 Yes Yes PHKL_39037 Yes Yes PHKL_36261 Yes Yes PHKL_36477 Yes Yes PHKL_37463 Yes Yes PHKL_38104 Yes Yes PHK
Table 3 Required and Recommended Patches (continued) PHKL_39114 Yes Yes PHKL_39401 No Yes PHKL_39523 No Yes PHKL_40022 No No PHKL_40377 No No PHSS_37553 Yes Yes PHSS_38135 Yes Yes PHSS_39094 No Yes PHSS_40152 No No PHNE_39147 No No TBD (sw-gettools patch) NO not applicable No Not Applicable Recommended Software In addition to the recommended patches listed in Table 3, HP recommends the software products listed in Table 4 for use with VxFS 5.0.1 and VxVM 5.0.1 installations.
Table 6 Base-VxVM-501 Bundle Components Package Description VRTSvxvm Veritas Volume Manager by Symantec VRTSvlic Symantec License Utilities Table 7 lists the Base-VxTools-501 bundle components.
• SMO Licenses (T2789DB) : HP Storage Management for Oracle • For more information on these licenses and the HP Serviceguard Storage Management Licenses, see HP Serviceguard Storage Management Suite Version A.03.00 Release Notes. Disk Space Requirements Table 9 and Table 10 list the disk space requirements for VxFS 5.0.1 and VxVM 5.0.1, respectively. Disk Space Requirements for VxFS 5.0.1 Table 9 lists the disk space required by VxFS 5.0.1. Table 9 Minimum Space Required for Each Directory for VxFS 5.
3 Installing the Veritas 5.0.1 Products This chapter describes how to install VxFS 5.0.1 and VxVM 5.0.1 with the swinstall (1M) command. This chapter addresses the following topics: • “Mounting the HP Serviceguard Storage Management Suite Media” (page 26) • “Installing Veritas 5.0.1 Products” (page 27) • “Installing VxFS 5.0.1” (page 27) • “Installing VxVM 5.0.
Installing Veritas 5.0.1 Products Veritas 5.0.1 products are supported with HP-UX 11i v3 March 2009 OEUR and later. If you do not have the March 2009 OEUR, it is recommended that you upgrade the HP-UX version on your system before installing the 5.0.1 version of the Veritas software. As the HP-UX 11i v3 March 2009 OEUR release contains the VxVM 5.0 and VxFS 5.0 products by default, you cannot directly install the 5.0.1 products. You must upgrade the Veritas 5.0.1 products from 5.0 to 5.0.
The system reboots automatically after the installation is complete. You can monitor the installation process for warnings and notes. For more information on installation, see the log file /var/adm/ sw/swagent.log. Verifying Base-VxFS-501 Installation Verify the Base-VxFS-501 installation on your system by entering the following command: # swverify Base-VxFS-501 For more information on the supported options, see swverify (1M).
NOTE: Ensure that you select the complete Base-VxVM-501 bundle for installation while installing Full-VxVM bundle B9116DB if your system already does not have Base-VxVM-501. Also, verify that the bundles Base-VxVM-501, Base-VxFS-501, Base-VxTools-501 and B9116DB are present on your system after installing B9116DB.
Installing Full VxVM in Interactive Mode To install Full VxVM in the interactive mode, complete the following steps: 1. Enter the swinstall command in the interactive mode, as follows: # swinstall -s For more information on supported options, see swinstall (1M). 2. 3. Mark the B9116DB bundle on the SD Install window. Select Actions, and click Install. Follow the on-screen instructions to complete the installation. NOTE: The B9116DB bundle contains a license for the Full VxVM 5.0.
2. 3. Create the configuration file for the HP-UX 11i v3 OE depot. If you want VxVM_5.0.1 DGV=140, which is compatible only with VxVM_5.0.1 software, either comment-out or delete the vxvm_version=4.1 entry at the end of the OE configuration file. To register the HP-UX 11i v3 OE depot, complete the following steps: a. # cd /var/opt/ignite/data/Rel_B.11.31 b. # /opt/ignite/bin/make_config \ - s :<1131_OE_depot> \ -c _cfg c. Test the configuration file.
3. Use the Ignite-UX interface to select the volume manager. On the Basic tab File System line, select the following: VERITAS Volume Manager (VxVM) with VxFS 4. Use the Ignite-UX interface to select VxVM and VxFS 5.0.1 software. On the Software tab, select the following: B3929GB OnlineJFS for Veritas File System 5.0.1 Bundle B9116DB Full VxVM License for Veritas Volume Manager Base-VxTools-501 VERITAS Infrastructure Bundle 5.0.1 for HP-UX Base-VxVM-501 Base VERITAS Volume Manager Bundle 5.0.
The following documents available http://www.docs.hp.com provide additional information on cold installation: • Ignite-UX Administration Guide • HP-UX 11i v3 Installation and Update Guide • HP-UX 11i Version 3 Release Notes • HP-UX System Administrator’s Guide Updating HP-UX and Veritas Products Using the update-ux Command This section describes how to update an HP-UX 11i v2 system to HP-UX 11i v3 with Veritas VxVM 5.0.1 and VxFS 5.0.1 using the update-ux command.
update SW already installed on the system. The newer revisions are not selected for installation. This will leave the incompatible old revision of SW on the system. The affected SW is: - VRTSfspro.FSPRO-PRG,r=4.1x replaces VRTSfspro.FSPRO-PRG,r=3.5_2_ga08.006 - VRTSfspro,r=4.1x replaces VRTSfspro,r=3.5_2_ga08.006 - VRTSob.VEAS-FILESET,r=3.2.555.1 replaces VRTSob.VEAS-FILESET,r=3.2.532.0.001 - VRTSob,r=3.2.555.1 replaces VRTSob,r=3.2.532.0.001 - VRTSobgui.VEA-FILESET,r=3.2.555.1 replaces VRTSobgui.
4 Setting up the Veritas 5.0.1 Products This chapter describes how to initialize and set up VxVM 5.0.1 and VxFS 5.0.1.
1. Select the disk to be used as your new VxVM root disk. HP recommends that this disk is internal to the main computer cabinet. If this is currently an LVM disk, you must remove the disk from LVM control as follows: • Use the vgreduce command to remove the disk from any LVM volume groups to which it belongs. • Use the lvremove command to remove any LVM volumes that are using the disk.
The following procedures describe how to start the vxconfigd daemon and to check whether the deamon is enabled and running, and how to enable the daemon: • Starting the vxconfigd Daemon To start the vxconfigd daemon, enter the following command: # vxconfigd This message indicates that vxconfigd is running but not enabled: mode: disabled • Determining Whether the vxconfigd Daemon is Enabled To determine whether vxconfigd is enabled, use the following command: # vxdctl mode The following message indicates
Enabling Cluster Support in VxVM This release includes an optional cluster feature that enables VxVM to be used in a cluster environment. The cluster functionality in VxVM enables multiple hosts to simultaneously access and manage a set of disks under VxVM control. A cluster is a set of hosts sharing a set of disks; each host is referred to as a node in the cluster. The VxVM cluster feature requires a license that you can obtain from your Customer Support channel.
log subdisks, read the section on DRL in the Veritas Volume Manager Adminstrator’s Guide available at: http://www.docs.hp.com 6. If the cluster is running with only one node, bring up the other cluster nodes. Enter the vxdg list command on each node to display the shared disk groups. Verifying Existing Shared Disks If you are upgrading from a previous release of VxVM, verify that your shared disk groups still exist. To verify that your shared disk groups exist, complete the following steps: 1.
The procedure discussed in this section applies to the following upgrade scenarios: • Upgrading from VxVM 3.5 to VxVM 5.0.1 • Upgrading from VxVM 3.5 Maintenance Pack 4 to VxVM 5.0.1 If there are volumes in the shared disk groups with the FastResync set option (fastresync=on), reattach each snapshot to its data volume before beginning the upgrade procedure.
2. To use enclosure-based names, enter when prompted by the vxinstall utility: Do you want to use enclosure based names for all disks ? [y,n,q,?] (default: n) For more information on the supported options, see vxinstall (1M). NOTE: Disks use the traditional naming format, usually c#t#d#. Enclosure-based naming enables disk devices to be named for enclosures rather than for the controllers through which they are accessed.
2. Install device files by entering the following command: # insf -C disk For more information on the supported options, see insf (1M). 3. For the volume manager to detect these new disks, enter the following command: # vxdisk scandisks For more information on supported options, see vxdisk (1M). 4. Invoke the vxdiskadm menu driven utility, by entering the following command: # vxdiskadm For more information on the supported options, see vxdiskadm (1M).
Setting Up a Veritas Enterprise Administrator Client To run VEA and administer a local or remote system, ensure that you have sufficient privileges. Also, ensure that the VxVM and the VEA server are installed on the same system to be administered and that the vxconfigd daemon and the VEA server are running.
For more information on the supported options, see mount_vxfs (1M). Displaying Information on Mounted File System To view the status of mounted file systems, enter the following command: # mount -v For more information on the supported options, see mount (2). Unmounting a VxFS File System Enter the umount command to unmount a file system, as follows: umount special | mount_point Specify the file system to be unmounted as a value for mount_point or for special (the device on which the file system resides).
as bootdg, contains volumes that are used to start the system. VxVM sets bootdg to the appropriate disk group if it takes control of the root disk. Alternatively, bootdg is set to nodg. To check the name of the disk group, enter the command: # vxdg bootdg 2. Decide on the layout of shared disk groups (as one or more shared disk groups may exist) and determine how many you wish to use. 3.
5 Upgrading from Previous Versions of VxFS to VxFS 5.0.1 This chapter discusses various VxFS upgrade paths based on the version of your OS. This chapter addresses the following topics: • “Upgrading from VxFS 3.3 or 3.5 on HP-UX 11i v1 to VxFS 5.0.1 on HP-UX 11i v3” • “Upgrading from VxFS 3.5 on HP-UX 11i v2 to VxFS 5.0.1 on HP-UX 11i v3” • “Upgrading from VxFS 4.1 on HP-UX 11i v2 or HP-UX 11i v3 to VxFS 5.0.1 on HP-UX 11i v3” • “Upgrading from VxFS 5.0 on HP-UX 11i v2 or HP-UX 11i v3 to VxFS 5.0.
The vxfsconvert command works with unmounted file systems. To upgrade mounted file system, use the vxupgrade command, as described in step 8. You must run fsck after vxfsconvert because vxfsconvert does not create all metadata files. 7. To run the VxFS-specific full fsck on the converted file system, enter the following command: # fsck -F vxfs -y -o full During pass 4, fsck displays several error messages that require a yes response to complete the conversion process. 8.
6. To convert any non-vxfs file system on your system to a vxfs file system, and upgrade the DLV from 2 and 3 to 7, enter the following command: # /opt/VRTS/bin/vxfsconvert The vxfsconvert command works with unmounted file systems. To upgrade mounted file system use the vxupgrade command as described in step 6, you must run fsck after vxfsconvert because vxfsconvert does not create all metadata files. 7.
a. To upgrade a mounted VxFS file system from DLV 2 to DLV 3, enter the following command: # vxupgrade -n 3 b. To upgrade a mounted VxFS file system from DLV 3 to DLV 4, enter the following command: # vxupgrade -n 4 4. Upgrade to HP-UX 11i v3. For more information on upgrading to HP-UX 11i v3, see the HP-UX 11i v3 Installation and Update Guide at: http://docs.hp.com. If your system already contains the HP-UX 11i v3 operating system, you can skip this step. 5. 6. Install VxFS 5.
1. To determine the volume names, enter the following command: # bdf 2. To determine the current disk layout version for system partitions, enter the following command: # fstyp -v 3. To upgrade file systems with DLV 2 or 3, before installing 5.0.1, complete the following steps: NOTE: You cannot upgrade from DLV 2 to DLV 4 directly. DLV4 is the lowest disk layout that is supported by VxFS 5.0.1. a.
6 Upgrading from Previous Versions of VxVM to VxVM 5.0.1 This section discusses the requirements to update from the pervious version of Veritas Volume Manager to the 5.0.1 version of Veritas Volume Manager and also the various supported disk groups. It addresses the following topics: • “Determining VxVM Disk Group Version” (page 51) • “Native Multipathing with Veritas Volume Manager” (page 52) • “Upgrading from VxVM 4.1 on HP-UX 11i v3 to VxVM 5.0.
# vxdg list To upgrade a disk group to version 140, use the following command: # vxdg upgrade After you upgrade from a previous release of VxVM, HP recommends that you upgrade to the latest disk group version. For more information on disk groups, see the Veritas Volume Manager Administrator's Guide available at: http://www.docs.hp.com Native Multipathing with Veritas Volume Manager By default, VxVM uses DMP to manage multiple paths to I/O devices.
to their corresponding agile or persistent device special files (DSFs) assigned by the operating system. CAUTION: Foreign devices are not supported as cluster-sharable disks. Do not perform this procedure on systems that require clustering features of VxVM (CVM). NOTE: Irrespective of the mode set, if you use the vxddladm or the vxdisk list commands, only the new style DSFs are displayed after migrating to HP-UX native multipathing. Enclosure-based naming scheme is not supported for foreign devices.
The output from the vxdisk list command shows the DMP metanode names according to the current naming scheme. Output in the default old naming scheme: # vxdisk list DEVICE TYPE c2t0d0 auto:LVM c3t2d0 auto:LVM c89t0d0 auto:cdsdisk c89t0d1 auto:cdsdisk c89t0d2 auto:cdsdisk c89t0d3 auto:hpdisk c89t0d4 auto:hpdisk c89t0d5 auto:hpdisk DISK - GROUP - STATUS LVM LVM online online online online online online Output in agile naming scheme.
# vxdisk list DEVICE TYPE disk155 auto:LVM disk156 auto:LVM disk224 auto:cdsdisk disk225 auto:cdsdisk disk226 auto:cdsdisk disk227 auto:hpdisk disk228 auto:hpdisk disk229 auto:hpdisk DISK - GROUP - STATUS LVM LVM online online online online online online For information on migrating an individual device or only a subset of devices, see vxdiskadm(1M). For information on foreign devices, see Veritas Volume Manager 5.0.1 Administrator's Guide.
After you install the 5.0.1 software, the Veritas Volume Manager 5.0 software that was bundled with the HP-UX operating system will no longer be available. To reinstall Veritas Volume Manager 5.0, you must use your HP-UX software CD/DVD. As only one version of the Veritas Volume Manager can reside on your system, if you choose to reinstall Veritas Volume Manager 5.0, the 5.0.1 software will no longer be available. Installing the 5.0.1 Veritas software updates Veritas File System 5.0. After installing the 5.
Upgrading From VxVM 5.0 on HP-UX 11i v3 to VxVM 5.0.1 Using Integrated VxVM 5.0.1 Package for HPUX 11i v3 You can upgrade from VxVM 5.0 HP-UX 11i v3 to VxVM 5.0.1 using the integrated VxVM 5.0.1 package for HP-UX 11i v3 from the ignite depot. To upgrade from VxVM 5.0 HP-UX 11i v3 to VxVM 5.0.1 on HP-UX 11i v3 using the integrated VxVM 5.0.1 package for HP-UX 11i v3 from the ignite depot, complete the following steps: 1. Integrate the VxVM 5.0.1 package with the latest HP-UX fusion.
Upgrading from VxVM 3.5 on HP-UX 11i v2 to VxVM 5.0.1 on HP-UX 11i v3 You must consider the following guideline prior to upgrading from VxVM 3.5 on HP-UX 11i v2 to VxVM 5.0.1 on HP-UX 11i v3: • VxVM 3.5 and VxVM 5.0.1 both support disk group version 90. To Upgrade from VxVM 3.5 on HP-UX 11i v2 to VxVM 5.0.1 on HP-UX 11i v3 To upgrade from VxVM 3.5 on HP-UX 11i v2 to VxVM 5.0.1 on HP-UX 11i v3, complete the following steps: 1. Stop activity to all VxVM volumes.
Upon successful completion of the upgrade, VxVM 4.1 will be replaced by VxVM 5.0.1. Disk groups with older disk group versions (90 or 120) will be accessible after the upgrade.
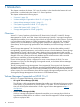
7 Upgrading Storage Management for Oracle from Previous Releases If your system is already running a previous release of Storage Management for Oracle (or Foundation Suite), this section describes how to upgrade it to Storage Management for Oracle 5.0.1. The operating system must be at a supported level for this upgrade. This chapter addresses the following topics: • “Upgrade Paths” (page 60) • ??? • “Upgrading from Storage Management for Oracle 4.1 on HP-UX 11i v2 to Storage Management for Oracle 5.0.
Figure 1 Upgrading the HP-UX Operating System Upgrading from Storage Management for Oracle 4.1 on HP-UX 11i v2 to Storage Management for Oracle 5.0.1 on HP-UX 11i v3 This section discusses the procedure to upgrade Storage Management for Oracle 4.1 on HP-UX 11i v2 to Storage Management for Oracle 5.0.1 on HP-UX 11i v3. Because all disk group versions supported by Veritas Volume Manager 4.1/5.0 are also supported by Veritas Volume Manager 5.0.1, any disk groups created in Storage Management for Oracle 4.
1. 2. Stop activity to all Storage Management for Oracle volumes. For example, stop any applications such as databases that access the volumes and unmount any file systems that have been created on the volumes. If you have any external Array Policy Modules (APMs) installed, uninstall the APMs. The following warning message displays during the operating system upgrade: WARNING: The file '/usr/conf/mod/dmpXXX.1' does not contain valid kernel code.
1. Stop activity on all Storage Management for Oracle volumes. For example, stop any applications such as databases that access the volumes and unmount any file systems that have been created on the volumes. 2. If you have any external Array Policy Modules (APMs) installed, uninstall the APMs. The following warning message is displayed during the operating system upgrade: WARNING: The file '/usr/conf/mod/dmpXXX.
8 Post Upgrade Tasks This chapter discusses the tasks that you must complete after upgrading the VxVM software to restore the previous configurations and to set up Storage Management for Oracle 5.0.1 correctly.
1. To invoke the common installer, run the installer command with the configure option, as shown in this example: # ./installer -configure 2. When the list of available products is displayed, select the number corresponding to the product you want to configure, and press Return. You can use this procedure to configure SFORA. Select a product to configure: 3. You will be prompted to enter system names on which the software must be installed. Enter the system names and press Return.
access the tools to support the Storage Management for Oracle product. The default settings only allow access to the superuser. Enter y to change permission for a DBA or a group of DBAs to access the support tools. When prompted, enter the login account or group name.
Configuration log files, summary file, and response file are saved at: /opt/VRTS/install/logs/installer-**** 17. The installation script prompts for a reboot if there are one or more errors. Restart the system (or systems) if the install script prompts for a reboot. 18. If you installed Storage Management for DB2 or Storage Management for Oracle, create a new repository database.
Table 14 sfua_db_config Options (continued) Option Description -o Reports the database server status. serverstatus -o stopdb Detaches the repository database from the database server. -o startdb Attaches the repository database to the database server. To create and configure the repository database, complete the following steps: 1. Run the sfua_db_config script: # /opt/VRTSdbcom/bin/sfua_db_config 2.
or after the installation. The configuration procedure for Storage Management for Oracle provides an option to enable DBAs to access tools support for the Storage Management for Oracle product. By default, only the superuser can access the /opt/VRTSdbed directory after the installation. For information on configuring the Storage Management for Oracle, see “Configuring Storage Management for Oracle” (page 64).
NOTE: Do not recursively change permissions, groups, or owners. To change permissions, complete the following steps: 1. Change permissions for the directory depending on the product that you have installed: For Storage Management for Oracle, run the following command: # chmod 550 /opt/VRTSdbed 2. Reset owner and group settings to the appropriate owner and group for the database administrators on your system.
3. On the node selected in Step 1, incrementally upgrade the disk layout of this file system to layout Version 6 or 7. For example, if you had a cluster mounted file system of disk layout Version 4 running with previous version of VxFS, after upgrading to VxFS 5.0.1, you must upgrade the disk layout to Version 6 or 7. The incremental upgrade is as follows: # vxupgrade -n 5 /mnt1 # vxupgrade -n 6 /mnt1 # vxupgrade -n 7 /mnt1 4.
1. Copy the /etc/vx/vxdba directory and contents to /var/vx/vxdba: # cp -rp /etc/vx/vxdba /var/vx/vxdba 2. Remove the /etc/vx/vxdba directory: # rm -rf /etc/vx/vxdba 3. Link the directories /var/vx/vxdba and /etc/vx/vxdba: # ln -s /var/vx/vxdba /etc/vx/vxdba Upgrading the VxVM Cluster Protocol Version If you are upgrading a cluster and want to take advantage of the new features in this release, you must upgrade the version of the VxVM cluster protocol.
For more information on setting default disk groups, see the Veritas Volume Manager Administrator’s Guide. If you want to confirm that the root disk is encapsulated, enter the command: # vxdg bootdg Upgrading the Array Support Library VxVM provides support for new disk arrays in the form of Array Support Library (ASL) software packages.
9 Removing Veritas 5.0.1 Products This chapter discusses how to remove the Veritas 5.0.1 suite of products from an HP-UX 11i v3 system, using the HP-UX SD commands. This chapter addresses the following topics: • “Removing Storage Management for Oracle” (page 74) • “Removing VxVM” (page 74) • “Removing VxFS” (page 76) • “Removing CVM” (page 77) • “Removing the Veritas Enterprise Administrator (VEA) Client” (page 77) CAUTION: If VxVM/VxFS 5.0.1 is installed on a system that contained VxVM/VxFS 4.
1. 2. Evacuate as many disks as possible. Evacuation moves sub-disks from the source disks to target disks. The evacuated disks provide the initial free disk space for volumes to be moved to LVM volumes. Disks can be evacuated in one of the following ways: • Using the vxdiskadm command with the Remove a disk option. • Using the vxevac script.
1. Display a list of all the volumes: # vxprint -g -Ath For more information on the supported options, seevxprint (1M). 2. Remove a named plex: # vxplex -g -o rm disk If the remaining plex has more than one sub-disk, enter the following sequence of commands to consolidate the sub-disks into a single sub-disk: # vxassist -g mirror volume layout=config # vxplex -g -o rm disk For more information on the supported options, see vxassist (1M) and vxplex (1M).
Removing Base-VxFS-501 To remove Base-VxFS-501, enter the following command: # swremove -x autoreboot=true Base-VxFS-501 For more information on the supported options, see swremove (1M). CAUTION: Do not remove the VRTSvlic package if there are any other Veritas products running on your system. NOTE: VxFS 4.1 is activated after the removal of Base-VxFS-501.
A Files Added and Modified After VxFS Installation This appendix discusses the files that are added and modified after installing VxFS 5.0.1. Files Added After VxFS Installation Table 15 lists the files added after installing VxFS 5.0.1. Table 15 Files Added After VxFS Installation File Description /usr/conf/lib/libvxfs50.a Kernel library for VxFS 5.0.1 /sbin/lib/mfsconfig.d/vxfs50 VxFS 5.0.1 command configuration file /usr/lib/libxdsm.a DMAPI library /usr/lib/libvxfsutil.a VxFS 5.0.
Table 16 Files Modified After VxFS Installation File Modifications /stand/system Deactivates JFS and OnLineJFS and configures VxFS 5.0.1 and Quick I/O. /etc/MANPATH Inserts /opt/VRTS/vxfs5.0.1/man before the /usr/share/man directory in the MANPATH environment variable to ensure that the VxFS 5.0.1 manpages are displayed, instead of HP OnLineJFS/JFS 5.0.1 manpages located in the /usr/ share/man directory.