Getting started with HP-UX Workload Manager Basic configuration and monitoring Introduction ................................................................................................................................... 2 Audience ...................................................................................................................................... 2 What is HP-UX Workload Manager? .................................................................................................
Introduction Today, most servers are highly underutilized. While average utilization varies by customer and operating system, in the HP-UX environment, it is often around 30%. There are myriad reasons for this, but one of the primary reasons is that customers often have one application per server, and they size that server for a peak load of typically three to five times the average utilization. This means that millions of dollars in server resources—CPU and memory—can lie idle for most of the time.
• HP Integrity Virtual Machines (Integrity VM) hosts • Resource partitions, which can be: – Whole-core: HP-UX processor sets (pSets) – Sub-core: Fair Share Scheduler (FSS) groups (WLM creates FSS groups using HP Process Resource Manager (PRM)) Note As of WLM A.03.01, PRM is no longer included with the WLM bundle. If PRM C.03.
For more information about running WLM with Integrity Virtual Machines, see the “HP-UX Workload Manager overview” white paper available from http://www.hp.com/go/wlm/ on the “Information library” page. Note For more robust management of virtual machines, you can use HP-UX Global Workload Manager (gWLM). For more information, see the following web site: http://www.hp.
Common HP-UX Workload Manager configurations WLM is controlled by a configuration you define. You can create this configuration in a text editor, through the WLM GUI, or through the WLM configuration wizard. This paper focuses on configuring WLM using the wizard.
Providing a fixed amount of CPU resources WLM enables you to give a workload group a fixed amount of CPU resources (cores), reserving that amount for your workload group. To set up a fixed CPU allocation using the configuration wizard: NOTE Usage of the WLM wizard requires Java™ Runtime Environment version 1.4.2 or later. (Starting with WLM A.03.04, Java 1.5 or later is required.) For PRM-based configurations, PRM C.03.
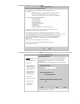
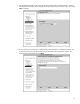
4. Read the introduction screen and click OK. 5. Name the workload group and click Next. In the following screen, the group is named “Grp1.
6. Assign a workload to the workload group you defined in step 5. a. Specify the Executable Path for an application that you want in the workload group, and click Add. b. Repeat step a to add more applications to the workload group. c. Click Next to continue.
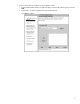
7. Enter data about the SLO, or goal, for the workload. Specify an SLO Name, and assign an SLO Priority by moving the slider or entering a value (between 1 and 100) in the text field. Each SLO needs a priority so that WLM can choose which SLOs get CPU resources when there is not enough for all the workloads. The highest priority is 1; the lowest is 100. Click Next to continue. 8. Select the Non-Metric Based and Fixed Allocation options to choose a CPU allocation that is fixed. Click Next to continue.
9. Specify the fixed amount of CPU (cores) the workload will receive by using the slider or entering the amount in the text field. In this example, the workload gets 200 CPU shares or two cores. Click Next to continue. 10. On this screen, you can specify a Condition String, which indicates a condition that must be met for the SLO to be active. For this example, the SLO should be active all the time, so leave the Condition String field blank, and click Next.
. On this screen, you can add more SLOs for the workload or edit the existing SLO. In this example, use only the one SLO you just defined. Select the Commit Current Workload Group option, and click Next. You have fixed the CPU allocation for a single workload. You can now continue to add workload groups (using a fixed allocation again or trying other types of allocations), edit the workload group you just defined, or continue with the WLM configuration.
. Assign users to the workloads if desired. User assignments ensure all the processes of a given user start in the specified workload. For this example, you are not concerned with user assignments, so omit these assignments by clicking Next. 13. This screen enables you to set global tunables. Click Next to accept the defaults and continue.
14. The following screen appears only if the system has HP-UX virtual partitions or nPartitions installed. If you plan on managing virtual partitions or nPartitions, see the “Automatically resizing virtual partitions” section on page 41 or the “Automatically resizing nPartitions using HP Instant Capacity software” section on page 41 for pointers to white papers that address partition management in more detail. Otherwise, click Next to continue. 15.
16. Click Finish to close the wizard. 17. Activate the new configuration file, instructing WLM to take control of resource management, using the following wlmd command: # wlmd –a /tmp/fixed_allocation.wlm Providing CPU resources as needed To ensure a workload gets the CPU resources it needs—without preventing other workloads’ access to unused CPU resources—WLM enables you to define usage goals. Usage goals indicate how efficiently a workload should use its CPU allocation.
The following figure (produced using wlmgui) shows a workload, named “SalesGrp,” with an SLO that has a usage goal. WLM determines an allocation for the workload based on its usage. By default, when the workload uses 75% or more of its allocation, WLM gives it a larger allocation. Similarly, if the workload is not using at least 50% of its allocation, WLM gives it a smaller allocation. The upper line in the graph shows the workload’s allocation of CPU shares. The lower line shows usage of CPU resources.
3. Enter the maximum amount of CPU resources (cores) the system will have. The wizard estimates the maximum value. Confirm or edit this estimate. The value you enter should account for changes in the CPU/core count caused by Instant Capacity and other such adjustments. 4. Read the introduction screen and click OK.
5. Name the workload group and click Next. In the following screen, the group is named “Grp2.” 6. Assign a workload to the workload group you defined in step 5. a. Specify the Executable Path for an application that you want in the workload group, and click Add. b. Repeat step a to add more applications to the workload group. c. Click Next to continue.
7. Enter data about the SLO for the workload. Specify an SLO Name and assign an SLO Priority by moving the slider or entering a value (between 1 and 100) in the text field. Each SLO needs a priority so that WLM can choose which SLOs get CPU resources when there are not enough for all the workloads. The highest priority is 1; the lowest is 100. Click Next to continue. 8. Select the Non-Metric Based and CPU Usage options for the CPU allocation policy, and click Next.
9. To request that the WLM adjustments fall within a minimum allocation and maximum allocation, use the slider or input fields to set these bounds. Click Next. NOTE The Min CPU and Max CPU values are merely requests; they are not hard limits. The requests in the following example are for 100 and 400 CPU shares, meaning one core and four cores.
10. On this screen, you can enter a Condition String, which indicates a condition that must be met for the SLO to be active. For this example, the SLO should be active all the time, so leave the Condition String field blank, and click Next. 11. On this screen, you can add more SLOs for the workload or edit the existing SLO. In this example, use only the one SLO you just defined. Select the Commit Current Workload Group option, and click Next.
You have set up a CPU usage goal for a single workload. You can now continue to add workload groups (using a usage goal again or trying other types of allocations), edit the workload group you just defined, or continue with the WLM configuration. For brevity, select Proceed to Next Step, and click Next. 12. Assign users to the workloads if desired. User assignments ensure all the processes of a given user start in the specified workload.
13. This screen enables you to set global tunables. Click Next to accept the defaults and continue. 14. This next screen appears only if the system has HP-UX virtual partitions or nPartitions installed.
15. Specify the full path and file name, indicating where to save the configuration, and click Next. In this example, the configuration will be saved as /tmp/usage-based_allocation.wlm. 16. Click Finish to close the wizard. 17. Activate the new configuration file, instructing WLM to take control of resource management, using the following wlmd command: # wlmd –a /tmp/usage-based_allocation.
Providing CPU resources for a given period For workloads that are only needed for a certain time, whether it is once a day, week, or any other period, WLM provides a way to make SLOs conditional on time and date ranges. With a conditional SLO, the SLO is active and influences the workload’s CPU allocation only when the condition, be it a time range or date, is true. To provide a workload group with CPU resources for a given time period: 1.
3. Name the workload group and click Next. In the following screen, the group is named “Grp3.” 4. Assign a workload to the workload group you defined in step 3. a. Specify the Executable Path for an application that you want in the workload group, and click Add. b. Repeat step a to add more applications to the workload group. c. Click Next to continue.
5. Enter data about the SLO for the workload. Specify an SLO Name and assign an SLO Priority by moving the slider or entering a value (between 1 and 100) in the text field. Each SLO needs a priority so that WLM can choose which SLOs get CPU resources when there are not enough for all the workloads. The highest priority is 1; the lowest is 100. Click Next to continue. 6. Select the Non-Metric Based and CPU Usage options for the CPU allocation policy, and click Next.
WLM automatically adjusts the CPU allocation for a workload when you have a usage-based allocation. You can request that the WLM adjustments fall within a minimum allocation and maximum allocation. 7. Use the slider or input fields to set these bounds. Click Next. NOTE The Min CPU and Max CPU values are merely requests; they are not hard limits. The requests in the following example are for 100 and 400 CPU shares, meaning one core and four cores.
8. On this screen, you can enter a Condition String, which indicates a condition that must be met for the SLO to be active. For this example, the SLO should be active Monday through Friday, so enter the corresponding string, and click Next. (For string syntax, see the online help for the screen.) 9. On this screen, you can add more SLOs for the workload or edit the existing SLO. Use only the one SLO you just defined. Select the Commit Current Workload Group option, and click Next.
You have set up a CPU usage goal for a single workload. You can now continue to add workload groups (using a usage goal again or trying other types of allocations), edit the workload group you just defined, or continue with the WLM configuration. For brevity, select Proceed to Next Step, and click Next. 10. Assign users to the workloads if desired. User assignments ensure all the processes of a given user start in the specified workload.
11. This screen enables you to set global tunables. Click Next to accept the defaults and continue. The second tunable, about transient_groups, is available because of the condition string you entered in step 8.
12. The following screen appears only if the system has HP-UX virtual partitions or nPartitions installed. If you plan on managing virtual partitions or nPartitions, see the “Automatically resizing virtual partitions” section on page 41 or the “Automatically resizing nPartitions using HP Instant Capacity software” section on page 41 for information on a white paper that addresses partition management in more detail. Otherwise, click Next to continue. 13.
14. Click Finish to close the wizard. 15. Activate the new configuration file, instructing WLM to take control of resource management, using the following wlmd command: # wlmd –a /tmp/time-based_allocation.wlm Automatically resizing pSets With multiprocessor systems running HP-UX 11i v1 (B.11.11) or later, you can group processors together to form pSets. By creating pSets, you isolate CPU resources for users or applications. WLM enables you to define workload groups based on pSets.
2. Read the introduction screen and click OK. 3. Name the workload group and click Next. In the following screen, the group is named “Grp4.
4. Assign a workload to the workload group you defined in step 3. a. Specify the Executable Path for an application that you want in the workload group, and click Add. b. Repeat step a to add more applications to the workload group. c. Click Next to continue. 5. Enter data about the SLO for the workload. Specify an SLO Name and assign an SLO Priority by moving the slider or entering a value (between 1 and 100) in the text field.
6. Select Non-Metric Based and CPU Usage for the CPU allocation policy, and click Next. WLM automatically adjusts the CPU allocation for a workload when you have a usage-based allocation. You can request that the WLM adjustments fall within a minimum allocation and maximum allocation.
7. Use the slider or input fields to set these bounds. Click Next. NOTE The Min CPU and Max CPU values are merely requests; they are not hard limits. The requests below are for 200 and 800 CPU shares, meaning two cores and eight cores.
8. On this screen, you can enter a Condition String, which indicates a condition that must be met for the SLO to be active. In this example, the SLO should be active all the time, so leave the Condition String field blank, and click Next. 9. On this screen, you can add more SLOs for the workload or edit the existing SLO. For this example, use only the one SLO you just defined. Select the Commit Current Workload Group option, and click Next.
You have set up a CPU usage goal for a single workload. You can now continue to add workload groups (using a usage goal again or trying other types of allocations), edit the workload group you just defined, or continue with the WLM configuration. For brevity, select Proceed to Next Step, and click Next. 10. Assign users to the workloads if desired. User assignments ensure all the processes of a given user start in the specified workload.
11. On this screen, you can set global tunables. Click Next to accept the defaults and continue. 12. The following screen appears only if the system has HP-UX virtual partitions or nPartitions installed.
13. Specify the full path and file name, indicating where to save the configuration, and click Next. In this example, the configuration will be saved as /tmp/pset-based_allocation.wlm. 14. Click Finish to close the wizard. 15. Activate the new configuration file, instructing WLM to take control of resource management, using the following wlmd command: # wlmd –a /tmp/pset-based_allocation.
Automatically resizing virtual partitions HP-UX virtual partitions, which are implemented in software, provide complete software isolation. Each virtual partition runs its own instance of the HP-UX operating system. If you require such isolation but want to optimize use of resources, you can use WLM to migrate cores among virtual partitions based on the needs of the applications in those virtual partitions. WLM provides example configurations to simplify migration of cores.
2. Read the introduction screen and click OK. 3. Name the workload group and click Next. In the following screen, the group is named “SalesGrp.
4. Specify values for the $ORACLE_HOME and $ORACLE_SID environment variables in the Oracle Home and Oracle SID fields, respectively, and then click Next. 5. The following screen shows that the wizard has ensured that all the Oracle processes running under a name that matches the pattern ora*Sales will run in the SalesGrp workload you defined in step 3. Click Next to continue.
6. Enter data about the SLO for the workload. Specify an SLO Name, and assign an SLO Priority by moving the slider or entering a value (between 1 and 100) in the text field. Each SLO needs a priority so that WLM can choose which SLOs get CPU resources when there are not enough for all the workloads. The highest priority is 1; the lowest is 100. Click Next to continue. 7. Select the Non-Metric Based and Fixed Allocation options to choose a CPU allocation that is fixed. Click Next to continue.
8. Specify the fixed amount of CPU resources the workload will receive by using the slider or entering the amount in the text field. In this example, the workload gets 300 CPU shares or three cores. Click Next to continue. 9. On this screen, you can enter a Condition String, which indicates a condition that must be met for the SLO to be active. For this example, the SLO should be active all the time, so leave the Condition String field blank and click Next.
10. On this screen, you can add more SLOs for the workload or edit the existing SLO. In this example, use only the one SLO you just defined. Select the Commit Current Workload Group option, and click Next. You have fixed the CPU allocation for a single database instance’s workload group. You can now add workload groups for other database instances, edit the workload group you just defined, or continue with the WLM configuration. For brevity, select Proceed to Next Step, and click Next.
11. Assign users to the workloads if desired. User assignments ensure all the processes of a given user start in the specified workload. For this example, you are not concerned with user assignments, so omit these assignments by clicking Next. 12. This screen enables you to set global tunables. Click Next to accept the defaults and continue.
13. The following screen appears only if the system has HP-UX virtual partitions or nPartitions installed. If you plan on managing virtual partitions or nPartitions, see the “Automatically resizing virtual partitions” section on page 41 or the “Automatically resizing nPartitions using HP Instant Capacity software” section on page 41 for information on a white paper that addresses partition management in more detail. Otherwise, click Next to continue. 14.
15. Click Finish to close the wizard. 16. Activate the new configuration file, instructing WLM to take control of resource management, using the following wlmd command: # wlmd –a /tmp/isolate_oracle_instances.wlm Example HP-UX Workload Manager configurations If you would like to try other configurations, WLM offers many example configuration files. Each file includes comments explaining the components used.
• par_manual_allocation.wlm, par_manual_allocation.wlmpar—These configuration files demonstrate how WLM can resize HP-UX Virtual Partitions (vPars) and nPartitions (nPars). In this configuration, you manually request the number of cores for a partition by using the wlmsend command to feed the request to WLM. Configure WLM in each partition on the system using the .wlm file. Configure the WLM global arbiter in one partition using the .wlmpar file. • par_usage_goal.wlm, par_usage_goal.
prmrun: Starting a process in a workload group You can explicitly start a process in a particular workload group using the prmrun command. For a particular user, the groups the user can access are identified in the WLM configuration file’s prm structure. The first group named after the user is the default group for processes the user starts; however, if any additional groups are named, the user can also run processes in those groups.
Monitoring HP-UX Workload Manager For monitoring WLM, there are several methods, some of which are described in the following sections. ps [-P] [-R workload_group] The ps command has options that are specific to HP Process Resource Manager (PRM), which WLM uses to define workload groups: • -P Adds the column PRMID, showing the workload group for each process.
HP Glanceplus If you have the optional HP Glanceplus product installed, you can also use it to see data on WLM workload groups. However, in Glanceplus, the workload groups are known as “PRM groups.
For more information For more information on HP-UX Workload Manager: • Browse the online help available in the WLM configuration wizard • See the wlm(5) manpage, which provides an overview of WLM and pointers to all the other WLM manpages • See the HP-UX Workload Manager User’s Guide, available on systems with WLM installed at /opt/wlm/share/doc/WLMug.pdf and on the Web at http://www.docs.hp.com/hpux/netsys/ • Contact any of the HP worldwide sales offices or visit the HP website at: http://www.hp.