
Internet Express for Tru64 UNIX Version 6.10 Administration Guide (5900-1418, March 2011)
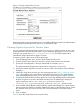

Click on one or more names from the User Account list and click on Display Selected.•
• Click on Display All to select all the names in the User Account list box.
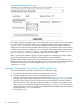
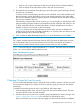
4. The Delete User Accounts form shows the login name, UID, primary group and login directory
for each user you selected.
To remove a user's home directory when the account is deleted, click on the checkbox in the
Remove Directory column. (By default, a user's home directory remains on the system after
the account is deleted.) All files assigned to that user are deleted and the disk space used by
that account is freed for other use.
When deleting a large number of user accounts, you can go directly to a specific page in the
listing by entering the page number in the text field at the top of the form and clicking on Go
To Page. Note that when you click the Delete button, all of the selected user accounts are
deleted, not just the user accounts on the current page.
Newsgroup postings and messages that the user sent to other users are not deleted. This
applies to user accounts that you delete individually or as a group (when you select accounts
to delete based groups to which they belong).
5. Click on Delete to delete the displayed accounts. To cancel the deletion, click on Reset.
Note:
On a system using the Network Information Services (NIS), the names of UNIX system accounts
are not displayed in the User Account Names list box, but will be included (if any match the
selection criteria) with the Internet Express captive accounts when you click on Submit.
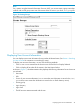
Figure 12 shows the result of a request to delete the val1 account. The home and mail directories
for the val1 account will be deleted with the account.
Figure 12 Deleting User Accounts
Changing Groups for User Accounts
You can use the Administration utility to change the list of secondary groups to which one or more
user accounts are assigned. (To change an account's primary group, you must use Tru64 UNIX
commands.)
To modify the secondary groups to which a user belongs, follow these steps:
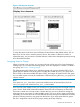
1. From the Manage Users menu, choose Change User Account Secondary Groups. The User
Account Selection Criteria form then displays.
2. Search for the user accounts whose secondary group assignments you want to change. (See
Section : Searching for User Accounts for instructions on searching for users.)
After you select the user accounts and press Apply, the User Accounts Selection List displays.
Changing Groups for User Accounts 49