
Migrating vPar Systems to Integrity VM


9 of 13
Individual Virtual Machine Configuration
With the VM Host set up and virtual networking ready, the virtual machines are now ready to be
created, configured, and booted.
Virtual Machine Creation and Configuration
For each virtual machine (i.e., each virtual partition being converted to a virtual machine), proceed as
follows:
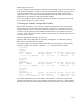
1. Define the virtual machine name, CPU, and memory configuration
# hpvmcreate –P <vm name> -c <cpu count> -r <memory size>
For our example virtual partition vpolyd02, this is accomplished by
# hpvmcreate –P vpolyd02 –c 1 –r 1024M
2. Using the virtual switch that corresponds to the LAN originally used by the virtual partition, define
the virtual machine’s networking configuration
# hpvmmodify –P <vm name> -a network:lan::vswitch:<vswitch name>
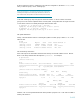
Continuing with our example, the virtual partition used the LAN that now corresponds to lan1 on the
VM Host. As illustrated above in the section “Virtual Switch Configuration” above, the virtual switch
defined with lan1 is vsw1. So, the command needed to define the appropriate networking for our
example VM is
# hpvmmodify -P vpolyd02 -a network:lan::vswitch:vsw1
MAC Addresses for Virtual NIC Differ from those of Physical NIC
When creating a virtual network device, note that it will have a (virtual)
MAC address associated with it. In the example here, that MAC address is
automatically created by Integrity VM. This new, virtual MAC address will
be presented by that VM during network communication. It must be
different than the MAC address of the physical NIC originally used by the
system (i.e., the vPar) - in fact Integrity VM enforces this difference.
As a result, any product or tool that associates the original system to a
MAC address must be reconfigured for correct behavior. One important
example is Ignite-UX. If the original system used an Ignite-UX server for
network installation, then that system’s entry in the Ignite-UX server’s
/etc/bootptab file must be changed to contain the MAC address
associated with its virtual NIC. Refer to the HP white paper Using Ignite-UX
with Integrity Virtual Machines for more details.
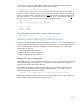
3. For each physical volume identified to be used by this virtual machine (as outlined in the earlier
section “Collect and Save Mass Storage Configuration”), identify the device filename associated with
the original system’s HW path and add that device to the VM’s configuration
# hpvmmodify –P <vm name> -a disk:scsi::disk:<device filename>