
ColorSpan Legacy ColorMark Pro Print Server and RIPStation - Tips and Tricks


3
Executive Summary
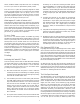
Getting Around System Control
The interface is divided into five sections: Ports, Process, Output,
and Printers. Each section delineates part of the spooling - ripping
- printing process.
Ports - where data enters the system from the network.
Input - where incoming print data is spooled for processing
Process - where print data is processed for printing
Output - where processed data is stored/queued for printing
Printers - where print data is actually printed
A detailed discussion of the Sytem Control user interface begins
on page 3.
Color and Color Matching
• You should limit the number of color corrections you apply to an
image, and avoid making color mode changes.
• A calibrated color monitor will significantly help you anticipate
the colors of final printed output.
• Photographic images should be in the RGB color space, while
spot colors are best selected using CMYK process values.
•TRUMATCH is a better spot color selection guide for process printing
than Pantone.
A discussion of Color and Color Matching begins on page 6.
Printing
• Files can be designed to minimize RIP time on the print server.
• Attaching external SCSI storage devices can speed RIP times.
• Use of ColorSpan Downloader can save time and processing on
both your workstation and the ColorMark Print Server.
A discussion of printing tips begins on page 7.
Tips and Tricks
• MediaSaver allows you to interactively organize or nest multiple,
smaller documents onto a larger sheet, saving media.
• Pausing queues and printers allows you to stop certain processes
of the print server without shutting down the whole system.
• Diagnostics allow you to test your system for errors.
The Tips and Tricks discussion begins on page 8.
This Tips and Tricks document is not a replacement for your Print
Server User Guide. You should also refer to the Tips and Tricks
document(s) that accompanies your ColorSpan printer(s). Those
documents will provide details on optimizing files for output on
those printers as well as the operation of the printers themselves.
All Tips and Tricks documents are available for ColorSpan’s web
site and OTIS, ColorSpan’s automated faxback service. See
Appendix A for information on accessing these services.
Getting Around System Control
“Mousing Around”
The mouse on your ColorMark Print Server includes two buttons.
Each of these buttons serves different purposes within the user
interface. Below are the mouse button conventions:
Left button: This button ‘opens’ queue, rip, and printer icons to
see what document(s) reside in that location. One, quick click will
open a window showing the contents of that particular icon. The
left mouse button is also used to bring down the menus at the top
of the System Control Window (System, Preferences, and Help),
and to pull down the menus that correspond to the individual queue
icons. Be aware, however, that there will be a slight pause before
the system will display the menu for that icon. In addition, the left
mouse button is used to select documents in windows, data entry
fields, etc., as well as drag documents from one location to another.
Right button: This mouse button is used to bring down the queue
menus instantaneously. There will be no pause before the system
displays the menu as there is when the left button is used to bring
down these queue icon menus.
Keyboard Shortcuts
Below is a list of some useful keyboard shortcuts when navigating
the user interface on your ColorMark Print Server:
Key Function
Control-/ Select all (documents in a window)
Mouse Actions
Shift-click Add multiple, non-continuous documents to a
selection
Alt-drag Add multiple, continuous documents to a selection
Control-drag When moving documents to different queues, makes
a copy in the destination location
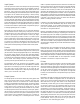
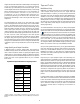
Document Details Window
Double clicking on any document in any queue will bring up the
Document Details window which lists information about the file.
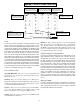
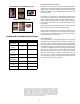
System Control Roadmap
Below and on the next page are diagrams of the System Control
(SysCon) User Interface, with a brief description of each section:
Close the
Window
Resume Pause
(effects selected
jobs only)
Delete selected
document(s)
Display
Document
Information
View/change
Document
Routing
Display
On-Screen
Preview
MediaSaver
™
Move Document
to top or bottom of
queue
Within Queue Windows
Note: All icons/operations not available in all queues