
ColorSpan Legacy ColorMark Pro Print Server and RIPStation - Tips and Tricks


5
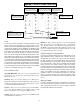
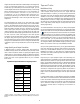
Input Queues
The Input queues are used to store and prioritze print jobs waiting
for the RIP process. The Input portion of the interface consists of
three queues, with fourth and fifth, special queues (Direct and
Attention). Jobs in the Priority queue will be processed by the
RIP first, followed by jobs in the Standard queue. The Direct queue
only appears on the interface during routing or direct printing,
and allows direct communication with the RIP without spooling
the print data to the server’s disk. The Direct queue takes priority
over all of the other input queues. Jobs in the Hold queue, however,
will remain there until you move the job to the Standard or Priority
queue. The Attention queue will only appear when there is a problem
with the configuration of the spooled data. When you view the
document in the Attention queue window, the system will give you
a message regarding the error condition.
While jobs are in the Input queues, you can check and change the
job characteristics and/or routing of any of the jobs. You can also
change the priority of a job by moving it to the top (or bottom) of
a queue, or by moving it to another queue. To move a job, drag it
to the icon of the queue you wish to move it to. To move a job to
the top or bottom of a queue, select the job and click on the up or
down arrow at the top of the window, respectively. A single click
on a queue’s icon will open a window with a list of the jobs in that
queue. See your print server user guide for more information on
these queues and manipulating documents within these queues.
Process
The Process column of the SysCon Interface contains the RIP and
the Tracking Log. The RIP (Raster Image Process) converts print
jobs from their PostScript-language description to a raster (bitmap)
for the print engine. The RIP icon will turn green and display a
completion percentage when it is active. Due to the complex nature
of PostScript, the percentage numbers may pause occassionally—
this is normal. The Tracking Log stores information of all jobs
spooled, processed, printed, deleted, etc. by the system.
The information within the Tracking Log is exportable to a tab-
delimited text file for importation into spreadsheet or database
applications. The Tracking Log tracks ink/media usage, RIP time,
print time, user, printer, media type, etc. for each job. For
information on RIP configuration, or exporting Tracking Log data,
refer to your Print Server User Guide.
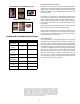
Output Queues
The Output queues consist of the same three primary queues that
make up the Input queues—Priority, Standard, and Hold. The
Output queue section of the interface also contains RipSaver
Temporary and RipSaver Permanent queues. An Attention queue
also appears when a job is incorrectly configured for a particular
output device (most commonly the media type in the job
configuration not matching the media installed on the printer).
The Output queues function the same way as the Input queues—
jobs are stored, in their RIP’ed form in this case, and prioritized
for the printer(s) attached to the system. Additionally, files in the
Output queues can be previewed on-screen prior to printing to
catch errors in file setup prior to commiting the file to ink and
media. To preview a RipSaver document, select the document, and
hit the monitor button at the top of the queue’s document window.
The system will then display an on-screen representation of the
RIP’ed file. The first time you select the on-screen preview for a
document, the system will have to create it for you—this can take a
few minutes for large RipSaver documents. Once the preview has
been created for a particular file, the system will display the preview
immediately without delay. Previews can be automatically created
in the RIP if you desire. See your Print Server User Guide for
details on creating previews in the RIP.
In addition to on-screen previews, documents in the Output queues
can be configured with MediaSaver/N-up which allows you to
interactively organize, or nest, multiple documents into a single
print job. See MediaSaver/N-up, this document, for more
information on using these features.
RipSaver. The RipSaver Temporary and RipSaver Permanent queues
store the RIP’ed files for printing (or re-printing) at a later time. As
the names imply, files in the Temporary queue will be stored until
the system needs drive space to process incoming print jobs, while
jobs in the Permanent queue can only be deleted by the user. Files
deleted from the Temporary queue by the system will be deleted in
order from the oldest to the youngest files. RipSaver documents
can be printed by dragging the job to either the Standard or Priority
Output queue.
External Drives. Your ColorMark Print Server supports a variety
of external hard drives in addition to removable storage media.
Refer to your Print Server User Guide for a list of supported devices
and attaching these to your particular print server. External drives
are intended for permanent storage of RipSaver documents only,
and are displayed in the SysCon interface under the Output heading.
Hard drives or removable media can be transported to another
ColorMark Print Server for output from that server.
Printers
Your ColorMark Print Server supports a variety of possible output
devices, but is limited by the type of server you own. RipStation
servers are limited to a single type of output device, but may support
more than one of that type of printer. ColorMark Pro print servers,
on the other hand, can support multiple, different printers from
the single server. See Appendix C, Description of Supported
Printers, for more information on the printers that your print server
can support.
Regardless of the type of printer(s) you have attached to your print
server, there are several configurations that can be made at the
printer icon in the user interface. Most printers can be configured
with media and/or ink type, while others can be configured to
automatically cut after every job, and other configurations based
on the type of printer you are configuring. Refer to your Print
Server User Guide or Printer Manual for more information on the
configuration of your particular printer(s). Finally, the menu for
the color printer icons contains an item called ‘Calibrate...’ Selecting
this menu item allows you to color calibrate your printer with the
ColorMark Calibrator. Color calibration is an extremely important
step in getting consistent color from your printer/print server, and
should be performed often. Refer to your Print Server User Guide,
Printer Manual, and/or Tips and Tricks for your printer for
information on color calibrating your printer.