
ColorSpan Legacy ColorMark Pro Print Server and RIPStation - Tips and Tricks


8
foreground while the downloader is downloading in the background!
Use of the downloader application can increase productivity
dramatically. By downloading tiff and PhotoCD images, you can
save the significant amounts of time that Photoshop (or other image
editing program) would normally take on your workstation to
process the information and send it to the print server.
Consequently, use of the LMDownloader maximizes your
productivity by allowing you to send one file to the printer in the
background, while editing or even scanning the next image in the
foreground.
The CSDownloader also allows you to save media over printing
from certain applications such as Photoshop. The ‘Conserve Media’
button in the downloader’s window tells the print server to use a
paper size that is the same size as the final printed image, saving
media both before and after the job. In Photoshop, you typically
need to pick a paper size that is larger than your desired printed
image. Photoshop then centers the image within the paper size
you have selected, often wasting significant amounts of media. You
can also choose to rotate some images so that their printed
orientation will use the least amount of media off of the roll. While
few people enjoy learning new programs, the CSDownloader is
worth the effort in the amount of time and media that can be saved
through its use. Detailed instructions on using the CSDownloader
is available in your Printing Tools Manual, and on-line by selecting
‘Help’.
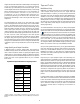
Image Quality and Output Resolution
A detailed primer on scanning, image quality, and resolution is
available in the Tips and Tricks document for your printer(s). Please
refer to that document for details on getting the highest quality
images from your output device(s). Below is a table that provides a
quick reference of the recommended image resolution for optimum
quality from each of the supported devices on your ColorMark
Print Server:
Optimum Output Resolution for Images by Device
Device
Resolution
(dpi)
DisplayMaker
Professional
75 to 150
DisplayMaker
Express
50 to 100
DisplayMaker
HiRes 8-Color
Series
150 to 200
DisplayMaker
Series XII
200 to 300
Giclée
PrintMakerFA
200 to 300
DesignWinder 150 to 200
Halon/Color
Copier
150 to 200
PressMate *
*output resolution on PressMate is dependent on desired line screen,
halftoning method, and other variables. See PressMate Tips and Tricks for
details.
Tips and Tricks
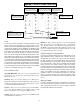
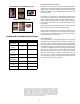
MediaSaver/N-Up
MediaSaver is a feature that allows you to interactively organize or
“nest” multiple, smaller print jobs onto one, larger sheet (see
illustration below). For instance, you could print up to 16 letter size
documents onto one E/AO-size (36 x 48 inch) sheet. MediaSaver is
available on most of the ColorSpan printers (see table, next page).
N-up, on the other hand, is designed to print multiple copies of the
same RipSaver document on a single, larger sheet. MediaSaver can
also allow you to print multiple copies of a single, smaller document
onto a larger sheet (as with N-up) for those printers that do not
directly support N-up.
To activate MediaSaver, route the jobs you want printed together
into one of the RIPSaver queues (temporary or one of the permanent
queues). Then shift-click on those jobs and hit the MediaSaver button
( ) at the top of the RipSaver document window. The ColorMark
print server will then try to organize all of the jobs together onto
one sheet (if possible). Jobs that cannot fit on the page will be placed
onto the desktop work area. If you do not like the placement of the
jobs on the sheet, you may interactively move them around by
clicking on a document and dragging it to the desired location. You
can change the default space between images by selecting “Gutter
Width” from the menu at the top of the MediaSaver window.
Once you have organized the printout, you may give the MediaSaver
job a name, and save it by selecting ‘Save and Exit’ from the menu
at the top of the MediaSaver window. Once you have saved the
MediaSaver document, you may delete the individual RipSaver
documents if you desire, however you will not be able to reprint the
documents individually.
N-up allows you to print multiple copies of the same image on a
single, larger sheet. To activate N-up, open the document information
window, enter the number of copies you desire, and hit the ‘N-up’
button. You will then be allowed to enter your desired space between
images (default is 1 inch/2.54 cm). Finally, click ‘OK’ until you have
exited the document information window. The thumbnail icon will
show three small white boxes over the image indicating that the
document is configured for N-up printing. When this document is
printed, the system will automatically fit as many copies across the
page as it can, and repeat the N-up print until all copies have been
printed.
Printing multiple copies of a single RipSaver document with Media
Saver works in the same manner as other MediaSaver documents.
In this case, however, select the single document you want printed,
hit the media saver button and proceed as in the above example. Be
sure to select the number of copies you desire in the document
information window before configuring the document for
MediaSaver.