
ColorSpan Legacy Print Server - Release Notes


- 7 -
ColorSpan Print Server Software 8.9x Release Notes
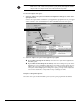
Click the checkbox marked Write, so that a checkmark appears in the box.
Do not change any other settings from their default values.
9. Click the OK button.
10. Close the Internet Services Manager.
11. Close the Administrative Tools window.
Copy Files to the Server
1. Open a web browser or FTP client application on any client computer that is con-
nected to the same network as the ColorMark Pro print server.
2. Enter the following FTP address:
ftp://ip_address/images
where ip_address is the IP address of the ColorMark Pro print server. For example, if the
IP address of the server is 10.10.10.45, the FTP address is:
ftp://10.10.10.45/images
To determine the server’s IP address, see “IP Configuration” below.
3. Copy the file(s) to the ColorMark Pro server.
The method for copying files varies depending on the FTP client application. Refer to
the application’s online help or user manual for instructions.
Print Files Using DiskDirect
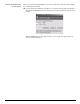
1. In the server’s System Control interface, click the DiskDirect icon (under Ports).
A dialog box appears with various source locations for DiskDirect files.
2. Click the Select Directory button.
A directory tree selection dialog box appears.
3. Browse to the directory “y:/images.”
4. Select the file type (such as EPS, TIFF).
5. Select the file you want to print.
6. Click the OK button.
The file is enqueued by the server.
IP Configuration To determine the server’s IP address:
1. From the Windows Start menu, select Run...
The Run dialog box appears.
2. Type CMD and press the Enter key.
The Windows command line window appears.
3. Type IPCONFIG and press the Enter key.
Windows displays the print server’s IP address information.
◆ To dismiss the Windows command line window, type EXIT and press the Enter key.