
HP RIP Software - HP RIP Software User Guide


How to Add a Printer to Windows XP 5-5
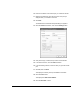
14. Enter a printer name and click Next.
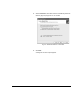
The Printer Sharing dialog box appears.
15. Select Do not share this printer.
16. Click Next.
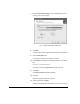
The Print Test Page dialog box appears.
17. Select No and click Next.
A dialog box appears with a summary of the installation.
18. Click the Finish button.
The following message may appear:
The software you are installing for this hardware
(Printer) has not passed Windows Logo testing to verify
its compatibility with Windows XP.
19. Click the Continue Anyway button.
Next, Windows copies the necessary files. The Printers window
reappears.
20. From the Printers window, right click the icon for the printer you
just created, and select Properties from the icon menu.
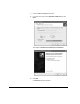
The Printer Properties dialog box appears.
21. Click the Ports tab.
22. Click the Add Port... button.
A Printer Ports dialog box appears that lists the available port
types.
23. Select Local Port, and click the New Port... button.
A dialog box appears, requesting a port name.
24. Enter the network path to the printer (for example:
“\\CSRIP\Kodiak”).
Replace “CSRIP” in this example with the server name, and “Win-
link” with the port name to the WinLink port.
25. Click OK, then click the Close button.
The Properties dialog box appears, with the Ports tab updated with
the port you just created.