HP XP P9000 Performance Advisor Software Installation Guide Abstract This document describes how to install and configure the HP XP P9000 Performance Advisor Software. This document is intended for users and HP service providers who have knowledge of the HP XP P9000 Performance Advisor and P9000 disk arrays hardware, software, and storage systems. For the latest release information on this product, see the HP XP P9000 Performance Advisor Software Release Notes.
© Copyright 2014 Hewlett-Packard Development Company, L.P. Confidential computer software. Valid license from HP required for possession, use or copying. Consistent with FAR 12.211 and 12.212, Commercial Computer Software, Computer Software Documentation, and Technical Data for Commercial Items are licensed to the U.S. Government under vendor's standard commercial license. The information contained herein is subject to change without notice.
Contents 1 Overview of HP XP P9000 Performance Advisor.............................................6 HP XP P9000 Performance Advisor resources...............................................................................6 Installation work flow................................................................................................................7 Upgrade work flow...................................................................................................................
Confirming the HP XP P9000 Performance Advisor services.....................................................64 Verifying installed JRE version..............................................................................................64 Configuring HP XP P9000 Performance Advisor related settings...............................................65 Launching HP XP P9000 Performance Advisor.......................................................................
Removing the HP XP P9000 Performance Advisor management station........................................111 Post removal instructions........................................................................................................112 12 Installing Oracle patches and security updates..........................................113 13 Support and other resources...................................................................116 Contacting HP..............................................................
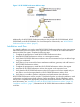
1 Overview of HP XP P9000 Performance Advisor The HP XP P9000 Performance Advisor Software (HP XP P9000 Performance Advisor) is a web-based application that collects, monitors, and displays the performance of your XP, and P9000 disk arrays.
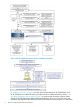
Figure 1 HP XP P9000 Performance Advisor setup Additionally, the HP XP P9000 Performance Advisor also provides HP XP P9000Watch, HP XP P9000Sketch, and HP XP P9000Info. For a brief description of these tools, see “HP XP P9000 Performance Advisor utilities” (page 9). Installation work flow In a typical installation, you need to install HP XP P9000 Performance Advisor on the management station followed by the host agents on the respective hosts.
Figure 2 HP XP P9000 Performance Advisor installation work flow In “Installation work flow” (page 7), the CLUI, HP XP P9000Watch, HP XP P9000Sketch, and HP XP P9000Info are additional utilities provided with HP XP P9000 Performance Advisor. “HP XP P9000 Performance Advisor utilities” (page 9) provides a brief description of these utilities.
on the installation and use of the CLUI, HP XP P9000Watch, and HP XP P9000Sketch, see the respective documentation. For document download location, see “Related information” (page 116). IMPORTANT: The CLUI, HP XP P9000Watch, HP XP P9000Sketch, and HP XP P9000Info are available in the Tools folder on the HP XP P9000 Performance Advisor installation disk 2.
5. 6. 7. 8. 9. before the upgrade was initiated, generate and add new licenses in HP XP P9000 Performance Advisor to continue monitoring those disk arrays. Verify the HP XP P9000 Performance Advisor functionality for historic data by plotting charts, and see if you are able to view the previous set of collections. Complete the prerequisites to upgrade the HP XP P9000 Performance Advisor host agents. Upgrade the HP XP P9000 Performance Advisor host agents on the respective hosts.
2 Understanding the HP XP P9000 Performance Advisor installation prerequisites This chapter describes the prerequisites to install the HP XP P9000 Performance Advisor software and the host agents, and explains the installation checklist. For more information, see “HP XP P9000 Performance Advisor and host agents installation checklist” (page 19). To upgrade an existing version of HP XP P9000 Performance Advisor, see “HP XP P9000 Performance Advisor and host agents upgrade checklist” (page 101).
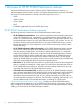
• Post Upgrade, after upgrading HP XP P9000 Performance Advisor • Post Uninstallation, after uninstalling HP XP P9000 Performance Advisor Pre installation scenario If HP XP P9000 Installation Assistant detects that HP XP P9000 Performance Advisor is not installed on the system, then the Pre-Install tab is enabled, and the following tests are performed: Figure 4 HP XP P9000 Installation Assistant — Pre-Install tab 12 • Target Operating System check: Verifies whether the target operating system is comp
• Default tomcat ports check: Verifies whether Port 80 (HTTP) and 443 (HTTPS) are free, else displays a warning message. • Incompatible software check: Verifies whether IIS Admin service is up and running. If the service is up and running, the tool displays an error message. Displays a warning message if the IIS service is installed but not started. Post installation scenario If HP XP P9000 Installation Assistant detects that HP XP P9000 PA v6.
• Hard disk space check: Verifies whether 64 GB free space is available in the PADB location and also verifies whether 8 GB free space is available in the Performance Advisor install location, else displays a warning message. • Physical memory check: Verifies whether 1 GB of physical memory is available on the system, else displays a warning message. • PA database check: Verifies the connection to Oracle database. If connection is not possible, the tool displays an error message.
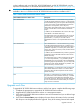
Figure 6 HP XP P9000 Installation Assistant — Pre-Upgrade tab • PA version check: Verifies whether the version of Performance Advisor is suitable to upgrade to PA v6.0 , that is, if the installed version is older than two versions, the tool displays an error message. • Installed PA Services Status check: Verifies whether the following Performance Advisor services are installed and are running, else displays an error message.
• PA database check: Verifies the connection to Oracle database. If connection is not possible, the tool displays an error message. During this check, the tool uses the PADB_HOME variable to connect to Oracle database to ensure that the value of the variable is correct. If the Oracle database is not initialized, the tool recommends to run oracledb helper tool. • Database version check: Connects to Oracle database and verifies whether the Oracle database version is suitable for upgrade.
◦ HP XP P9000 Performance Advisor Security ◦ HP XP P9000 Performance Advisor Tomcat • PA environment variables check: Verifies whether PADB_HOME and HPSS_HOME environment variables are created and do not contain trailing slash, else displays an error message. • Hard disk space check: Verifies whether 64 GB free space is available in the PADB location, else displays a warning message.
Figure 8 HP XP P9000 Installation Assistant — Post-Uninstall tab • PA Services Status check: Verifies whether the following Performance Advisor services are uninstalled, else displays an error message.
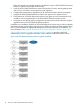
The 1. 2. 3. installation checklist contains prerequisites and tasks that you must address before: Installing the HP XP P9000 Performance Advisor on a management station. Installing the HP XP P9000 Performance Advisor host agents on the respective hosts. Logging into HP XP P9000 Performance Advisor and initiating configuration and performance data collections. NOTE: • The installation checklist is available starting with HP XP P9000 Performance Advisor v4.6.
Table 2 HP XP P9000 Performance Advisor and host agents installation checklist (continued) Determine the coexistence for HP XP P9000 Performance Advisor with other storage products. For more information, see “Determining the coexistence with other storage products” (page 26). HP XP P9000 Performance Advisor management station prerequisites Verify whether existing applications on the management station support other Oracle database instances to be installed.
Table 2 HP XP P9000 Performance Advisor and host agents installation checklist (continued) IMPORTANT: If you are currently using the RAID Manager (Business Copy and Continuous Access Synchronous), you already have command devices that can be used by an HP XP P9000 Performance Advisor host agent. Map the command devices to the guest operating platforms, if these operating platforms are residing on the virtual servers. For more information, see “Mapping command devices” (page 41).
Table 2 HP XP P9000 Performance Advisor and host agents installation checklist (continued) After installing the HP XP P9000 Performance Advisor host agents Verify if the HP XP P9000 Performance Advisor Windows host agent services have started. For more information, see “Confirming the HP XP P9000 Performance Advisor Windows host agent services” (page 77). Verify if the HP XP P9000 Performance Advisor UNIX host agent services have started.
2. Determine how frequently you want to access data from the XP and the P9000 disk arrays. IMPORTANT: The rate of data collection can affect the loads seen by the XP and the P9000 disk arrays, and the management station. HP XP P9000 Performance Advisor provides the following types of data collection: • Configuration data collection: The frequency of configuration data collection depends on how often you change the configuration of an XP or a P9000 disk array.
For collecting DKC and the port data, you must set the data collection frequency to 10 minutes. • To estimate management station's disk volume space required for the HP XP P9000 Performance Advisor database: ◦ HP recommends that there be at least a week's historic data available when you are forecasting using charts or alarms. ◦ Determining disk space requirements: Use the following formula to determine the disk space requirements for HP XP P9000 Performance Advisor on a daily basis.
Example 1 Determining the disk space requirements for HP XP P9000 Performance Advisor Consider that the HP XP P9000 and the XP disk arrays, P9500 and XP24000 are monitored by the HP XP P9000 Performance Advisor management station.
collection occurs for all the XP and the P9000 disk arrays not every 15 minutes of the hour, but at varied points of time in the day.
• HP XP P9000 Performance Advisor + HP Systems Insight Manager Server • HP XP P9000 Performance Advisor + HP Storage Essentials • HP XP P9000 Performance Advisor Host Agent + Command View AE • HP XP P9000 Performance Advisor cannot coexist with applications that do not allow different application-specific Oracle database instances to coexist. For example, HP Storage Essentials does not allow another Oracle database instance to coexist with its specific instance.
• For information on the recommended free space, see Table 5 (page 49). NOTE: For additional database operations, HP recommends that 50 GB of free space be available on the drive where the HP XP P9000 Performance Advisor database (PADB) will be installed.
taskId=101&prodClassId=-1&contentType=SupportManual&docIndexId=64180& prodTypeId=18964&prodSeriesId=64823. Getting the fully qualified domain name or IP address of your management station The fully qualified domain name consists of ([servername].[domain name]). To get the fully qualified domain name or the IP address of your management station: 1. Open the command prompt window on your management station. 2. Type ipconfig /all at the prompt.
communicate with an LDAP, or RADIUS server, the HP XP P9000 Performance Advisor Native Authentication is implemented. There are no prerequisites associated with the HP XP P9000 Performance Advisor Native Authentication type. Windows System Authentication The Windows System Authentication is required in the following case: 1. Your management station belongs to a Windows domain. 2.
IMPORTANT: • Note the LDAP Distinguished Names (DN)s for the StorageAdmins and StorageUsers groups. An LDAP group used with HP XP P9000 Performance Advisor must have the DNs of the group members available in an attribute of the group. • Note the UserBaseDN and GroupBaseDN required for HP XP P9000 Performance Advisor to allow authentication and authorization of users. ◦ UserBaseDN is the location in the LDAP tree that contains all the user entries.
Example 2 VSA added to User_1 profile in the HP XP P9000 PA administrators group: Vendor_ID=11 SubAttributeType=1 Attribute Value= XPPA: role=administrator (For HP XP P9000 Performance Advisor administrators: XPPA: role=administrator) Example 3 VSA added to User_2 profile in the HP XP P9000 PA users group: Vendor_ID=11 SubAttributeType=1 Attribute Value= XPPA: role=user (For HP XP P9000 Performance Advisor users: XPPA: role=user) For more information on implementing the above-mentioned types of authenticati
Description Microsoft Loopback Adapter Physical Address 02-00-4C-4F-4F-50 DHCP Enabled No IP Address 169.254.25.129 Subnet Mask 255.255.0.0 For more information on configuring Loopback Adapters, see “Installing a Loopback Adapter” (page 119). Static IP address To assign a static IP address, do the following: 1. Right-click My Network Places and select Properties. 2. In the Network Connections window, right-click the network that you are using and select Properties from the pop-up list. 3.
IMPORTANT: • If Adobe Flash Player v10.1.85.3 or later is installed on your management station, it blocks commonly reserved ports as a security measure to prevent unauthorized activities. If a port number is specified at the end of a URL, it is verified against the list of commonly reserved ports. If the port number matches any entry in the list, the network request will be rejected and a securityError event will be logged.
TCP 0.0.0.0:80 0.0.0.0:0 LISTENING 804 The last column of the output from the above command is the process identifier (PID), denoted by . In the example output, the PID is 804. To forcibly terminate the process which is using the port, execute the following command: TASKKILL /F /PID Following is an example for terminating the process that is using port 80: TASKKILL /F /PID Where, is replaced by the process identifier of the task currently using port 80.
HP XP P9000 Performance Advisor host agent prerequisites This section describes the following host agent prerequisites that you must complete before installing the HP XP P9000 Performance Advisor host agents: • “Verifying the supported configurations for HP XP P9000 Performance Advisor host agents” (page 36) • “Configuring settings on Windows and UNIX hosts” (page 37) • “Creating and assigning command devices to host agents” (page 38) • “Mapping command devices” (page 41) • “Verifying host agent co
URL: http://h20000.www2.hp.com/bizsupport/TechSupport/DocumentIndex.jsp?lang=en&cc=us& taskId=101&prodClassId=-1&contentType=SupportManual&docIndexId=64180& prodTypeId=18964&prodSeriesId=64823. If you plan to install a UNIX host agent, ensure that you install the supported JRE version on your UNIX host before you being the host agent installation. Also, the Path environment variable on your host must point to the installed JRE location.
Setting up a Linux host Before installing the HP XP P9000 Performance Advisor host agent on a Linux host, ensure that the following prerequisites are completed: 1. You must have a root or superuser access to the host. 2. Configure the root or superuser account to allow remote access via the FTP services by completing the following steps: a. Run the /usr/sbin/ntsysv command and enable wu-ftpd b. Edit /etc/pam.d/ftp by commenting out the line with #: auth required /lib/security/pam_listfile.
Manager, you must launch the Command View AE Device Manager and then the Remote Web Console. • “Creating a command device for the XP24000/XP20000/XP12000/XP10000 Disk Array” (page 39). • “Creating a command device for the XP1024/XP128 Disk Array” (page 39). • “Creating a command device for a P9000 disk array” (page 40). NOTE: • For the XP24000/XP20000/XP12000/XP10000 Disk Array, configure the command devices as SLPR0 to report the full SLPR data.
1. 2. 3. 4. Click Physical View to open the LDEV Information window. Click VIEW for the desired frame on the ARRAY GROUPS view. Select the desired parity group in the Frame Information window, and then select the desired array group on the next Frame Information window. From the LDEV list, select the LDEV that you want to convert into a command device. The details of the selected LDEV are displayed in the LDEV Information display area.
1. 2. 3. Log on to Remote Web Console with administrator privileges. In the HP XP P9000 Remote Web Console Explorer pane, under Storage Systems node, click the P9000 disk array node for which you want to create a command device. In the list that appears, select Logical Devices. The list of LDEVs for the selected P9000 disk array appear under the LDEVs tab in the Storage Systems work area. 4. 5. 6. 7. 8.
7. Select the HBA WWN record for the host group from the Available Hosts table. The HBA WWN is specific to the HBA port on the host where you assign the command device. 8. Click Add New Host. 9. Select the corresponding port record from the list displayed in the Available Ports table. 10. Click Add. The combination of the port and host group details appear in the Selected Host Groups table. 11. Click Next. 12. Select the LDEV record from the list in the Available LDEVs table.
1. 2. In the VMware Infrastructure Client screen, right-click the guest operating platform where you want to map the command devices. Select Edit Setting from the pop menu. The Virtual m/c Properties dialog box appears. 3. Select Hard Disk from the list and click Add. The Add Wizard appears, and guides you through the process of adding hard disks or command devices. 4. 5. 6. 7. Select Hard Disk as the device type and click Next>. Select Raw Device Mappings and click Next>.
Figure 10 Sample xpinfo -i output for UNIX host agent 44 Understanding the HP XP P9000 Performance Advisor installation prerequisites
3 Installing HP XP P9000 Performance Advisor This chapter describes the process of installing HP XP P9000 Performance Advisor on a management station.
3. The installation wizard verifies the following on your management station and takes the appropriate action: • If Microsoft .NET Framework v2.0 or later is installed. If Microsoft .NET Framework v2.0 or later is not installed, a message appears displaying that the required version is not available. Click OK on the message dialog box for the installation wizard to install Microsoft .NET Framework v3.5 (recommended version).
Read through the instructions displayed on the Welcome installation window. • To proceed with the installation, you must complete a set of installation prerequisites and tasks provided in a checklist that appears when you click Launch Checklist. For more information, see “Launching the HP XP P9000 Performance Advisor checklist” (page 47).
through the upgrade of HP XP P9000 Performance Advisor. For more information on the checklist, see “Upgrade checklist for HP XP P9000 Performance Advisor” (page 100). To upgrade to the latest version of HP XP P9000 Performance Advisor, the current version on your management station must be v5.4, v5.4.1, v5.5, or v5.5.1. After completing the necessary prerequisites and tasks, to continue with the HP XP P9000 Performance Advisor installation or upgrade: 1.
3. Click Next. The Next button is enabled only when you select the check box. The HP XP P9000 Performance Advisor installation wizard verifies the available free disk space on your management station. If not enough free disk space is available, the installation wizard prompts you to free up the disk space and retry the installation. Upon clicking OK, the installation wizard exits. • If enough free disk space is available and if it is an upgrade, the process begins.
Table 7 Maximum size configured for Oracle related files for upgrade from previous version (continued) PA Versions PA 5.4 PA 5.5 PA 6.0 Yes Yes Yes size should be set to 32 GB. For TEMP01.DBF, the maximum size should be set to 16 GB. Complying with the End User License Agreement To review the license agreement and proceed with the HP XP P9000 Performance Advisor installation: 1. Read the agreement displayed under the End User License Agreement (EULA). 2.
1. 2. Click Change, do one of the following: ◦ Browse to the folder in the Change Location window ◦ Enter the path to the folder in the Folder Name text box Click OK. The Install Database to displays the updated database location. TIP: For optimal performance, HP recommends that you place the HP XP P9000 Performance Advisor database on a disk volume other than where HP XP P9000 Performance Advisor is installed. Click Next to proceed. The IPv6 Configuration installation window appears.
RMI Server Port field, and click Next to proceed. For more information on the next set of steps, see “Implementing the authentication method” (page 52). Implementing the authentication method Based on the authentication method you want for HP XP P9000 performance Advisor users, select the respective option from the following list displayed on the Authentication Configuration installation window: • HP XP P9000 Performance Advisor Native Authentication.
Windows System Authentication In this authentication method, the HP XP P9000 Performance Advisor installer verifies for the following groups on your local system and creates them if they do not exist: • HP Storage Admin • HP Storage Users They are provided the same privileges that HP XP P9000 Performance Advisor Administrators and Users own.
1. Enter the required Server and Connection values. “LDAP server connection settings” (page 54) provides the description for each of the fields under the Server and Connection sections. Table 8 LDAP server connection settings Screen elements Description Server Address box and Port box Network name (or IP address) and Port # of the LDAP server to be used for authentication. The default port # is 636 for LDAP when SSL is enabled. The default port # is 389 for LDAP when SSL is not enabled.
Configuring the LDAP user search and filter, and group settings To configure the LDAP user search and filter settings, and group settings: Implementing the authentication method 55
1. Enter the required HP XP P9000 Performance Advisor User Search and Filter Settings and HP XP P9000 Performance Advisor Group Settings. “LDAP server User Search and Filter, and Group settings” (page 56) provides the description for the HP XP P9000 Performance Advisor User Search and Filter Settings and HP XP P9000 Performance Advisor Group Settings fields.
Table 9 LDAP server User Search and Filter, and Group settings (continued) Screen elements Description HP XP P9000 PA Users Group DN box Distinguished names of the HP XP P9000 Performance Advisor Users groups in the LDAP directory. Group Search Filter box The LDAP filter to be used when searching for group entries in the LDAP directory, during user authorization.
1. Enter the required server connection values. “RADIUS server connection settings” (page 58) provides the description for each of the RADIUS fields. NOTE: Among the following settings, only the server address and shared secret values must be provided. The remaining values are pre-populated and should not be modified. Figure 14 Configure RADIUS Authentication Settings installation window Table 10 RADIUS server connection settings 2.
Sample RADIUS settings The entries enclosed in the tag correspond to respective fields in the Radius Settings screen. • RADIUS server address: 15.154.71.
Select the installation method based on your requirement: • Select Complete and click Next to continue with the HP XP P9000 Performance Advisor installation. The Ready to Install window appears. For more information, see “Completing the HP XP P9000 Performance Advisor installation and next steps” (page 62). IMPORTANT: If there is not enough disk space available in , but is available in other disk volumes on your management station, the installation wizard displays an informational message.
TIP: For optimal performance, HP recommends that you install HP XP P9000 Performance Advisor on a disk volume other than where the Windows operating system is installed. Selecting HP XP P9000 Performance Advisor host agents To select the HP XP P9000 Performance Advisor host agents that you want to install: 1. Click the + sign or the down arrow beside the Host Agents menu to view the HP XP P9000 Performance Advisor host agents for the following operating platforms: 2.
3. Select the type of installation that you want. The following installation options are available: This feature will be installed on the local drive (disk volume). This feature and all the sub features, will be installed on the local drive. This feature will be installed on the first use (only if the feature supports this option). This feature will not be installed. This feature will be installed to run from the network (only if the feature supports this option).
• Creating database • Creating database listener The appropriate status log is displayed on the Ready to Install window while the installation is in progress. When prompted, insert the HP XP P9000 Performance Advisor installation disk 2 to continue with the installation. The database is created in the location that you specified on the Database Location Specification installation window. The Installation Complete window appears after the installation.
After accessing the HP XP P9000 Performance Advisor, do one of the following based on whether you have performed an installation or upgrade: • Return to the installation checklist to complete the remaining prerequisites and checklist items for installing the host agents. For more information, see “Installation checklist for HP XP P9000 Performance Advisor” (page 18). • Return to the upgrade checklist to complete the remaining prerequisites and checklist items for upgrading the host agents.
Configuring HP XP P9000 Performance Advisor related settings Configure the following settings as appropriate on your web client or management station after installing or upgrading HP XP P9000 Performance Advisor. It includes creating and adding users as administrators, or users for the different authentication types.
Only users from these groups are provided the administrator and user privileges, and are authorized to log on to HP XP P9000 Performance Advisor. NOTE: You cannot add other local groups that reside on your management station to the HP Storage Admin or the HP Storage Users groups. After the above-mentioned settings are configured, launch HP XP P9000 Performance Advisor. For more information, see “Launching HP XP P9000 Performance Advisor” (page 66).
2. Enter your user name and password. HP XP P9000 Performance Advisor authenticates your credentials based on the authentication type you selected while installing HP XP P9000 Performance Advisor. Your site or system administrator will have information on the authentication type configured on the management station. For more information on authentication types, see “Implementing the authentication method” (page 52).
• Additional PA LTU that you purchased • Internal raw disk capacity or usable capacity that the LTU supports IMPORTANT: • The internal raw disk capacity is applicable only for the XP disk arrays. It refers to the total capacity of all the RAID groups created on your XP disk array and excludes the disk capacity occupied by the external RAID groups and pool volumes, such as the ThP pools and the VVols.
9. Add the Permanent license to HP XP P9000 Performance Advisor: a. Log on to HP XP P9000 Performance Advisor. For more information, see “Launching HP XP P9000 Performance Advisor” (page 66). b. In the HP XP P9000 Performance Advisor Home screen, click PA and DB Settings+License in the left pane. The License screen appears. c. d. e. Click Browse in the Add New License File section. Navigate to the folder where the license (.dat) file is stored. Select the license that you want to add and click Open.
For more information on viewing and managing licenses, see the HP XP P9000 Performance Advisor Software User Guide. For document download location, see “Related information” (page 116). License management in installation and upgrade scenarios “License management during installation or upgrade” (page 70) provides the different license management scenarios.
4 Installing the HP XP P9000 Performance Advisor host agents This chapter describes the process to install HP XP P9000 Performance Advisor Windows and UNIX host agents.
8. Install or upgrade the HP XP P9000 Performance Advisor host agents on the respective operating system hosts.
Enabling IPv6 and configuring HTTP port for the Windows host agent Enable your HP XP P9000 Performance Advisor Windows host agent to use IPv6 as the communication protocol, if the HP XP P9000 Performance Advisor is also enabled for IPv6. Ensure that both the HP XP P9000 Performance Advisor and host agents communicate using the same protocol, either IPv4 or IPv6. Also, configure the HTTP port that the host agent should use to communicate with HP XP P9000 Performance Advisor.
the Windows GUID (\\?\Volume{GUID}) is created and assigned to command devices on the Windows host. NOTE: These verification tests only help you to verify if the details provided are accurate. Even if the tests are not successful, the host agent installation does not stop. You can rectify the errors and proceed with the installation, or complete the installation and then resolve the validity and connectivity issues.
1. 2. 3. Open the paxp_service.properties file from the :\ Program Files\Hewlett-Packard\xppa\hostagent\config folder on your host system. If it is a custom install location, the file is available in the :\\hostagent\config folder. Edit the following fields based on which one has an incorrect entry: ◦ ManagementStation.Hostname=, where you provide a valid DNS or IP address. ◦ http.
In addition to the above-mentioned, you can also do the following: ◦ View the description for each program feature that you want to install. Clicking a program feature displays a brief description and the amount of disk space required to install it, in the Feature Description frame. ◦ Choose a location on your host to install the HP XP P9000 Performance Advisor host agent.
Figure 16 HP XP P9000 Performance Advisor Windows host agent log file Based on whether you have performed an installation or upgrade, do one of the following: • Return to the installation checklist to complete the remaining checklist items. For more information, see “HP XP P9000 Performance Advisor and host agents installation checklist” (page 19). • Return to the upgrade checklist to complete the remaining checklist items.
Executing the UNIX host agent installer IMPORTANT: Before proceeding with the installation, use HP XP P9000Info to verify that the connectivity to the command device is established. If you are performing an upgrade, the connectivity to the command device must already exist. For more information, see “Verifying host agent connectivity to a command device” (page 43). To execute the UNIX host agent installer: 1. Telnet to the remote host as a root user. 2.
HP XP P9000 Performance Advisor UNIX host agent post-installation steps The following HP XP P9000 Performance Advisor UNIX host agent services start: • HP XP P9000 Performance Advisor Hostagent • HP XP P9000 Performance Advisor Realtime Server To confirm whether the above-mentioned services have started, see “Confirming the HP XP P9000 Performance Advisor UNIX host agent services” (page 79).
Executing the OpenVMS Integrity Server host agent installer IMPORTANT: • Before you begin the installation, use HP XP P9000Info to verify that the connectivity to the command device is established. For more information, see “Verifying host agent connectivity to a command device” (page 43). • Ensure that the TCP/IP services are running on the OpenVMS host. • The JRE v1.6.0–2.p1 is bundled along with the OpenVMS Integrity Server host agent software.
The name of the log file is prefixed with the date and time, that is, yyyy-MM-dd_hh-mm-ss_PerformanceAdvisorXP.log. For example, 2009-09-16_09-22-08_PerformanceAdvisorXP.log NOTE: The PerformanceAdvisorXP.log file cannot be opened when the host agent and realtime services are active on an OpenVMS Integrity Server (IA-64) host. To view the log file, stop the services, navigate to the hostagent/log/ folder, and then open the PerformanceAdvisorXP.log file.
3. Click the Host Information tab on the Array View screen. The HP XP P9000 Performance Advisor host-specific details appear in the Host Information table: Screen elements Description Host Displays the system name of the host. OS Displays the operating system installed on the host and its current version. HA Version Displays the version of the host agent installed on the host. RMLib Version Displays the RAID Manager Library version installed on the host.
d. e. f. g. h. Log on to the HP XP P9000 Performance Advisor host agent as an administrator or as a member of the Administrators group. Open the Computer Management console by clicking Start+Run+compmgmt.msc, and press the Enter key. Under Storage in the left pane, select Disk Management. In the right pane, select a command device from the list of command devices displayed by the HP XP P9000Info command (see “XPInfo –i command” (page 82)). Right-click the command device and select New Partition.
6. 7. In the Array View screen, select the host agent record in the Host Information table, and click Request Info. After the Status column displays Received for the selected host agent record, click the Configuration Collection or Performance Collection tab. The text GUID is appended to the file names of those command devices on which the GUIDs are created. The HP XP P9000 Performance Advisor configuration and performance data collection through such command device files uses \\?\Volume {GUID}.
5 Configuring SSL settings for HP XP P9000 Performance Advisor You can configure SSL settings for HP XP P9000 Performance Advisor using the unsigned or the signed approach. Unsigned approach You can generate unsigned SSL certificates on the server and add them to the JRE's trusted list of certificates to enable SSL on a HP XP P9000 Performance Advisor. The advantage with this method is that it does not need a Certificate Authority (CA) signed certificate.
1. On the HP XP P9000 Performance Advisor host agent, download the InstallCert program from the following location: https://jira.springsource.org/secure/attachment/13865/ InstallCert.java NOTE: JavaC is required to compile the InstallCert program on the host agent server. When you compile the program, ensure that it is named as InstallCert. 2. Compile the downloaded java file using the following command: <%JAVA_HOME%>\bin\javaC InstallCert.java 3.
[ [ Version: V3 Subject: CN=abc.domain.company.net, OU=DDD, O=HP, L=Bangalore, ST=Karnataka, C=IN Signature Algorithm: SHA1withRSA, OID = 1.2.840.113549.1.1.
The default locations of the file for windows and non windows are listed below : 9. • C:\Program Files (x86)\Hewlett-Packard\xppa\hostagent\config • /opt/xppa/hostagent/config Start the HP XP P9000 Performance Advisor host agent service. For more information, see “Starting, stopping, and restarting host agent services” (page 122). IMPORTANT: To enable SSL on a HP XP P9000 Performance Advisor Windows host agent, complete the following steps in addition to the above-mentioned steps: 1.
The text file csr.txt will be generated in the current directory. Type csr.txt at the prompt to open the file. C:\Program Files\Java\jdk1.6.0_33\bin>csr.txt The sample for the csr.
C:\Program Files\Java\jdk1.6.0_33\bin>keytool -import -trustcacerts -alias secon daryIntermediate -keystore c:\hpss\pa\tomcat\conf\keystore -file c:\hpss\pa\tomc at\conf\secondary.cer Where ever the password is prompted the password provided is “changeit” Enter keystore password: Certificate was added to keystore C:\Program Files\Java\jdk1.6.
LmNvbS9jcHMvdGVzdGNhLzA7BgNVHR8ENDAyMDCgLqAshipodHRwOi8vY3JsLnZl cmlzaWduLmNvbS9TVlJUcmlhbFJvb3RHMi5jcmwwDgYDVR0PAQH/BAQDAgEGMG0G CCsGAQUFBwEMBGEwX6FdoFswWTBXMFUWCWltYWdlL2dpZjAhMB8wBwYFKw4DAhoE FI/l0xqGrI2Oa8PPgGrUSBgsexkuMCUWI2h0dHA6Ly9sb2dvLnZlcmlzaWduLmNv bS92c2xvZ28uZ2lmMB0GA1UdDgQWBBQoFxOKvdaitdwGLLe2jtoQZmBu5TAfBgNV HSMEGDAWgBRIGeeSb5KdNGOZwPCZyNaljIx/ZTANBgkqhkiG9w0BAQUFAAOCAQEA NgvA9cj2h5yFC2SJMmE8a9trUmjnorZWO/Ifmdf5ADuQuf+k8arodHpdSeq/f2Gj wDIo3oYL2bT/66tw46Kx3Q/Z02pp7YW+BRvKejBYXN9FJxsXEkPKpz4SR
DoFSX7YLDOSHqd0vhBewNSEuUQGlZFxWUZAmqDhWg//RfUQbkQ7rvieUYf4FkHFB O1EcrusYALdbPb7YPQmoSMxJN35ZonFENR4Ym852CmJH7jR9lIv2zCncJn4BHnXF hzePlo0cnADie0O6ytoy63PNnKhCf3tXhtleQlLIuOtgWTRXmVedSaytKbWJNWg= -----END CERTIFICATE----- 6. To Enable the https for Performance Advisor perform the following steps. a. Stop the Performance Advisor services. b. Change server.xml file for tomcat. Directory path: \HPSS\ pa\tomcat\conf. c.
6 Using HP XP P9000 Performance Advisor After installing the HP XP P9000 Performance Advisor and the host agents, start collecting the configuration and the performance data for the XP and the P9000 disk arrays. You can initiate configuration data collection for only one XP or P9000 disk array at a time, and select only one command device through which you can collect data for the XP or the P9000 disk array.
Collecting configuration data You can create a one-time configuration data collection or schedule it on a periodic basis. The procedure described here is for scheduling a configuration data collection. IMPORTANT: • Select only one command device from an XP or a P9000 disk array to perform the configuration data collection for that array. • When a configuration data collection is in progress for an XP or a P9000 disk array, do not initiate another configuration data collection for that array.
Figure 20 Configuration Data Collection 5. 6. Select the Collection Schedule as hourly, daily, weekly, or monthly. By default, the collection is scheduled weekly, every sunday at 00:00 hours. If you selected an XP disk array and outband mode of configuration data collection: • Manually enter the SVP IP address in the SVP IP Address text box and proceed to next step to initiate the configuration data collection.
you want to monitor, enable the associated performance data collection schedules to automatically collect data for the new components (RAID groups and ports). IMPORTANT: If the configuration data collection fails due to an error, the Collection Status displays . The reason for the error is displayed as a tool tip. After completing the configuration data collection, start collecting the performance data for the XP or the P9000 disk array. For more information, see “Collecting performance data” (page 96).
performance data collection schedule that you are creating, HP XP P9000 Performance Advisor does the following validations and displays appropriate error messages if the validations fail: 5. • If it is the first performance data collection schedule, HP XP P9000 Performance Advisor verifies if the configuration data is already available for that XP or P9000 disk array.
NOTE: • Selecting a ThP, snapshot, or a continuous access journal volume also provides the respective volume pool information. • The THP Group(s), CA Journal Group(s), and the SNAP Group(s) component type lists are displayed only if the corresponding components are configured on the selected XP or the P9000 disk array. The External RG(s) component type list is displayed only if the external volumes are attached to the selected XP or the P9000 disk array.
10. Select the Add new RAID Groups, Ports to this schedule check box, if you want the performance data collection schedule to automatically collect the performance data for the new RAID groups or the ports that are discovered during the scheduled configuration data collection. If the Add new RAID Groups, Ports to this schedule check box is selected in the first schedule, it is automatically disabled in the second schedule.
7 Understanding the HP XP P9000 Performance Advisor upgrade prerequisites This chapter describes the prerequisites to upgrade the HP XP P9000 Performance Advisor software and the host agents, and explains the upgrade checklist. For more information, see “HP XP P9000 Performance Advisor and host agents upgrade checklist” (page 101). To install HP XP P9000 Performance Advisor, see “HP XP P9000 Performance Advisor and host agents installation checklist” (page 19).
• Upgrading HP XP P9000 Performance Advisor host agents: This section directs you to the HP XP P9000 Performance Advisor host agents upgrade procedures for the host agents you want to upgrade. • After installing HP XP P9000 Performance Advisor host agents: This section lists the post-upgrade tasks and prerequisites that you must complete to login, and configure data collections in HP XP P9000 Performance Advisor.
Table 12 HP XP P9000 Performance Advisor and host agents upgrade checklist (continued) Reconfigure the email and alarm notification settings on the management station to receive alarms, reports, and data collection failure notifications. For more information, see “Reconfigure the email and alarm settings on your management station” (page 105). Based on the host agents you want to install, download the respective host agent files to the respective hosts.
IMPORTANT: Ensure that the following prerequisites are completed before you begin the upgrade: • Adequate free disk space (at least double the size of the existing database) is available on the , where you intend to perform the upgrade. For example, if HP XP P9000 Performance Advisor is installed on the C:\ drive, ensure that adequate free disk space is available on C:\ before proceeding with the upgrade.
8 Upgrading HP XP P9000 Performance Advisor This chapter describes upgrading the current version of HP XP P9000 Performance Advisor to its latest version.
IMPORTANT: • If the upgrade does not complete, the installation wizard will automatically perform a roll-back of HP XP P9000 Performance Advisor to the earlier version, from where you had initiated the upgrade. • The HP XP P9000 Performance Advisor v6.0 installer log details are available in the PA_Install.log file in the :\PA_Install_Log path, where refers to the drive on which the operating system is installed. For the PA_Install.log to open, Windows Installer v4.
9 Upgrading the HP XP P9000 Performance Advisor host agents This chapter describes upgrading the HP XP P9000 Performance Advisor Windows and UNIX host agents.
3. Click Next. The Ready to Upgrade the Program screen appears. 4. 5. Click Next. During the upgrade process, you will be prompted to confirm the removal of RAID Manager Library, click Yes. NOTE: The RAID Manager Library is shipped along with the installer for the HP XP P9000 Performance Advisor Windows host agent. The Setup Completed Successfully screen appears, indicating the completion of the upgrade process.
10 Modifying or repairing HP XP P9000 Performance Advisor After installing HP XP P9000 Performance Advisor or the host agents, modify the settings that you selected during the installation.
Modifying HP XP P9000 Performance Advisor Windows host agent program features You can select the real-time component and install it for your HP XP P9000 Performance Advisor host agent, or remove the already installed real-time component on your host. To modify the current HP XP P9000 Performance Advisor program features for your Windows host agent: 1. Run the setup.exe installation script. For more information, see “Executing the Windows host agent installer” (page 72).
11 Removing HP XP P9000 Performance Advisor To remove HP XP P9000 Performance Advisor, you must first remove the host agent from each host, and then remove HP XP P9000 Performance Advisor from the management station.
4. Click Yes to remove the RAID Manager Library. If the RAID Manager Library functions are being shared by some other application, click No to retain it. Removing a UNIX host agent To remove the host agent from hosts other than Windows, complete the following steps: 1. Telnet to the remote host as root. 2. Navigate to the tmp directory. 3. Untar the host agent .tar file by entering: tar -xvf hostagent_.tar 4. Run the uninstall script by entering: unix_local_uninstall.
NOTE: • Ensure that 1 GB free space is available in the management station’s TEMP folder. (TEMP folder here refers to the folder defined by the user or system environment variable named TEMP). • During the un-installation process, the installation wizard stops and starts the Distributed Transaction Coordinator service, which is a Windows-based service. To remove the HP XP P9000 Performance Advisor management station: 1. From the Control Panel in Windows, click Add/Remove Programs. 2.
12 Installing Oracle patches and security updates This section describes the Oracle patch installation procedure to apply the latest patches and security features for the Oracle instance that is installed with HP XP P9000 Performance Advisor. It is not mandatory to install the patches. It is required only if you want to meet the security compliance standards of Oracle within your organization.
3. 4. Close all open folders that contain HP XP P9000 Performance Advisor files and ensure that no applications are accessing any files pointed to by %PADB_HOME%. Ensure that the following services are stopped: • Distributed Transaction Coordinator • HP XP P9000 Performance Advisor Database • HP XP P9000 Performance Advisor Database Job Scheduler By default, this service is disabled.
NOTE: Re-running the Oracle patch installer when it is already installed displays the following error message: The Oracle patch application process for HP XP P9000 Performance Advisor Software failed. For more information, inspect the __OraclePatch.log and opatch.log located under . The installation wizard will exit now. You can ignore the above error.
13 Support and other resources Contacting HP HP technical support For world wide technical support information, see the HP support website: http://www.hp.
Websites • HP.com http://www.hp.com • HP Storage http://www.hp.com/go/storage • HP Manuals http://www.hp.com/support/manuals • HP download drivers and software http://www.hp.com/support/downloads • HP Software Depot http://www.software.hp.
Typographic conventions Table 13 Document conventions Convention Element Blue text: Table 13 (page 118) Cross-reference links and email addresses Blue, underlined text: http://www.hp.
A Installing a Loopback Adapter IMPORTANT: The procedures provided here for installing the Loopback Adapter on different Windows versions are directly taken from the Oracle documentation. For the latest information on Loopback Adapter, see the Oracle website: http://download.oracle.com/docs/html/B10130_02/ reqs.htm. When you install a Loopback Adapter, it assigns a local IP address for your computer.
8. 9. 10. 11. 12. 13. 14. 15. 16. 17. 18. 19. In the Select Network Adapter window, do the following: a. Manufacturers: Select Microsoft. b. Network Adapter: Select Microsoft Loopback Adapter. c. Click Next. In The wizard is ready to install your hardware window, click Next. In the Completing the Add Hardware Wizard window, click Finish. If you are using Windows 2003, restart your computer. Right-click My Network Places on the desktop and select Properties.
1. 2. 3. 4. 5. 6. 7. 8. Open the Windows Control Panel. Double-click Add Hardware to start the Add Hardware wizard. In the Welcome window, click Next. In The wizard can help you install other hardware window, select Install the hardware that I manually select from a list, and click Next. From the list of hardware types, select the type of hardware you are installing window, select Network adapters, and click Next. In the Select Network Adapter window, do the following: a. Manufacturers: Select Microsoft.
B Starting, stopping, and restarting host agent services This section describes the procedures to start, stop, or restart Windows, UNIX, and OpenVMS Integrity Server (IA–64) host agent and real-time services: IMPORTANT: • When a Windows host agent service is started, stopped, or restarted using the Start+Programs+HP Storage Works+HP XP P9000 Performance Advisor Host Agent menu, the real-time service is also automatically started, stopped, or restarted.
Stopping HP XP P9000 Performance Advisor Realtime service, please wait… To stop the UNIX host agent and real-time services: • To stop the HP XP P9000 Performance Advisor Hostagent service, type /opt/xppa/hostagent/sbin/xppa stop in the command prompt window. • To stop the HP XP P9000 Performance Advisor Realtime Server service, type /opt/xppa/realtime/xpparealtime stop in the command prompt window.
Glossary A Array Control Processor (ACP) ACP is used in the XP disk arrays prior to the XP24000 Disk Array. With the introduction of the XP24000 Disk Array, the DKA has replaced ACP. The DKA is also applicable for the P9000 disk arrays. ACP handles the transfer of data between the cache and the physical drives held in the DKUs. The ACPs work in pairs, providing a total of eight SCSI buses. Each SCSI bus associated with one ACP is paired with a SCSI bus on the other ACP pair element.
D DASD Fast Write (DFW) The DFW is the function of a storage controller that allows caching of active write data without exposure of data loss. This is achieved by journaling of the active write data in the NVS. Device Special File (DSF) In the non windows systems, the DSF is an interface for a device driver that appears in a file system as if it were an ordinary file. In the Windows systems, the DSF allows the software to interact with a device driver using the standard input or the output system calls.
LDAP is used for centralized authentication, where the LDAP server authenticates and authorizes HP XP P9000 Performance Advisor users. LDEV Logical device. An LDEV is created when a RAID group is carved into pieces according to the selected host emulation mode (that is, OPEN-3, OPEN-8, OPEN-9). The number of resulting LDEVs depends on the selected emulation mode. The term LDEV is also known as term volume. LUN Logical unit number.
RAID Manager Library (RML, RMLIB) The RAID Manager Library is an API library that enables third-party software products to directly operate some of the functions on the HP XP P9000 and XP disk arrays. Read/Write (R/W) Read-write access. Remote Authentication Dial In User Service (RADIUS) The RADIUS authentication is a networking protocol that provides centralized authentication, where the RADIUS server authenticates and authorizes the HP XP P9000 Performance Advisor users.
on predefined set of volumes to another set of volumes with the same characteristics. For more information, see the manuals set provided for Tiered Storage Manager on the HP Manuals page. trap A type of SNMP message used to signal that an event has occurred. (SNIA) U User Access Code (UAC) 128 Glossary The UAC controls the installation and the removal of programs and prevents programs from being added to the registry on a Windows Vista system.
Index management station, 110 post install instructions, 110 C conventions document, 118 text symbols, 118 D Disk space requirements, 24 document conventions, 118 prerequisites, 116 related documentation, 116 documentation providing feedback, 116 F feedback documentation, 116 H help obtaining, 116 Host agent Windows, Linux, UNIX, , 45 HP technical support, 116 HP XP P9000 Performance Advisor Browser requirements, 45 Coexistence, 45 Firmware requirements, 45 License entitlement, 45 S Stagger Schedule, 2