
HP XP P9000 Performance Advisor Software v6.0 User Guide
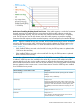

5. Provide the following details on the Array information input screen:
• Enter the Array DKC serial number, which is a five digit number, such as 10900, 53036.
• Select the Hardware platform from the list.
The supported P9000 disk array models, such as the P9500 and the XP disk array models,
such as XP24000, XP20000, XP12000, XP10000, XP1024, and XP128 are displayed
for selection.
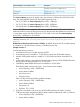
6. Click Next >>.
The Requestor Information screen appears.
7. Provide the requestor and the company related information, and click Next >>.
The Requestor Information screen appears again with all the details that you provided.
8. Click Next >> to confirm the details.
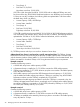
The Certificate screen appears and provides the license details. You can do the following on
the Certificate screen:
• Click Save to print a copy of the certificate.
• Click Keyfile to save the license file as a .dat file on your system.
• Click Email to send a copy of the license certificate and the key file to the intended
recipient.
After installing the Permanent license for an XP disk array, if you want HP XP P9000 Performance
Advisor to monitor internal raw disk capacity beyond the Permanent licensed capacity, generate
another Permanent license at the HPAC website.
Similarly, after installing the Permanent license for a P9000 disk array, if you want HP XP P9000
Performance Advisor to monitor usable capacity beyond the Permanent licensed capacity, you can
generate another Permanent license or a Meter based Term license at the HPAC website.
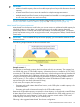
The procedure to generate and add the Meter based Term license is similar to the above procedure
for Permanent license. While generating a Meter based Term license, you can select the TB-Days
that you want to use when entering the registration number. For example, if you have a Meter
based Term LTU for 100TB-Days and you want to use only 25TB-Days, enter 25 as the TB-Days.
You are provided a license key that can be used for 25TB-Days. You can use the remaining
75TB-Days later for the same or a different P9000 disk array. The TB-Days of Meter based Term
license that you generate are bound to the P9000 disk array serial number when the license key
is generated.
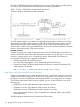
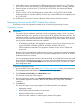
Installing licenses
To install a license:
1. Click PA and DB Settings+License in the left pane.
The License screen appears.
2. Click Browse in the Add New License File section.
3. Navigate to the folder where the license (.dat) file is stored.
4. Select the license that you want to add and click Open.
The license file appears in the File Name box.
30 Managing licenses for XP and P9000 disk arrays