Web ViewPoint Pathway Plug-in User Guide Version 1.3 Part Number 528942-003 Abstract This manual describes the installation, configuration, and usage of HP Web ViewPoint Pathway Plug-in H01AAH (forward) on a HP NonStop™ system. (Note: User Guide Version number has been synchronized with the Part Number suffix; therefore Version 1.1 was intentionally skipped.) Supported Release Version Updates (RVUs) This publication supports J06.03 and all subsequent J-series RVUs, and H06.
Table of Contents 1. Introduction.......................................................................................................................... 3 2. Web ViewPoint Pathway Installation & Configuration.......................................... 4 2.1. Considerations and Requirements...................................................................... 4 2.1.1. General.................................................................................................................... 4 2.2.
1. Introduction Web ViewPoint Pathway Plug-in is a thin web-based product for the monitoring and management of Pathway applications from Web Viewpoint. This is a plug-in product to Web ViewPoint, and therefore requires that Web ViewPoint be installed and operational prior to attempting an install and activation of the plug-in.
2. Web ViewPoint Pathway Installation & Configuration This release provides a PC wizard based tool to automate most of the install process. Configuration data is collected through user input and then the configuration files are built and pushed to the NonStop server. This new process greatly simplifies and streamlines the Pathway install process. 2.1. Considerations and Requirements 2.1.1. General Hardware HP NonStop Server Software Microsoft Internet Explorer 6.
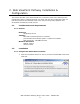
2. The next window gives you the choice of Single Resident or Multi Resident Installation. a. For Single Node select it and click on NEXT. i. The next window requires you to enter the information of the resident and the location. You need to enter the Node name, IP address/DNS name, WVP sub-volume, Pathway plug-in sub-volume, Backup sub-volume for pathway. Then follow the rest of the steps from Step 3.
b. For Multi Node, select it and click on Next. i. In the window below, enter the different node names and IP address/DNS names. Then enter the WVP sub-volume, the Pathway sub-volume (where you want to install Pathway) and the backup sub-volume for pathway. After all the required details are entered, click on APPLY. Then follow the rest of the steps from Step 3. 3. Next, the wizard reconfirms with you on the current configurations. Click Yes to continue with your configurations.
4. In the below screen you need to enter the Group User ID and Password. Verify the subvolume names and make sure the Admin and user ports are not already occupied. The default auto manage and Refresh process names are, $ZPAM & $REF.
5. The wizard checks the node configurations such as FTP ability, disk space and security to determine if the installation can continue. After these checks have been completed, the wizard verifies the Web ViewPoint configuration files to begin installing the plug-in files to Web ViewPoint. 6. The wizard verifies the server series, Subvolume and then shows the following popup to verify the TCP/IP program name that should be used. The default is TCPIP. Enter the appropriate value and click on OK.
7. Once the process names are verified, the wizard will do a few more checks to ensure that the installation can proceed and then proceed to modify Web ViewPoint configuration files and upload the Pathway installation files. 8. Once all the files have been uploaded successfully the following popup verifies if you want to restart Web ViewPoint display the plug-in. Click Yes to reflect the new installation. 9.
. Once all the files have been uploaded, the following e-mail popup verifies if you want to e-mail your installation configuration files. This does not need to be done, so please click Cancel. 11. After the installation is done you get the below window. Click on OK 12. Click on FINISH when the below window comes. The wizard installation for Pathway is now complete.
2.2.2. Using DSM/SCM or Manual Installation Web View Point Pathway can be installed using DSM/SCM tool or can be installed manually also. 1. For DSM/SCM, use the IPSETUP.exe program to upload the files from the CD / PC to the NonStop server. Follow the screens on the Wizard and provide the necessary information as prompted. Once the IPSETUP program completes ensure that the files listed below have been transferred in the correct format and the file codes are correct. 2.
Steps: 1. FTP the following files to $system.zwpy. (Note: You may FTP the files under a different $volume.subvolume) The following files have to be transferred in 'BINARY' Mode REMOVPLG SETUPPLG WVPPADM WVPPCTRL WVPPUSER WVPPREF WPWTMPAK The following files have to be transferred in 'ASCII' Mode INSTWVPP MAKEWPY 2. Obey the Install file ‘INSTWVPP’ (read the following instructions first) 2.1. Set your working volume to $system.zwpy (or $volume.
d.4. Name of the Refresh Process: This is the process name of the Refresh Program (WVPPREF). This process starts alongside Web ViewPoint Pathway and will be a part of STRTWVP. It runs in the background to Relearn the Pathway environments once a day by default. Back to top 2.3 Uninstall Pathway 2.3.1. Uninstall from Wizard Install If you have installed the Pathway plug-in using the wizard install, uninstalling the product is simple. Please follow these instructions to uninstall: 1.
2.3.3. General Uninstall Instructions To uninstall Pathway, please change the following files. Note: This method can be used, if you do not remember where you have copied the original Web ViewPoint backup configuration files, or if you have other Web ViewPoint plug-ins and you only want to get rid of the Pathway plug-in 1. WVPCONF - Remove Section [PLUGINOBJECT] OBJECTFILE $.WVPP.WVPPUSER OBJECTID OBJID_ZWVPPU ......... ......... ASSIGN CCE-FILE, $IDEL.WVPP.WVPPCCE 2.
3.Using Web ViewPoint Pathway 3.1. Activating Web ViewPoint Pathway When Web ViewPoint Pathway is first run through the Browser, it tries to activate itself by contacting the activation website over the internet. If you are a new user you will be prompted to enter your registration details. If you have an active Internet connection the activation will happen automatically, if not then the system will provide you with details and handle the registration and activation via email.
3.2.1. Administration Functions Administration functions are accessible at the Web View Point instance and under the Admin Section. A logon screen is displayed upon access to this port. Use your Guardian id/alias & password to logon to the NonStop Server you are connected to. Using a tree structure, Web ViewPoint Pathway displays the NonStop Server you are connected to. The right part of the Window is divided into an upper and a lower panel.
Click on the Learn button (displayed to the lower right of the rows of entry fields) to initiate the learn process. A progress bar shows the state of the learn process. Click on the Continue… button when this task is completed. Names of the newly learned Pathways appear in a list-box labeled “Learned Pathways” on the lower panel. To maintain Pathway previously learned information… From time to time you may want to update the information about the previously learned Pathways.
Select Pathways from the list of “Learned Pathways” to perform one of the three functions (a button is provided for each): Edit File Info… - Enter or change Obey files names to start/shutdown the selected Pathway(s). Information previously defined for each Pathway is displayed below the list-box (one row per Pathway). Make any necessary changes and click on the Edit File Info… button.
Remove – Click on this button to remove all information for selected Pathways from the Web ViewPoint Pathway database. All updated information is located centrally on the NonStop Server and becomes immediately available to all Web ViewPoint Pathway users. Back to top 3.2.2. User Functions User functions are accessible via Web ViewPoint port. This will be the port number which you use to access Web ViewPoint’s Performance, Events, Operations and Admin features. The default Web ViewPoint port is 7500.
Please note that the list of Pathways displayed are those previously learned via the Administration functions (described earlier in this document) of Web ViewPoint Pathway. This also is the case any time references are made to “all Pathways” or “Pathways” in this section. The following sections describe the features and commands available at each level. Back to top 3.2.2.1.
Node Level Commands Following commands are available by clicking on the node name of a NonStop Server on the hierarchical navigation tree: Quick Status – Displays current status of all Pathways. This is equivalent to a “STATUS PATHWAY” command via Pathcom. Error messages are returned for Pathways that are not currently running or whose MAXSPI (a parameter defined at cold start of a Pathway – default is one) value is reached. Start – A check-box list of Pathways is displayed.
Shutdown – A check-box list of Pathways is displayed. Check the checkbox for one or more Pathways, and click on the Shutdown button to confirm and shutdown the selected Pathways. Web ViewPoint Pathway issues a request on the host to OBEY the shutdown file previously defined for each Pathway using the Administration Function (described earlier in this document). The result of this process (obey file listing) is displayed in a new Window.
Pathway Level Commands Following commands are available by clicking on the Pathway name of a selected NonStop Server on the hierarchical navigation tree: Properties – Displays current status & statistics of the selected Pathway. This is a complete set of current data that would otherwise need to be retrieved from a combination of “INFO PATHWAY”, “STATUS PATHWAY”, and “STATUS PATHMON” commands via Pathcom.
Start – Opens a dialog box, giving you the option to perform a Cold or Cool start. Select the appropriate option and click on the Start button. Web ViewPoint Pathway issues an OBEY request on the host for the proper startup file previously defined for this Pathway using the Administration Function (described earlier in this document). The result of this process (obey file listing) is displayed in a new Window.
Selecting Entities Web ViewPoint Pathway prompts you (on the right panel) to identify entities to apply a command to, as soon as you select a command for any of the three Objects (TERM, TCP, SERVER). Aside from certain exceptions, available options are the same, and are as follows: All (object name) – Selected command applies to all entities.
Quick Commands Web ViewPoint Pathway displays the results of an executed command on an Object’s entities, on the browser Windows right panel. You may click on the redo icon command again for the same entities. on the toolbar to execute the same To issue a new command on the same entities, click on the command icon on the toolbar. This shows a list of all available commands for the selected object. Simply select a command from the list.
TERM o Abort ABORT TERM State options: SUSPENDED, RUNNING. o Info INFO TERM State options: [Not] RUNNING, STOPPED, SUSPENDED. o Resume RESUME TERM State option: SUSPENDED. o Restart ABORT TERM and START TERM State option: SUSPENDED. o Start START TERM State option: STOPPED. o Stats STATS TERM State option: RUNNING. o Status STATUS TERM State options: [Not] RUNNING, STOPPED, SUSPENDED. o Stop STOP TERM State option: RUNNING.
o Suspend SUSPEND TERM State option: RUNNING. o Add ADD TERM o Alter ALTER TERM o Delete DELETE TERM TCP o Info INFO TCP State options: [Not] PENDING, RUNNING, STOPPED. o Refresh REFRESH TCP State options: RUNNING. o Start START TCP State options: STOPPED. o Stats Terms STATS TERM TCP o Stats START TCP State options: RUNNING.
o Status STATUS TCP State options: [Not] PENDING, RUNNING, STOPPED. o Stop STOP TCP State options: PENDING, RUNNING, not STOPPED. o Switch SWITCH TCP State options: RUNNING. o Add ADD TCP o Alter ALTER TCP o Delete Delete TCP SERVER o Freeze FREEZE SERVER o Info INFO SERVER Special considerations: There are five info options: Base values – returns main attributes (e.g.
o Restart Assigns – returns SERVER ASSIGN(s) ), if any Params – returns SERVER PARAM(s) ), if any CPU Load – returns SERVER CPU Distribution(s), if any STATUS SERVER, [FREEZE SERVER], [STOP SERVER], [THAW SERVER]. START SERVER o Start START SERVER. o Stats Linkmon STATS LINKMON SERVER o Stats TCP STATS TCP SERVER o Status STATUS SERVER State options: FROZEN, FREEZE PENDING, PENDING, THAWED.
commands. In this scenario, the SERVERs will be taken back to their original state after alterations are completed. o Delete Delete SERVER Back to top 3.2.2.2. Managing Groups You may define one or more Groups of Entities for any Pathway Object and assign them an identifiable name. Entities may be part of one or more Groups.
To Add a Group, Select the Add option, and enter a group name (free format – 1 to 35 characters) in the entry box to the right of the Add option. A list of all Entities for that Object and Pathway is displayed in a list box labeled “Available Entities”. Select any one or more entities and move them to the “Selected Entities” box. Click on the Submit button to add the new Group. To Edit a Group, Select the Edit option.
Below is a screenshot of one of the Auto Manage settings screens. This particular screen is almost the same for both Auto Manage TERM and Auto Manage SERVER. This screen allows the user to select which entities to monitor and define a setup to monitor and act upon.
Another Auto Manage screen is the Define Rule setting screen where the user defines what triggers a particular setup. The Define Rule setting screen is quite similar yet different for TERM and SERVER since each has its own separate COUNTERs that it is recording data for with the plug-in. Below is a screenshot of the TERM Auto Manage Define Rule screen.
Similar to the TERM Auto Manage Define Rule screen, below is a screenshot of the SERVER Auto Manage Define Rule screen.
Auto Manage has one more screen, the Specify Action screen where the user can set a specific action the user can take when the particular condition is met. The SERVER and TERM Auto Manage Specify Action screens are quite similar but different in the actions that can be taken. Below is a screenshot of the SERVER Auto Manage Specify Action screen. To Add a New Setup: Enter the setup name and select the entities for which the setup applies to. The available options are: ‘ALL’ and ‘Select Particular Entities’.
and if an EMS message needs to be written. If the “Write to EMS” action is checked, then whenever a particular condition has been met, an EMS message is generated under the Web ViewPoint Pathway SubSystem ZWPY – WVPPWY (i.e. SSID #261). To Edit a Predefined Setup: After a Setup has been defined, the user will see all the defined Setups in the Select box named “Defined Setups”.
4.Configuring Web ViewPoint Pathway Web ViewPoint Pathway provides a set of configuration options which are primarily used to provide flexibility in the location of database files. The following table provides the available ASSIGNs and PARAMs used by objects WVPPADM, WVPPUSER and WVPPCTRL: ASSIGNs LICENSE-FILE, WVP File WVPCONF Section WVPPUSER WVPPADM Description This provides Web ViewPoint Pathway with the location of license file that contains the licensekey.
GROUPE-FILE, WVPCONF WVPPUSER WVPPADM This provides the location of the file that stores entity group information. This ASSIGN needs to have a fully qualified path to the pathway plug-in subvolume. By default, this ASSIGN points to $SYSTEM.ZWVPP.GROUPE PWAWORK1-FILE, WVPCONF WVPPUSER WVPPADM This provides the location of the file that is used to stage temporary information when executing commands.
5.Configuring Pathway Menu Display Web ViewPoint Pathway menu items can be customized by the user to change the location of where the Pathway User and Admin menu items are displayed. Both the location and the ‘Pathway’ Menu item name can be customized. By default, the Pathway User item is located under the Operations Menu and the Pathway Admin item is located under the Admin Menu within Web ViewPoint.