
Installation and Upgrade Guide

Updating Service Processor (SP) Firmware
G06.24 Software Installation and Upgrade Guide—528593-005
7-28
Correcting a Failed SP Firmware Update (Using the
OSM Service Connection)
Correcting a Failed SP Firmware Update (Using the OSM Service
Connection)
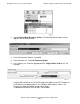
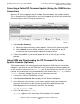
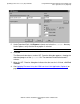
When an SP fails to update using the multiple firmware update, the number of failed
SPs is displayed in the Failed column, and a red X appears by the SP that failed under
Resource name in the SP Firmware resource list:
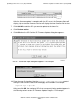
1. Select Action Summary.
a. When the Action Summary screen appears, select the SP action that failed.
b. Select Details from the Action Summary screen or right click on the SP
resource to find out more details about the firmware failure.
2. Correct the problem. If you cannot update or reset an SP, call your service
provider.
Using OSM and Downloading the SP Firmware File to the
System Console (Optional)
SP firmware updates are normally performed through the OSM Service Connection.
However, if you need to use the OSM Low-Level Link to perform firmware updates on
an SP, you must have access to spntcde9, the SP firmware file that runs on a system
console. HP recommends that you download the SP firmware file (spntcde9) into the
\osm\bin directory, although you can use any directory you want.
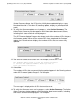
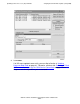
1. If necessary, start an OutsideView session.
2. Select Session>Receive file to display the IXF Receive dialog box.
3. In the Host box enter the host system name, and the volume and subvolume
where the firmware file resides, based on the SYSnn specified during the
Build/Apply phase of installing the new RVU. For example:
\prod2.$system.sys01
4. In the File box, enter spntcde9.
spntcde9 appears in the Local area File Name box. For example: