
Instruction Manual

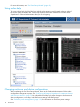

TIP: Select the ? icon to access detailed help information about each setting or topic.
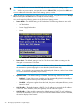
TIP: Within any menu option, navigate the cursor to What is This, and press the OK button
to view additional information about each setting, option, or alert.
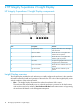
4. When all settings on the Enclosure Settings menu are accurate, navigate the cursor to Accept
All, and then press the OK button to accept the current settings.
You can change the following options in the Enclosure Settings screen:
• Power Mode—The default setting is AC Redundant. The following selections are valid:
AC Redundant◦
◦ Power Supply Redundant
◦ None
• Power Limit—The default setting is Not Set. The Power Limit Watts ac setting can be
changed in increments of 50 Watts.
NOTE: When calculating the Power Limit Watts ac value, derate the circuit to 80% of
the maximum to prevent tripping the circuit breaker (United States only).
NOTE: If your facility cannot support the calculated peak Watts ac, set the Power Watts
ac value to match the capability of your facility.
• Dynamic Power —The default setting is Enabled. The following selections are valid:
Enabled —Some of the power supplies can be automatically placed on standby to
increase overall enclosure power subsystem efficiency.
◦
◦ Disabled —All power supplies share the load; the power subsystem efficiency varies
based on load.
• OA1 IP Addr— The default setting is DHCP; if no IP address is received, the IP address
is 0.0.0.0. The IP address, mask, and gateway are set within this option.
• OA2 IP Addr— If this module is present, the default setting is DHCP; if no IP address is
received, the IP address is 0.0.0.0. If only one Onboard Administrator module is installed,
the screen displays "Not Present."
20 HP Integrity Superdome 2 Insight Display