
User Guide

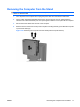
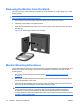
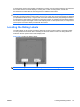
Table Of Contents
- Product Features
- Safety and Maintenance Guidelines
- Setting Up the Monitor
- Installing the Monitor on the Stand
- Installing an HP Ultra-slim Desktop (USDT) on the Stand
- Installing an HP Thin Client on the Stand
- Adjusting the Monitor
- Turning on the Monitor
- Removing the Computer from the Stand
- Removing the Monitor from the Stand
- Monitor Mounting Alternatives
- Locating the Rating Labels
- Operating the Monitor
- Troubleshooting
- Technical Specifications
- Agency Regulatory Notices
- LCD Monitor Quality and Pixel Policy

5. Connect the Thin Client power cable and peripheral device cables, such as keyboard and mouse
cables, to the rear of the computer (1), then plug the computer and monitor power cables into an
electrical wall outlet (2).
Figure 3-15 Connecting the Cables
6. Slide the power supply tray out from the base of the stand (1) and place the Thin Client power
supply into the tray (2). Route any loose cables through the cables guides on the sides of the tray
(3).
Figure 3-16 Installing the Power Supply
ENWW Installing an HP Thin Client on the Stand 13