
User Guide

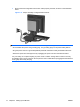
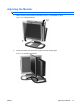
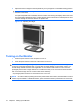
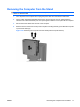
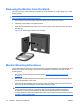
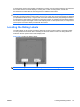
Table Of Contents
- Product Features
- Safety and Maintenance Guidelines
- Setting Up the Monitor
- Installing the Monitor on the Stand
- Installing an HP Ultra-slim Desktop (USDT) on the Stand
- Installing an HP Thin Client on the Stand
- Adjusting the Monitor
- Turning on the Monitor
- Removing the Computer from the Stand
- Removing the Monitor from the Stand
- Monitor Mounting Alternatives
- Locating the Rating Labels
- Operating the Monitor
- Troubleshooting
- Technical Specifications
- Agency Regulatory Notices
- LCD Monitor Quality and Pixel Policy

Installing the .INF and .ICM Files
After you determine that you need to update, you can install the .INF and .ICM files from the CD or
download them.
Installing from the CD
To install the .INF and .ICM files on the computer from the CD:
1. Insert the CD in the computer CD-ROM drive. The CD menu is displayed.
2. View the Monitor Driver Software Readme file.
3. Select Install Monitor Driver Software.
4. Follow the on-screen instructions.
5. Ensure that the proper resolution and refresh rates appear in the Windows Display control panel.
NOTE: You may need to install the digitally signed monitor .INF and .ICM files manually from the CD
in the event of an installation error. Refer to the Monitor Driver Software Readme file on the CD.
Downloading from the Worldwide Web
To download the latest version of .INF and .ICM files from the HP monitors support Web site:
1. Refer to
http://www.hp.com/support and select the country region.
2. Follow the links for the monitor to the support page and download page.
3. Ensure the system meets the requirements.
4. Download the software by following the instructions.
ENWW Installing the .INF and .ICM Files 21