HP SmartStart Scripting Toolkit Windows Edition User Guide Part Number 415598-403 June 2010 (Twelfth Edition)
© Copyright 2005, 2010 Hewlett-Packard Development Company, L.P. The information contained herein is subject to change without notice. The only warranties for HP products and services are set forth in the express warranty statements accompanying such products and services. Nothing herein should be construed as constituting an additional warranty. HP shall not be liable for technical or editorial errors or omissions contained herein. Confidential computer software.
Contents Introduction .................................................................................................................................. 6 SmartStart Scripting Toolkit............................................................................................................................ 6 Microsoft Windows Preinstallation Environment ............................................................................................... 6 Minimum requirements .....................................
RBSURESET return codes ................................................................................................................... 30 Using HPDISCOVERY ................................................................................................................................. 30 HPDISCOVERY command-line syntax.................................................................................................. 31 HPDISCOVERY command line arguments....................................................
LO100CFG return codes ................................................................................................................... 64 LO100CFG command file contents .................................................................................................... 65 Troubleshooting .......................................................................................................................... 66 Troubleshooting table .......................................................................
Introduction SmartStart Scripting Toolkit The SmartStart Scripting Toolkit is a server deployment product that delivers an unattended automated installation for high-volume server deployments. This document describes how to best utilize the Toolkit to configure HP ProLiant servers. It also contains information about the Toolkit utilities and how to use them in an unattended environment. This document does not include information about installing the operating system.
• Microsoft® Windows® Automated Installation Kit for Windows Vista® SP1 and Windows Server® 2008 (for the creation of Windows® PE 2.1) or Microsoft® Windows® Automated Installation Kit for Windows 7 and Server® 2008 R2 (for the creation of Windows® PE 3.0).
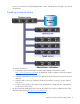
Deployment using the SmartStart Scripting Toolkit Deployment overview The SmartStart Scripting Toolkit includes a set of utilities for configuring and deploying servers in a customized, predictable, and unattended manner. These utilities enable you to duplicate the configuration of a source server on target servers with minimal user interaction. IMPORTANT: ProLiant 100-series servers do not support all toolkit commands, and those that are supported might not work as expected.
process. For information on automating deployments, see the "Advanced topics (on page 13)" section of this document. Creating a network share To create a network share: 1. Download the appropriate SmartStart Scripting Toolkit SoftPaq from the Toolkit website (http://www.hp.com/servers/sstoolkit). The Windows® Toolkit is available in both 32- and 64-bit versions. 2. Install the Toolkit SoftPaq on a common server that resides on the same network as the servers to be deployed. 3.
Adding drivers to Windows PE 2.1 The SmartStart Scripting Toolkit contains HP drivers that are to be used with Windows® PE 2.1. The drivers are located in the hpDrivers directory of the SmartStart Scripting Toolkit. Run the executable file in this directory, and then select the Extract button to extract the drivers to a location to be used in the following steps. You can add drivers to WinPE either offline or online. To add drivers offline: 1. Apply the base image (Winpe.
For example: dism /image:C:\SSSTK.TMP /Add-Driver /driver:C:\ssstk\hpDrivers\example.inf 3. For each additional device driver repeat steps 1 and 2. When you finish customizing the image, prepare the image for deployment by using the peimg /prep command. NOTE: If the appropriate iLO driver is not installed some utilities do not work correctly. To add drivers online: 1. Use the drvload tool, drvload.exe inf_path, where inf_path is the path to a device driver INF file. drvload x:\hpDrivers\example.inf 2.
You cannot capture and apply Lights-Out settings using HPONCFG in the same fashion as CONREP and HPACUSCRIPTING. For more information, see "Using HPONCFG." IMPORTANT: Because the -w argument does not capture certain types of information, such as the administrator password, data files created with HPONCFG using the -w argument cannot then be used as input files for HPONCFG, unless they are modified first. Configuring the target server and installing the operating system 1.
Advanced topics Overview The advanced topics addressed in this section cover some of the most common deployment tasks that can be automated using the Toolkit. IMPORTANT: The script files and script segments in this section are provided only as examples. You must modify the scripts for your environment. When creating or modifying your own scripts, the pause command is a valuable tool to help you determine that each step of the script is functioning as desired.
RAID 5 ADG setting. The following example demonstrates how to use IFHW to detect a particular card or device: REM *** Configure the array controllers by reading the configuration REM *** information in the script file and stamping it onto the array REM *** controllers of the target server echo Configuring the Array Controllers... ifhw .\hpdiscovery.xml allboards.xml PCI:"Smart Array 5i Controller" if errorlevel 1 GOTO NEXT1 .\ACU\bin\hpacuscripting.exe -i .\ArraySettings\SA5iArray.ini :NEXT1 ifhw .
See the operating system documentation for a complete description of the options that can be modified in the unattended installation file to customize the installation. To perform an unattended operating system installation and add mass-storage drivers: 1. Using a standard text editor, create or modify the following additional Toolkit files for the unattended installation: a. Edit the STARTDEPLOY.CMD file, which is executed by STARTNET.
HPDISCOVERY utility to determine the server type, and then executes a typical deployment script (DEPLOYSERVER.CMD). REM @echo off cd %tools% %Tools%\System\hpdiscovery -f hpdiscovery.xml %Tools%\System\ifhw hpdiscovery.xml %Tools%\System\allboards.xml HWL:SystemName eq "ProLiant DL380 G2" if errorlevel 1 goto NEXT1 call .\Typical.cmd goto end :NEXT1 %Tools%\System\ifhw hpdiscovery.xml %Tools%\System\allboards.xml HWL:SystemName eq "ProLiant ML370" if errorlevel 1 goto NEXT2 call .\Typical.
rem @echo off cls echo [ SCRIPT FOR REMOTE INSTALL OF W2K3 ON TYPICAL SERVER ] REM pause echo Retrieving State Information... %Tools%\System\statemgr /r phase if errorlevel 3 goto State3 if errorlevel 2 goto State2 if errorlevel 1 goto State1 if errorlevel 0 goto State0 :State0 REM *** Configure the target server hardware by reading the REM *** configuration information in the script file echo Running Configuration Replication Utility... %Tools%\System\conrep -l f%GlobalData%\HardwareSettings\hwconfig.
if errorlevel 1 GOTO NEXT2 %Tools%\ACU\bin\hpacuscripting.exe -i %GlobalData%\ArraySettings\pl-r1.ini GOTO NEXT5 :NEXT2 %Tools%\System\ifhw hpdiscovery.xml %Tools%\System\allboards.xml PCI:"Smart Array 5312" if errorlevel 1 GOTO NEXT3 %Tools%\ACU\bin\hpacuscripting.exe -i %GlobalData%\ArraySettings\pl-r1.ini GOTO NEXT5 :NEXT3 %Tools%\System\ifhw hpdiscovery.xml %Tools%\System\allboards.xml PCI:"Smart Array 640X Controller" if errorlevel 1 GOTO NEXT4 %Tools%\ACU\bin\hpacuscripting.
REM *** REBOOT if necessary %Tools%\System\reboot PXE :State2 REM=============================================================== REM *** Create partition by reading content of the script file and REM *** stamping the configuration onto the hard drive in the REM *** target server REM=============================================================== echo Creating Disk Partition... %MsTools%\DiskPart /s %GlobalData%\diskPart0.txt echo Formatting Disk Partition...
add mass-storage drivers, you must modify the [MassStorageDrivers] and the [OEMBootFiles] sections. You can also use Microsoft® Setup Manager to help you create a custom UNATTEND.TXT file. For more information on this process, see "HOW TO: Use Setup Manager to Create an Answer File in Windows Server™ 2003 (http://support.microsoft.com/kb/323438/EN-US/)" on the Microsoft® website.
ADPU160M.SYS CPQARRY2.SYS CPQCISSM.SYS MegaIDE.sys Symmpi.sys LsiCsb6.sys HPCISSs2.sys AAC.sys TXTSETUP.OEM [GuiUnattended] AdminPassword=password AutoLogon=Yes AutoLogonCount=1 OEMSkipRegional=1 OemSkipWelcome=1 TimeZone=20 [UserData] ComputerName=TEST FullName=HP OrgName=HPQ ProductID=xxxxx-xxxxx-xxxxx-xxxxx-xxxxx [Proxy] Proxy_Enable=0 Use_Same_Proxy=0 [LicenseFilePrintData] AutoMode=PerServer AutoUsers=999 [GuiRunOnce] "c:\ntcsp\setupex.
TSClients=On TSEnable=On [Networking] InstallDefaultComponents=Yes [Identification] JoinWorkgroup=WORKGROUP [NetOptionalComponents] SNMP=1 WBEMSNMP=1 SimpTCP=1 [SNMP] Community_Name=Public Traps=Localhost Accept_CommunityName=public Send_Authentication=yes [TerminalServices] ApplicationServer=0 PermissionsSetting=0 [Display] AutoConfirm=1 BitsPerPel=16 ConfigureAtLogon=0 VRefresh=60 Xresolution=800 Yresolution=600 [OEM_Ads] Logo=Compaq.bmp 3.
NOTE: Booting from a USB drive key is supported only on certain ProLiant servers. For more information, see the HP Insight Foundation suite for ProLiant website (http://www.hp.com/go/foundation). To boot Windows® PE from a USB drive key, see the Microsoft® Windows® PE documentation.
REM ---if errorlevel 3 goto HWNOTFOUND if errorlevel 2 goto REBOOTREQUIRED if errorlevel 1 goto NEXT2 goto end NEXT2: REM ---REM Example of Option Rom Flash for a SmartArray 5i Controller REM ---System\ifhw hpdiscovery.xml System\allboards.xml PCI:"Smart Array 5i Controller" if errorlevel 1 goto NEXT3 REM ---REM This section performs the Option ROM Flash. Online Flash components REM are kept in a directory called Roms REM ---Roms\cp002238.
2. Use ACU to erase the array configurations: hpacuscripting -i erase.ini The erase.ini file is provided in the Toolkit sample files.
Toolkit utilities Syntax conventions Syntax refers to the way a command and parameters must be entered. Unless specified otherwise, enter commands, parameters, and switches in all uppercase or all lowercase letters. Sample syntax line: SAMPLE[/R|-R][DRIVE:][PATH]FILENAME[...] Command element Meaning SAMPLE Specifies the name of the command. [ ] Indicates a component of the command line. Enter only the information within the brackets, not the brackets themselves.
Utility online help Most Toolkit utilities include usage instructions. To obtain help with the syntax, parameters, and switches of a particular Toolkit utility, enter the file name followed by /? in the command line. For example, for usage instructions on the CONREP utility, enter the following command: CONREP /? The utility displays information about its command line syntax, argument, and switches.
Command line argument Description the next reboot, and the system is restarted. If no argument is provided, then the system is set to boot using the defined boot order. /? This argument displays help information. REBOOT return codes There are no return codes for the REBOOT utility. REBOOT command-line examples Command-line argument Description REBOOT A: This command reboots the system to the A: drive. REBOOT PXE This command reboots the system by itself to the PXE NIC.
SETBOOTORDER return codes Value Meaning 0 The boot order was set successfully. SETBOOTORDER command-line examples Command-line argument Description SETBOOTORDER cdrom hd pxe usb floppy This command sets the system devices to boot in this order: CD-ROM drive, hard drive, PXE, USB, diskette drive. SETBOOTORDER default This command sets the boot order to the factory default. Using STATEMGR The STATEMGR utility enables the user to keep track of the execution state during system reboots.
STATEMGR return codes Value Meaning 0 The command was completed successfully. n N arguments were ignored because they were not in the variable= format. STATEMGR command-line examples Command-line argument Description STATEMGR /W PHASE 3 STATEMGR writes the state value 3 to the PHASE environment variable. STATEMGR /R PHASE STATEMGR reads the PHASE environment variable and returns its value as a return code.
• System name • ROM information • Processor information • NIC information • PCI devices present in the system • HP Smart Array controller information User process decisions can be made based on data that is in the file created by this utility. The HPDISCOVERY program loads all plug-ins listed in the DAT file. If no plug-ins were passed on the command line and the DAT file does not exist, then the program searches the current directory for the plug-ins and load.
NOTE: Before running HPDISCOVERY, you must install WMI. For details on installing extra packages in Windows® PE, see the Windows® PE documentation. Command line argument Description hpdiscovery /f x:\hpdiscovery.xml This command generates the hpdiscovery.xml file in the x:\ location. hpdiscovery /p plugin storage.dll This command only loads and executes the storage plugin. hpdiscovery This command generates the hpdiscovery.xml file in the current directory.
IFHW command line examples Command-line argument Description ifhw hpdiscovery.xml allboards.
Expression input Result HWQ:SystemName eq "ProLiant DL380 G2" and "PCI:Smart Array 5i" and HWQ:ROMDate eq "11/12/2004" True if the system is a ProLiant DL380 G2 with a Smart Array 5i Controller present and a ROM date of 11/12/2004 "PCI:Smart Array 5i" or "PCI:Smart Array 6i" True if the system contains a Smart Array 5i Controller or a Smart Array 6i Controller Using HWQUERY HWQUERY is used from a script, in conjunction with other utilities, to control the deployment.
Command-line argument Description MY_SYS_RAM=TotalRAM 768, HWQUERY produces the following: MY_SYS_RAM=768 hwquery hpdiscovery.xml allboards.xml "TEST=Smart Array" hwquery hpdiscovery.xml allboards.xml MYRAM=TotalRAM MYROMDATE=ROMDate hwquery hpdiscovery.xml allboards.xml "TEST=smart array 5i" For a hpdiscovery.xml file that indicates a Smart Array 5i Controller is present, HWQUERY produces the following: TEST=Smart Array 5i Controller For a hpdiscovery.
IMPORTANT: The file format for the DOS version of CONREP and the current version of CONREP are not compatible. CONREP command-line syntax conrep [-s | -l] [-xhardware_definition_file] [fsystem_configuration_file] [-?] CONREP command line arguments Command-line argument Description -s This argument saves the system configuration to a file. -l This argument loads the system configuration from a file and writes it to the target server.
CONREP screen output A typical screen output generated by CONREP is similar to the following: conrep 3.00 - SmartStart Scripting Toolkit Configuration Replication Program Copyright (c) 2007-2009 Hewlett-Packard Development Company, L.P. System Type: ProLiant DL360 G4 ROM Date: 08/16/2005 ROM Family: P52 XML System Configuration: conrep.xml Hardware Configuration: demo.
helptext="Lists of PCI devices and their interrupts-not displayed if default" >EMPTY_DELETE 80 86 25 a3 00 00 fa 41 0e 11 ff ff 00 00 78 c1 CONREP -s (Store to Data file) Example usage for HP ProLiant 100 series servers To extract the BIOS settings from an SL160z
CONREP –l (Load from Data File) Example Usage for HP ProLiant 100 series servers To load the BIOS configuration settings from a previously captured/edited data file (in this case “sl160zconrep.dat”) to an SL160z G6 server: [root@ilo002481b08134 conrep]# ./conrep -l -xconrepSL160zg6_20090728.xml -fsl160zconrep.dat conrep 3.00 - SmartStart Scripting Toolkit Configuration Replication Program Copyright (c) 2007-2009 Hewlett-Packard Development Company, L.P.
ACU reads the array configuration described in a specified script file. See "Creating an ACU script file (on page 41)." ACU then applies this configuration to a target system. Capturing a configuration To capture the configuration of a system, enter the following command at the system command line prompt: hpacuscripting -c [drive:][path]OUTPUTFILENAME.ext [-internal | external] -e [drive:][path]ERRORFILENAME.ext OUTPUTFILENAME is the name of the capture file, and ext. is the file extension.
You can add blank lines and comments to any script to make it easier to read and understand. To create a comment, enter a semicolon, and then enter the comment text. ACU ignores all text on the same line after a semicolon. Sample custom input script The sample script in this section gives all possible values for each option. • If an option is shown in bold type, you must enter a value for that option when writing your own script.
Array = A|B|C|D|E|F|G|...Z|a|b|c|d|e|f OnlineSpare = None | N | Port:ID,Port:ID... | Box:Bay,Box:Bay... | Port:Box:Bay,Port:Box:Bay,... ; COMMENT: These values are available only in Custom method mode. In Auto method mode, the choices are Yes|No. Drive = * | N | Port:ID,Port:ID... | Port:Box:Bay,Port:Box:Bay,... Box:Bay,Box:Bay... | DriveType = SCSI | SAS | SATA LogicalDrive = 1|2|3|...
Category Options Description Control Action These options define the overall behavior of ACU when it processes scripts and creates configurations. Control options can occur only once in a script file and must be listed first.
• Method mode (on page 45) Action mode You must specify an Action mode: • In Configure mode, you can create new arrays, but you cannot modify existing arrays. The controller must be connected to unassigned physical drives for this mode to be available. • In Reconfigure mode, you can modify existing arrays. For example, you can set up an array expansion, a logical drive extension, or a migration. These procedures do not destroy data, unless you specifically want the data to be deleted.
• Slot [N][:M]—Configure the internal controller in slot number N, or the external controller at port M in slot N. • WWN [N]—Configure the external controller that has the World Wide Name N. • SerialNumber [N]—Configure the shared storage controller that has serial number N. • IOCabinet[N],IOBay[N],IOChassis[N],Slot[N],Cabinet[N],Cell[N]—Configure the controller in the Integrity server that has the slot path information defined by this sequence of identifiers.
ReadCache, WriteCache Enter a number between 0 and 100 to specify the percentage of cache that is to be allocated to drive reads or writes. The default value for both options is 50. The allowable cache ratios depend on the controller model and whether it has battery-backed write cache, as described in the following table. A "+" indicates that the specified cache ratio is allowed for that type of controller, while a "–" indicates that the ratio is not allowed.
SurfaceScanDelay Enter a number between 1 and 30 to specify the duration of the surface scan delay in seconds. Video performance options To optimize the controller performance for video, set values for the following options as indicated: DPOEnable = No ElevatorSortEnable = Yes IRPEnable = No In addition: • Set the MNPDelay to any integer value from 1 to 60 (units are minutes). If you want to disable this option, set a value of zero instead.
If you use Custom method mode, choose one of the following methods to specify the drives to be used in the array. (Different arrays on the same controller can use different methods.) • To specify individual drives, use the applicable convention (port:ID, box:bay, or port:box:bay). • To specify only the number of drives to use (not which specific drive IDs to use), enter that number as the value for this option.
• Sectors (on page 51) • Size (on page 51) • SSPAdaptersWithAccess (on page 51) • StripeSize (on page 51) ArrayAccelerator This option specifies whether the array accelerator is enabled or disabled for the specified logical drive. The default value is Enabled. LogicalDrive The value that you enter for this option specifies the ID number of the logical drive that is to be created or modified.
RAID The value that you enter for this option specifies the RAID level of the logical drive. • When the Action mode is Configure, and the Method mode is Auto, ACU automatically selects the highest RAID level that the controller and drive configuration can support except RAID 50 or RAID 60. To specify RAID 50 or 60 for a controller that supports either of these RAID levels, use the Custom setting. In this case, you must also specify the number of parity groups ("ParityGroups" on page 50).
• For RAID 0, RAID 1, or RAID 1+0 arrays, you can enter any of the stripe size values listed in the sample script. • For RAID 5 arrays, the maximum stripe size in most cases is 256 KB, but old controller models are often limited to 64 KB. • For RAID 6 arrays, the maximum stripe size is either 64 KB or 256 KB, depending on the controller. The default stripe size value depends on the action mode.
• Microsoft® Windows® • OpenVMS • Tru64 • Linux • Solaris • Netware • HP-UX ACU scripting error messages Error code Error message Comment or clarification 1 General error. The ACU process cannot be initiated. You might see this error message if you are not authenticated to use ACU or if ACU is already running. 268 Error saving controller. ACU cannot save one or more controller configurations. 278-282 Controller is locked by another machine or user.
Error code Error message Comment or clarification 1112 Controller has maximum number of license keys. — 1114 Controller requires nonfailed physical drives to set license keys. — 2564 Controller is locked by another machine or user. — 2818 Invalid Method. The scripted Method value is not valid. 2819 Invalid Controller. The scripted controller does not match any existing controllers. 2820 Could not detect controller . — 2821 No controllers detected.
Error code Error message Comment or clarification 2834 Invalid logical drive. — 2835 Logical drive not specified. The script file has commands that require a logical drive, but no logical drive is specified. 2836 New logical drive ID does not match the next available logical drive ID. The script file specifies a logical drive ID that is not the first unused ID in the sequence.
Error code Error message Comment or clarification 2851 Invalid RAID Array ID. The scripted RAID Array ID is invalid. Use characters from the set a–z, A–Z, 0–9, !, @, #, *, (, ), ,, -, _, +, :, ., /, and [space]. The ID cannot end with a space character or exceed the maximum number of characters allowed by the controller. 2852 Invalid SSP state. — 2853 Cannot change SSP settings. — 2854 Invalid SSP adapter ID. — 2855 Controller does not support logical drive SSP states.
Error code Error message Comment or clarification 2876 Invalid physical drive count. The script specifies more drives than are available of the specified drive type. 2877 No spares available. No drives were found that could be used as spares for the specified array. 2878 Spare request for RAID 0 is invalid. RAID 0 does not support spares. 2879 Reset and reconfigure combined error. A controller reset with data loss was specified while in Reconfigure mode. 2880 Invalid drive type specified.
Command-line argument Description BootDeviceLUN[0]=1111 Your input, default LUN, or current value when read from HBA HPLPCFG return codes Value Meaning 0 The command was completed successfully. 1 There was an invalid command line option. 2 There was a file open error. 3 There was an NVRAM checksum error. 4 There was an NVRAM data error. 5 There was no adapter or Emulex HBA found on this host. 6 There was an error retrieving the I/O address.
You must then invoke the tool to load the contents of hba.ini input to the HBA NVRAM: hplpcfg /l hba.ini. Using HPONCFG The HPONFCG utility only supports HP ProLiant 300/500/700 and Blade servers. HP offers support for the RILOE II, iLO, iLO 2, and iLO 3 features available on ProLiant servers with the HPONCFG utility. HPONCFG is an online configuration tool used to set up and reconfigure RILOE II, iLO, iLO 2, and iLO3 without requiring a reboot of the server operating system.
Command-line argument Description performing any additional actions. -mouse This argument causes HPONCFG to configure the server for optimized mouse handling. HPONCFG return codes Value Meaning 0 The script was sent successfully to the device, or there is no RILOE II, iLO, iLO 2, or iLO 3 present in the system. 1 The script could not be sent to the device. If the script itself fails, errors are reported in the log file created by HPONCFG.
PAGE 62 Setting a configuration A specific configuration can be sent to the iLO, iLO 2, iLO 3, or RILOE II by using the command format: HPONCFG /f add_user.xml /l log.txt In this example, the input file has contents: PAGE 63Command-line argument Description SelectBootEnable=1 Read-only variable BootDeviceWWID=22334455 Your input BootDeviceLUN[0]=1111 Your input and default LUN HPQLAREP return codes Value Meaning 0 The command was completed successfully. 1 There was an invalid command line option. 2 There was a file open error. 3 There was an NVRAM checksum error. 4 There was an NVRAM data error. 5 There was no adapter found on this host. 6 There was an error retrieving the I/O address.
WWID=11111111 HostAdapterBiosEnable=1 SelectBootEnable=1 BootDeviceWWID=22222222 BootDeviceLUN[0]=3 You must then invoke the tool to load the contents of hba.ini input to the HBA NVRAM: hpqlarep /l hba.ini. Using LO100CFG LO100CFG enables you to configure the LightsOut 100 device that appears on the HP ProLiant 100 series servers. Under Windows®, WMI is used through the Microsoft_IPMI class, make sure WMI is installed in the Windows® PE environment.
LO100CFG command file contents A typical data file generated by LO100CFG is similar to the following: /> PAGE 66Troubleshooting Troubleshooting table Issue Troubleshooting Data loss in Toolkit Improper use of the Toolkit utilities and modification of the CONREP data files can result in loss of critical data. Because of the potential data-loss risk, only experienced individuals should use the Toolkit utilities. Before using the Toolkit, all necessary precautions must be taken to ensure that mission-critical systems remain online if a failure occurs.
Technical support Reference documentation For support software and drivers, see the HP software and drivers website (http://www.hp.com/support/files). For more information on the Toolkit, see the additional documentation found on the Toolkit website (http://www.hp.com/servers/sstoolkit). For more information on unattended installation, see the following resources: o Operating system documentation o Windows Server® 2003 Technical Reference (http://technet2.microsoft.
Acronyms and abbreviations ACU Array Configuration Utility ADG Advanced Data Guarding (also known as RAID 6) API application program interface BIOS Basic Input/Output System CLI Command Line Interface CONREP Configuration Replication utility CPQACUXE Array Configuration Utility XE CPQLOCFG Lights-Out Configuration Utility DHCP Dynamic Host Configuration Protocol DOS disk operating system GUI graphical user interface HBA host bus adapter Acronyms and abbreviations 68
HPDISCOVERY HP Discovery Utility HPONCFG HP Lights-Out Online Configuration utility HWQUERY Hardware Query Utility I/O input/output IFHW IF Hardware Utility iLO Integrated Lights-Out iLO 2 Integrated Lights-Out 2 iLO 3 Integrated Lights-Out 3 IP Internet Protocol IPL initial program load IPMI Intelligent Platform Management Interface LO100CFG Lights-Out (100 series) Online Configuration utility LUN logical unit number NIC network interface controller Acronyms and abbreviations 69
NVRAM non-volatile memory PCI peripheral component interface PSP ProLiant Support Pack PXE Preboot Execution Environment RAID redundant array of inexpensive (or independent) disks RAM random access memory RBSU ROM-Based Setup Utility RIBCL Remote Insight Board Command Language RILOE II Remote Insight Lights-Out Edition II ROM read-only memory SAS serial attached SCSI SATA serial ATA SCSI small computer system interface SP1 Service Pack 1 Acronyms and abbreviations 70
SSP Selective Storage Presentation STATEMGR State Manager utility USB universal serial bus VPD vital product data WMI Windows Management Instrumentation WOL Wake-on LAN WWID World Wide ID WWN World Wide Name WWPN worldwide port name XML extensible markup language Acronyms and abbreviations 71
Index A adding drivers 10 advanced topics 13 arguments, CONREP 36 arguments, HPDISCOVERY 31 arguments, HPLPCFG 57 arguments, HPONCFG 59 arguments, HPQLAREP 62 arguments, HWQUERY 34 arguments, IFHW 32 arguments, LO100CFG 64 arguments, RBSURESET 30 arguments, REBOOT 27 arguments, SETBOOTORDER 27, 28 arguments, STATEMGR 29 array configurations, erasing 24 audience assumptions 6 authorized reseller 67 B booting Windows PE from a USB drive key 22 C capturing configurations 11, 41 caution, data loss 6 clearing
examples 28, 29, 30, 31, 33, 34, 62 expression examples 33 expressions 33 F file contents 37, 60, 65 flashing the ROM 23 H Hardware Query Utility (HWQUERY) 34 HP Array Configuration Utility Scripting (HPACUSCRIPTING) 40 HP Discovery Utility (HPDISCOVERY) 13, 30 HP Emulex FC HBA BIOS Configuration Utility (HPLPCFG) 57 HP Lights-Out Online Configuration Utility (HPONCFG) 11, 12, 60 HP QLogic FC HBA BIOS Configuration Utility (HPQLAREP) 62 HP SmartStart Scripting Toolkit 8 HP SmartStart, deployment 8 HP Soft
ROM, updating 23 S sample deployment procedure 8 screen output, CONREP 37 serverdetect.cmd 14 SETBOOTORDER utility 28 Setup Manager 14 source server, capturing configuration from 11 startdeploy.