
A9899A and A9900A PCI-X 2-Port Gigabit Ethernet Card Installation Guide


8
HP CONFIDENTIAL Codename: Mt. Diablo/Orca Part Number: Last Saved On: 2/11/04 2:01 PM DRAFT COPY
• Grasp the card by its edges or faceplate with both hands, insert the card into the slot, and
firmly but gently press the card in until it is fully seated.
• Secure the card and reassemble the system.
Step 3: Connect the card to the network
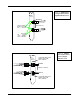
• Attach the network cable (or cables) to the card. Attach the connector from a LAN cable
to the card (Figure 1). For 1000Base-SX, the cabling can be either 62.5 micron or 50
micron multimode fiber optic (MMF) cable with LC connectors. If the remote
connection is type SC, you will need an LC-to-SC conversion cable. For 1000Base-T,
the cabling must be Cat 5 UTP or better with RJ-45 connectors. Refer to the tables at the
end of this procedure for operating distances.
• Attach the free end of the LAN cable (or cables) to any unused port(s) on the switch.
Set the interfacing ports on the switch to the same settings as this LAN card: either set
the card and switch port to auto negotiation, or set them to the same speed and duplex
mode.
• If you are using Jumbo Ethernet frames, ensure that all end stations on a given LAN*
have the same maximum transmission unit (MTU) setting. The switch ports in your
LAN can have any MTU setting greater than or equal to the end station’s MTU. (*Note:
here “LAN” means that the end stations do not have any routers or layer 3 switches in
between them.)
• Ensure the power cable is connected to system. Power up the system.