HP Patch/iX Welcome to the MPE/iX 5.5 training for HP Patch/iX, formally known as PatchManager/iX. This document should serve only as a training material and was not designed to be a users manual. To install patches using HP Patch/iX refer to the manual entitled HP 3000 System Software Installation and Maintenance Manual HP Part Number 30216-90223. You will need to set aside about 3 to 4 hours to complete this material.
• • • • Both reactive and PowerPatch patches to be installed simultaneously. Customization of the patches delivered on the PowerPatch tape. Creation of the patch installation tape while users remain on the system. Creation of a CSLT only when necessary. In this class you will learn how to take advantage of these and other key HP Patch/iX features to improve the patch process in your environment. Changes in Patch Delivery When introduced, HP Patch/iX and its catalog will be delivered on every patch tape.
The expectation is that phase I can be performed with users on the system during normal business hours, while phase II is performed at night or on the weekend during the systems scheduled downtime period. This two phased approach has several key benefits: • • • • By doing setup, patch qualification, library modification, and tape creation while the system is available to users, downtime required to apply a set of patches is reduced.
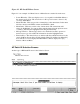
HP Patch/iX Basics HP Patch/iX is a screen based utility that guides you through the patch management process, but allows you a great deal of flexibility in the selection of patches. There are four types of screens you will see in HP Patch/iX: • • • • Menu Screen - A menu screen allows you to scroll up/down among the menu items using the up/down arrow or j/k keys and press the Return Key to select the menu item.
Figure 2-1. HP Patch/iX Menu Screen Figure 2-1 is an example of a Menu Screen. A Menu Screen contains five main areas: • • • • • Screen Hierarchy - This area displays a tree of your path, from the Main Menu, to the current screen. Note: The screen above is the top level screen so there is only one entry: Main Menu. Menu Title Bar - This area provides column titles for the menu items. In the menu title bar contains an ACTION column and STATUS column. Menu Items - This area contains a list of menu items.
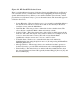
Figure 2-2. HP Patch/iX Selection Screen There is a slight difference between a Selection Screen and a Menu Screen see Figure 22. In a selection screen you mark items in the list by highlighting the item and pressing specific labeled function keys. When you are satisfied with the selected items you then press the Process [f4] function key to process the marked items.
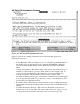
HP Patch/iX Information Screens Figure 2-3. HP Patch/iX Information Screen Figure 2-3 presents an example information screen. The items that appear in an Information Screen are: • • • • • Screen Hierarchy - This area displays a tree of your path, from the Main Menu, to the current screen. In the current screen is the patch GLAHX72D, which was selected from the Qualify Patches screen, which was selected from the Main Menu. Current View Number - This is the number of the current view.
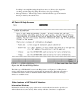
• Scrolling is accomplished using the up/down arrow or j/k keys (for single line scrolling), and the [Page Up] [Page Down] keys (for page scrolling). Message Window - The message window will describe the type of information that is provided by the current view. HP Patch/iX Help Screens Figure 2-4. HP Patch/iX Help Window The final type of HP Patch/iX screen is the Help Screen, see Figure 2-4. A Help Screen can be opened from any window by pressing the [f1] function key.
information window may provide an estimate of how long the activity will take. HP Patch/iX does not expect any user input when an information window is displayed. Prompt Windows Prompt windows are one mechanism HP Patch/iX uses to get user input. Prompt windows will appear and clearly state what information must be entered by the user. This could be the LDEV number of a tape device, or the name of the user running HP Patch/iX Error Windows Error Windows appear when HP Patch/iX encounters an error.
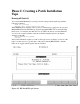
Phase I: Creating a Patch Installation Tape Running HP Patch/iX You can install HP Patch/iX by restoring it and its catalog from the patch tape with the following command: :FILE PPT; DEV=TAPE :RESTORE *PPT; PATCH@.INSTALL.SYS;SHOW When HP Patch/iX is installed on the system you will run it by logging into the system as MANAGER.SYS in the INSTALL group and typing PATCHIX. It is recommended that this be done on a terminal other than the console.
After you enter your name, and verify that it was entered correctly the Main Menu screen will be displayed. Figure 3-2. HP Patch/iX Main Menu Screen The HP Patch/iX Main Menu screen, shown in Figure 3-2, has five items that are typically performed in order. The definitions of each of the menu items are as follows: • • • • • Select Activities - This menu item will allow you to select the types of activities you plan to perform, and have HP Patch/iX setup the environment for those activities.
Selecting the Appropriate Patching Activities The first step in the patch management task is to select the type of patching you will be performing, and have HP Patch/iX prepare the system. Figure 3-3. HP Patch/iX Select Activities Screen To select the patching activities you plan to perform highlight the Select Activities menu item and press the Return Key. The Select Activities screen will be displayed (see Figure 3-3 above).
An Express release is a release of a new product that has both SUBSYS and PowerPatch components. Warning: There is a difference between a SUBSYS add-on of a normal HewlettPackard product and a Hewlett Packard product released through the Express Release process. If you receive a SUBSYS without a PowerPatch then this is a normal add-on and you must use the AUTOINST tool to install the SUBSYS. HP Patch/iX allows the installation of an Express Released product which is a PowerPatch with some SUBSYS components.
can be useful if you have already setup the system by restoring or downloading patches, but can result in errors if you fail to properly set up the environment. Figure 3-5. HP Patch/iX performing setup activities When you choose to have HP Patch/iX perform the default setup operations HP Patch/iX will automatically start the setup of the system based on your selection of activities (see Figure 3-5 above).
View Patches Figure 3-6. HP Patch/iX Main Menu after Select Activities completes You can enter the View Patches screen if you want to see a list of the patches installed on the system, or the patches that came from the patch tape and are available for installation. If you are adding-on Product (SUBSYS) components the list of products found on the SUBSYS tape can also be displayed from this screen.
Figure 3-7. Viewing installed patches from the View Patches screen View(1) = Installed Patches: An alphabetically sorted list of installed patches, the date of installation, the name of the person who installed it and the source of the patch. An example of an Installed Patches view screen is shown in Figure 3-7 above.
Figure 3-8. Viewing available patches from the View Patches screen View(2) = Available Patches: An alphabetically sorted list of patches, the status of the patch, the recommendation/criticality flag values for the patch, and the source of the patch. An example of an Available Patches view screen is shown in Figure 3-8 above.
Figure 3-9. Viewing available products from the View Patches screen. View(3) = Available Products: The product number of each product on the SUBSYS tape. An example Available Products view screen is shown in Figure 3-9 above. Note: The installed patches information is only available for HP Patch/iX installed patches at this time. HP Patch/iX logs information about the installed patches to a binary file (PMSWINFO.PUB.SYS).
Qualifying Patches For Your System The next step in the patch management process is to qualify the set of patches for your system. Figure 3-10. HP Patch/iX Main Menu before qualifying patches. Figure 3-10 (above) shows the HP Patch/iX screen after the Select Activities step is complete, and before the Qualify Patches step is started. Highlight the Qualify Patches menu item and press the [Return] Key. The first step in the qualification process is what we call a full qualification.
Figure 3-11. HP Patch/iX patch Qualification Prompt Before starting this qualification step HP Patch/iX prompts you for a verification of the start of qualification. This prompt provides you with an estimate of how long it will take to do the qualification for the number of patches in the set. In the example shown in Figure 3-11 above, there are 82 patches in the patch set. The estimate is based on a complex analysis of the patch components.
Figure 3-12. HP Patch/iX Patch Qualification Status When you reply Yes to the prompt HP Patch/iX will display a status window that provides estimated and elapsed time for patch qualification (see Figure 3-12 above). The message window provides a description of the current internal activity and a heart-beat.
Figure 3-13. HP Patch/iX provides a list of patches When qualification is complete a list of the available patches will be displayed in a scrollable Selection Screen along with information about the patch status.
The Message Window displayed at the bottom of the screen displays the one-line description for the highlighted patch. You can use the up/down arrow or j/k keys (for single line scrolling) and [Page Up][Page Down] keys (for page scrolling) to scroll through the list of patches. If you want additional information about a patch, highlight the patch and press the [Return] key. To get the detailed information screen for the patch.
Creating a Patch Installation Tape Now that you have qualified the patches for your system you are ready to create the patch installation tape. In some cases this will be a simple store of files to the tape, in many cases this will require library components to be added to the staged libraries (copies of SL, XL and NL.PUB.SYS) and a CSLT to be created. There are several steps that are performed at this time: • • • • • Setting up for Create Tape Phase.
These files will be used during the steps leading up to the creation of the patch installation tape. Note: If only a STORE tape is required (i.e. no CSLT and UPDATE) then HP Patch/iX will skip to the Create the Tape item. Restore Patches from the PowerPatch Tape If a PowerPatch is not being applied then the first step in the Create Tape screen (see Figure 3-15 below) will be skipped. This is the item that restores the patch files (listed in TMPSTR01) from the PowerPatch tape. Figure 3-15.
Figure 3-16. HP Patch/iX Modifying the System Libraries Modifying the Libraries HP Patch/iX will modify the staged copies of the system libraries (see Figure 3-16 above). This includes applying SEGMENT/SOM replacements, relinker patches, and binary patches. The current operation being performed will be displayed in the MESSAGE window at the bottom of the screen. The TMPSTR00, TMPSTR04, TMPSTR05, TMPSTR06, TMPSTR07, TMPSTR08, and TMPSTR11 files created earlier are used during this phase of Patch/iX.
patch management phase and can exit by pressing the [Return] Key. The patch installation tape can be removed from the drive until you are ready to install the patches.
Phase II: Installing the Patches. If HP Patch/iX created a CSLT you will need to update from the CSLT. HP Patch/iX will tell you on exit whether a CSLT is required. Update Required: If a CSLT is required the screen will look like the following after exiting HP Patch/iX: Note: An update IS required to install this set of patches. You must: 1) Prepare this system for an update from the CSLT/STORE tape. 2) Update with the CSLT/STORE tape created by HP Patch/iX.
When you rerun HP Patch/iX it will ask whether you wish to continue the previous run. Answer Yes. If you accidentally answer No then exit and rerun with an info="phase2" parameter. Note: If you ever forget what the legal parameters are try an info="?" parameter. This will produce an error, but will provide a list of the legal info parameters.
Viewing Detailed Patch Information You can often successfully install patches without ever knowing what they are intended to fix, or how they will change your system software. If you are interested in understanding more about the patches you are installing HP Patch/iX provides extensive information about the patches. Figure 5-1. List of patches after patch qualification completed. In the Qualify Patches screen (see Figure 5-1 above) you can get a quick view of all the patches.
The status of a patch tells you what phase of the patch lifecycle the patch is currently in. Common values are: • • • BT (Beta patch) is a patch status that signifies that the patch is not yet released to the general public. These types of patches are available to specific customers who request the patch and are willing to accept the risk of a patch that has not been installed on many customer systems.
the Qualify Patches screen and press the [Return] Key. Note: some information is available about the patches from the View Patches screen, but much of it is static information that does not consider your environment. The detailed information screen has several information views that are available. Each view has a number associated with it as follows: You can select a view by typing the view number, or pressing the Previous View [f5] and Next View [f6] buttons.
Figure 5-3. Patch detail, GR Text View View(2) = GR Text: Provides the General Release text for the patch (see Figure 5-3 above). General release text provides information about the problem the patch was intended to fix. The major information sections in the GR Text view are: • • • • • • Known Conflicts - This includes a list of other patches known to have conflicts with this patch.
• • Product Version Information - This provides the version of the product being patched. Dump Analysis Text - This is text related to a dump that is sometimes useful in understanding the problem the patch was intended to fix. It is not required reading in order to understand the patch. Figure 5-4. Patch detail, SI Text View. View(3) = SI Text: Provides information about additional required installation steps beyond the normal installation steps (see Figure 5-4 above).
Figure 5-5. Patch detail, KPR Numbers View(4) = KPR Numbers: Provides a list of Known Problem Report numbers for known problems the patch is intended to fix (see Figure 5-5 above). KPRs are also known as Service Requests (SR).
Figure 5-6. Patch detail, Product Numbers View(5) = Product Numbers: Provides you with a list of products that are affected by the patch (see Figure 5-6 above).
Figure 5-7. Patch detail, Supersedes Tree. View(6) = Supersedes: Provides a patch supersede tree (see Figure 5-7 above). When a patch is created it is often built on a previous patch, and therefore includes the previous patch in it. It is said to supersede the previous patch. The current patch will be highlighted in the patch supersedes tree.
Figure 5-8. Patch detail, Component Information View(7) = Patch Components: Provides a list of components that are contained in the patch, and will provide component checksum status if the view was opened under the Qualify Patches screen (see Figure 5-8 above).
Figure 5-9. Patch Detail, Patch Dependency View View(8) = Patch Dependencies: Provides a list of the patches that must be present for this patch to successfully install on the system (see Figure 5-9 above). All the dependent patches must be present and qualify in order for the patch to be installed.
Customizing the Set of Patches Patch Qualification In the past only PowerPatch patches went through some sort of qualification on your system. This was because the AUTOINST tool performed limited patch qualification. The AUTOINST tool could not qualify and install reactive patches however. The patch qualification phase of HP Patch/iX is responsible for determining which patches can/should be installed on your system. HP Patch/iX performs a more robust qualification than is available with AUTOINST.
Figure 6-1. Patch summary view of detailed patch information The summary view of the detailed patch information screen for the patch will display the patch QUALIFICATION STATUS (see Figure 6-1 above). Next to the qualification status, in parenthesis, will be the reason for the disqualification. The following sections will describe each of the possible reasons and how to get more information about why the patch failed to qualify.
Figure 6-2. Patch detail, patch dependencies view (patch dependency disqualifies) This signifies that the patch has some dependency on another patch that has not qualified for the system. To determine what the dependent patches are and their current qualification status choose the View(8) = Patch Dependencies view (see Figure 6-2 above). (enhancements must be forced) A FOS enhancement is a release of new operating system functionality in the form of a patch.
(a newer patch was detected) When a patch is built for MPE/iX, the patch will often be built on fixes made for previous patches. This technique makes sure that applying the newer patch will not cause a problem that was fixed by an earlier patch. This new patch is said to supersede the older patches it was built on. All of the patches in the Supersede tree are referred to as a patch family.
qualify. This can be caused by an attempt to force a patch that cannot be forced. Another common cause is an attempt to force an older patch without first vetoing the newer patch. Figure 6-3. Supersedes tree for patch MPEHX71B With the introduction of HP Patch/iX all patches will contain supersede information that HP Patch/iX will use to determine what the newest patch is dynamically. All older patches in the set of available patches will be disqualified with the status (a newer patch was detected).
Figure 6-4. General Release Text for MPEGXH8B Consider the example where the patch MPEGXH8B is delivered on the PowerPatch tape. From viewing the General Release (GR) text shown in you determine that the patch is designed to fix a problem experienced on large systems with multiple CPUs. Since your system is a mid-sized single CPU system you decide that adding this patch is not necessary.
Figure 6-5. Qualify Patches Screen To remove this patch from the list of qualified patches you return to the Qualify Patches screen (see Figure 6-5 above) and Veto the patch by pressing the Veto [f2] or V key. Next you press the [f4] key to re-qualify the changes since the last qualification. The patch qualification status should change to No. If the status changes to No, all patches that depend on this patch for installation will also be set to No.
Figure 6-6. General Release text describing the enhancements in MPEHX16A You should read the General Release (GR) text (see Figure 6-6 above) to determine what functionality the enhancement is providing. If the enhancement provides new functionality you desire or supports a new peripheral you plan to install then you probably want to force the patch on the system. Return to the Qualify Patches screen where you will be able to force the enhancement patch on the system.
Figure 6-7. After forcing the enhancement MPEHX16B To force the enhancement to qualify, highlight the patch and press the Force[f3] or F key. Then press the [f4] key to re-qualify the changes since the last patch qualification. The resulting patch list is shown in above in Figure 6-7. Patch Requalification Every time you make some change using the Force, Undo Force, Veto, or Undo Veto functionality you will need to re-qualify the set of patches.
Figure 6-8. The difference filter showing changes in last re-qualification. Figure 6-8 (above) shows the difference filter, which allows you to see the changes caused by the last re-qualification. The filters that are available are: Filter(1) = All This filter shows all available patches. Filter(2) = Qualified This filter shows only the patches that qualify for the system. Filter(3) = Disqualified This filter shows only the patches that do not qualify for the system.
Error Handling When HP Patch/iX experiences an error it displays an error window that gives a short description of the error. Figure 7-1. HP Patch/iX Error Message Prompt You can press the [Return] key to continue, or the [f1] key to get the Error Help window (see Figure 7-1 above).
Figure 7-2. HP Patch/iX Error Help Screen The Error Help window provides a scrollable window that gives cause and action text for the error (see Figure 7-2 above). There are three error levels in the HP Patch/iX utility. • • • Warning Level - warnings are given if a condition exists that could hinder your ability to complete the task. An example of a warning condition is if the patch reference file (REFxxxxx) is missing or corrupt.
When a fatal error is encountered HP Patch/iX will prompt with the fatal error prompt. When you acknowledge the error by pressing the [Return] Key HP Patch/iX will exit gracefully. Upon exit it will print important error information to the terminal window. If HP Patch/iX experienced an installation tools library error it will also print the error message associated with that error. ************** INTERNAL ERROR MESSAGE ******************* HP Patch/iX experienced the following library status RL STATUS.
• • • • • • • PATCHAUD.INSTALL.SYS -This is the logfile for the common installation tools library routines used for patch qualification activities. It contains extensive (and often hard to understand) information about the patch qualification results. AUTOLOG.INSTALL.SYS - A log file of most of the activity carried out by calls to the common installation tools library from the Create Tape screen. This file has all OCT, LINK EDIT, SOMPATCH, BUILDINT, and ABLDINTX output.
Recovering from Errors In many cases HP Patch/iX allows you to recover from errors at a place close to where the error occurred. HP Patch/iX maintains a binary recovery file called PMRECOVR.INSTALL.SYS that contains information about the last run of the tool. When you restart HP Patch/iX, it will look for this file, and if found, ask you whether you want to recover. If you respond Yes HP Patch/iX will restore the environment from this file. It will also tell you where you last left off.
Figure 8-2. HP Patch/iX Main Menu before tape creation. HP Patch/iX allows you control over how to continue. You can choose to continue from where you left off or select any of the previous menu items to start at an earlier step. For example if a patch had a problem being added to the NL, you could choose to restart, select the Patch Qualification menu item, Veto the patch, and then start the Create Tape phase again.
Figure 8-3. HP Patch/iX resuming at tape creation after an error. When starting Phase II HP Patch/iX will prompt you, asking if you are ready to begin phase II. If you accidentally answer No, you can exit HP Patch/iX and restart with the info parameter "phase2", and HP Patch/iX will recover from the phase2 recovery file P2RECOVR.INSTALL.SYS. It will then start the phase II installation process. Handling Recovery Phase I Recovery Files PMRECOVR.INSTALL.
V MPEFX92A F MPEGX67A F MPEGX98A If a fatal error is experienced later and the user enters the "Qualify Patches" screen again then HP Patch/iX will use this information to automatically customize the list of patches. This feature saves the user the time required in remembering what customizations where made. The user then can always remove any customizations that were made. Phase II Recovery Files PMRECOVR.INSTALL.
HP Patch/iX Reports HP Patch/iX creates two reports when it completes phase I successfully. These reports are: Special Instructions This report has the special instructions for each patch that was placed on the patch installation tape. The report is saved as SITEXT.INSTALL.SYS. This text will be formatted with the patches listed alphabetically. A block of Special Instructions text will follow the Patch ID. Only those patches that had special instructions will be listed in the special instructions report.