
Owner manual


Chapter 6 Installing an Additional Processor
51
CAUTION Take the following precautions when installing processors:
• Leave the processor in the anti-static bag until you are
ready to install it.
• Wear an anti-static wrist strap and use a static-dissipating
work surface or grounding mat connected to the chassis
when handling components.
• Before removing a processor from the anti-static bag,
touch a grounded, unpainted metal surface to discharge
static electricity.
1. Unpack the processor shipping box and check the contents against the packing
list.
CAUTION Do not unseal the anti-static bag, or remove the processor until
you are ready to install it.
2. Log off all users, backup files, and shut down the NOS according to the
instructions in your NOS documentation.
3. Press the power switch on the HP Netserver control panel when prompted by
the operating system.
Normally, this completes the shutdown procedure.
WARNING Power supplies continue to provide standby current to the
Netserver until the power cables are disconnected.
4. Disconnect the AC power cord.
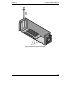
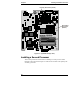
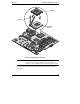
5. Gain access to the system board:
a. Pull out the anti-tip foot at the bottom of the rack. Then slowly slide the
HP Netserver chassis out from the rack as far as it can be extended.
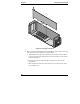
b. Remove the cover. Refer to Chapter 2, "Opening and Closing the HP
Netserver."
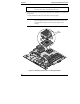
c. Remove rear blower. Refer to Chapter 1, “Opening and Closing the HP
Netserver.”
d. Remove the air flow guide. Refer to Chapter 2, "Opening and Closing the
HP Netserver."