HP Photosmart 2600/2700 series all-in-one User Guide
HP Photosmart 2600/2700 series all-in-one User Guide
© Copyright 2004 Hewlett-Packard Development Company, L.P. The information contained herein is subject to change without notice. Reproduction, adaptation or translation without prior written permission is prohibited, except as allowed under copyright laws. – – ● ● ● ● ● Adobe and the Acrobat logo are either registered trademarks or trademarks of Adobe Systems Incorporated in the United States and/or other countries. Windows®, Windows NT®, Windows ME®, Windows XP®, and Windows 2000® are U.S.
Contents 1 2 3 4 5 6 7 User Guide HP all-in-one overview.........................................................................................5 The HP all-in-one at a glance.................................................................................5 Control panel overview...........................................................................................6 Menu Overview.....................................................................................................
Copy a two-page black-and-white document........................................................62 Make a 10 by 15 cm (4 by 6 inch) borderless copy of a photo..............................63 Copy a 10 by 15 cm (4 by 6 inch) photo onto a full-size page..............................63 Copy a photo several times on one page.............................................................64 Resize an original to fit onto letter or A4 paper.....................................................
Contents 12 Use HP Instant Share (USB)............................................................................125 Overview.............................................................................................................125 Get started..........................................................................................................126 Send images using your HP all-in-one................................................................ 126 Send images using your computer................
19 Technical information......................................................................................217 System requirements..........................................................................................217 Paper specifications...........................................................................................217 Print specifications..............................................................................................219 Copy specifications.................................
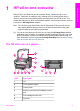
HP all-in-one overview Many HP all-in-one functions can be accessed directly, without turning on your computer. Tasks such as making a copy, sending a fax, or printing photos from a memory card can be accomplished quickly and easily from your HP all-in-one. This chapter describes the HP all-in-one hardware features, control panel functions, and how to access the HP Image Zone software. Note The HP Photosmart 2600 series and HP Photosmart 2700 series all-in-ones have slightly different features.
Chapter 1 HP all-in-one overview (continued) Label Description 7 Paper-length guide 8 Output tray 9 802.11b and g wireless radio on indicator (HP Photosmart 2700 series all-in-one only) 10 Paper-width guide 11 Glass 12 Ethernet port and Ethernet indicator lights 13 Rear USB port 14 Power connection 15 Fax ports (1-LINE and 2-EXT) 16 Rear clean-out door Note The wireless radio on the HP Photosmart 2700 series all-in-one is on by default.
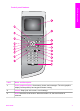
Label Name and Description 1 Color graphics display: View menus, photos, and messages. The color graphics display can be pulled up and angled for better viewing. 2 Cancel: Stop a job, exit a menu, or exit settings. 3 Scan: Select the scan function. When the button is lit, the scan function is selected.
Chapter 1 HP all-in-one overview (continued) Label Name and Description 4 Right arrow: Increase values, or go forward when viewing photos on the color graphics display. 5 Photo: Select the photo function. When the button is lit, the photo function is selected. Use this button to print photos from a memory card or to save photos to your computer. 6 Down arrow: Navigate down through menu options. 7 Proof Sheet: Print a proof sheet when a memory card has been inserted in a memory card slot.
Purpose Shows that a print cartridge is nearly empty. The color on the bottom of the icon corresponds to the color on the top of the print cartridge. For example, the green icon represents the cartridge that has green on top, which is the tri-color print cartridge. Shows the ink level of the print cartridge represented by the color of the icon. This example shows the gray photo print cartridge. Left: shows that there is a wired connection. Right: shows that there is no wired connection.
HP all-in-one overview Chapter 1 Menu Overview The following tables provide a quick reference to top-level menus that appear on the HP all-in-one color graphics display. Copy Menu Copy Menu 1. Number of Copies 2. Reduce/Enlarge 3. Tray Select 4. Paper Size 5. Paper Type 6. Copy Quality 7. Lighter/Darker 8. Enhancements 9. Color Intensity 0. Set New Defaults Scan To menu The Scan To menu lists scan destinations, including applications installed on your computer.
1. Select Computer 2. HP Instant Share 3. Memory Card Photo Menu When the HP all-in-one is connected to one or more computers on a network, the Photo Menu shows a different set of options than when it is connected to a computer via a USB cable. Photo Menu 1. Print Options 2. Edit 3. Transfer to Computer 4. Slideshow 5. HP Instant Share Fax Menu Fax Menu 1. Resolution 2. Lighter/Darker 3. Set New Defaults Proof Sheet Menu Proof Sheet Menu 1. Print Proof Sheet 2.
Chapter 1 HP all-in-one overview Macintosh computer screen. However, information about the color graphics display icons is presented on the color graphics display. Setup Menu 1. Help Menu 2. Print Report 3. Speed Dial Setup 4. Basic Fax Setup 5. Advanced Fax Setup 6. Tools 7. Preferences 8. Network 9. HP Instant Share 0. Bluetooth Use the HP Image Zone to do more with your HP all-inone The HP Image Zone software is installed on your computer when you set up your HP all-in-one.
Tip If the HP Director on your computer does not contain any icons, an error might have occurred during the software installation. To correct this, use the Control Panel in Windows to completely uninstall the HP Image Zone software; then reinstall the software. For more information, see the Setup Guide that came with your HP all-in-one. Button Name and Purpose Scan Picture: Scans a photo, picture, or drawing and displays it in the HP Image Zone.
Chapter 1 HP all-in-one overview (continued) Feature Purpose Settings Use this feature to view or change various settings for your HP all-in-one, such as print, scan, or copy. Status Use this feature to display the current status of your HP all-in-one. Open the HP Image Zone software (Macintosh OS X v10.1.5or later) Note Macintosh OS X v10.2.1 and v10.2.2 are not supported. When you install the HP Image Zone software, the HP Image Zone icon is placed in the Dock.
Icon HP all-in-one overview Products Feature and Purpose Unload Images: Use this feature to transfer images from a memory card to your computer. Scan Picture: Use this feature to scan an image and display it in the HP Gallery. Scan to OCR: Use this feature to scan text and display it in the selected destination text editing software program. Note Availability of this feature varies by country/region. Make Copies: Use this feature to make a copy in black and white or color.
Chapter 1 HP all-in-one overview (continued) Feature Purpose Search HP Image Zone Help Use this feature to search the HP Image Zone Help, which provides software help and troubleshooting information for your HP all-in-one. Display the HP Image Zone Dock menu The HP Image Zone Dock menu provides a shortcut to HP Image Zone services. The Dock menu automatically contains all of the applications available in the HP Image Zone window Services tab list.
● Macintosh OS 9: The HP Director is a standalone application that must be opened before its features can be accessed. Use one of the following methods to open the HP Director: – – Double-click the HP Director alias on the desktop. Double-click the HP Director alias in the Applications:Hewlett-Packard:HP Photo and Imaging Software folder. The HP Director displays only the task buttons that pertain to the selected device. Note The icons in the table below might appear differently on your computer.
HP all-in-one overview Chapter 1 In addition to the HP Gallery feature, several menu items without icons allow you to select other applications on your computer, change feature settings on your HP all-inone, and access the onscreen help. The following table explains these items. Manage and Share Feature Purpose More Applications Use this feature to select other applications on your computer. HP on the Web Use this feature to select an HP website.
2 Find more information A variety of resources, both printed and onscreen, provide information about setting up and using your HP all-in-one. Setup Guide The Setup Guide provides instructions for setting up your HP all-in-one and installing software. Make sure you follow the steps in order.
Chapter 2 (continued) The HP Image Zone Help provides detailed information on using the software for your HP all-in-one. ● ● ● The Get step-by-step instructions topic provides information on using the HP Image Zone software with HP devices. The Explore what you can do topic provides more information about the practical and creative things you can do with the HP Image Zone software and your HP devices.
3 Connection information Your HP all-in-one comes equipped with networking capability. It also comes equipped with a USB port so you can connect directly to a computer using a USB cable. If you insert an HP bt300 Bluetooth® Wireless Printer Adapter into the PictBridge camera port (USB host port) on the front of your HP all-in-one, Bluetooth devices such as PDAs and camera phones can print to your HP all-in-one.
Chapter 3 Connect using wireless The HP Photosmart 2700 series all-in-one uses an internal networking component that supports a wireless network. Detailed instructions on connecting your HP all-in-one to a wireless (802.11b or g) network are included in the Setup and Network Guides that came with your device. Connect using the HP bt300Bluetooth Wireless Printer Adapter The HP bt300 allows you to print images from most Bluetooth devices directly to your HP all-in-one without a cable connection.
This displays the Bluetooth menu and then selects Device Name. The Device Name screen appears. Note Your HP all-in-one ships with the predefined name of TBD. c Use the visual keyboard on the Device Name screen to enter a new name. d When you have finished entering a name for your HP all-in-one, highlight Done on the visual keyboard and press OK. For more information on using the visual keyboard, see Enter text and symbols.
Chapter 3 Note The default security setting is Low. Low level security does not require authentication. Passkey authentication is now set for your HP all-in-one. Set your HP all-in-one to be invisible to Bluetooth devices You can set your HP all-in-one to be either Visible to all Bluetooth devices (public) or Not visible to any (private): ● ● Visible to all: Any Bluetooth device within range can print to the HP all-in-one.
Note For more information on printing a network configuration page to obtain the IP address of your HP all-in-onet, see the Network Guide that came with your device. 2 3 The embedded Web server Home page appears in the browser window. In the left hand column, under Applications, select Scan. Follow the onscreen instructions.
Connection information Chapter 3 26 HP Photosmart 2600/2700 series all-in-one
4 Work with photos Your HP all-in-one allows you to transfer, edit, share, and print photos in several different ways. This chapter contains a brief overview of the wide range of options for performing each of these tasks, depending on your preferences and computer setup. More detailed information for each task is available in other chapters within this guide, or in the onscreen HP Image Zone Help that came with your software. Transfer photos You have several different options for transferring photos.
Chapter 4 Transfer photos using a Macintosh The graphic below shows several methods for transferring photos to your Macintosh, HP all-in-one, or a memory card. For more information, see the list below the graphic. A Transfer a photo from a memory card inserted into your HP all-in-one to your Macintosh. B Transfer a photo from your HP digital camera to your Macintosh. C Transfer a photo by scanning a photo directly onto a memory card inserted into your HP all-in-one.
A Edit a photo on your Windows PC using the HP Image Zone software. B Edit a photo using the control panel on your HP all-in-one. Edit photos using a Macintosh The graphic below shows three methods for editing photos using a Macintosh. For more information, see the list below the graphic. Edit a photo on your Macintosh using the HP Image Zone software. B Edit a photo on your Macintosh using the iPhoto software. C Edit a photo using the control panel on your HP all-in-one.
Chapter 4 Share photos You have several different options for sharing photos with friends and family. For more information, see the section below specific to your operating system. Share photos using a Windows PC Work with photos The graphic below shows several methods for sharing photos using a Windows PC. For more information, see the list below the graphic. A Share photos from your USB-connected HP all-in-one using the HP Instant Share service.
A Share photos from your USB-connected HP all-in-one using the HP Instant Share service. Transfer photos from your USB-connected HP all-in-one to your computer, where you use the HP Instant Share software to send the photos through the HP Instant Share service as an e-mail to your friends or family. B Share photos from your network-connected HP all-in-one through the Internet to the HP Instant Share service, where the photos are stored in an online photo album.
Chapter 4 A Print photos from your PictBridge digital camera using PictBridge. Note If your digital camera is an HP model that does not support PictBridge, you can still print directly to the HP all-in-one. Connect the camera to the USB port on the back of the HP all-in-one instead of to the camera port. This works with HP digital cameras only. B Print photos from your camera using a software application on your computer. C Print photos from a memory card using the control panel on the HP all-in-one.
A Print photos from your PictBridge digital camera using PictBridge. Note If your digital camera is an HP model that does not support PictBridge, you can still print directly to the HP all-in-one. Connect the camera to the USB port on the back of the HP all-in-one instead of to the camera port. This works with HP digital cameras only. B Print photos from your camera using a software application on your computer. C Print photos from a memory card using the control panel on the HP all-in-one.
Work with photos Chapter 4 34 HP Photosmart 2600/2700 series all-in-one
Load originals and load paper 5 Load originals and load paper This chapter provides instructions for loading originals on the glass to copy, scan, or fax; choosing the best paper type for your job; loading paper in the input tray; and avoiding paper jams. Load an original You can copy, scan, or fax up to letter- or A4-size originals by loading them on the glass, as described here. You should also follow these instructions when loading a proof sheet on the glass for photo printing.
Load originals and load paper Chapter 5 Choose papers for printing and copying You can use many types and sizes of paper in your HP all-in-one. Review the following recommendations to get the best printing and copying quality. Whenever you change paper types or sizes, remember to change those settings. Recommended papers If you want the best print quality, HP recommends using HP papers that are specifically designed for the type of project you are printing.
● ● ● ● ● ● ● Any size paper other than letter, A4, 10 by 15 cm (4 by 6 inch), 5 by 7 inch, Hagaki, or L. Depending on your country/region, some of these papers might not be available to you. Paper with cutouts or perforations (unless specifically designed for use with HP inkjet devices). Photo paper other than HP Premium Photo Paper or HP Premium Plus Photo Paper. Envelopes. Banner paper. Transparency film other than HP Premium Inkjet Transparency Film or HP Premium Plus Inkjet Transparency Film.
Load originals and load paper Chapter 5 2 Tap a stack of paper on a flat surface to align the edges, and then check the paper for the following: – – 3 Make sure it is free of rips, dust, wrinkles, and curled or bent edges. Make sure all the paper in the stack is the same size and type. Insert the stack of paper into the input tray with the short edge forward and the print side down. Slide the stack of paper forward until it stops.
Load originals and load paper 6 Fully extend the output tray extender to catch completed copy, print, or fax jobs. To load full-size plain paper in the optional lower tray ➔ The HP 250 Sheet Plain Paper Tray is available as an accessory for this product. For information on loading paper in this accessory, read and follow the instructions that came with the accessory.
Load originals and load paper Chapter 5 Tip For more help on loading small-size photo paper, refer to the icons engraved in the base of the input tray for loading photo paper (indicated by paper and camera icons). To make sure you have pushed the photo paper far enough forward, look for the engraved dotted lines in the base of the input tray. These indicate how far forward the paper must be loaded. 4 Slide the paper-length and paper-width guides inward against the stack of photo paper until they stop.
Load originals and load paper 5 Replace the output tray. To load postcards or Hagaki cards in the optional rear tray ➔ The HP Auto Two-sided Print Accessory with Small Paper Tray and the Hagaki Tray with Auto Two-sided Print Accessory are available for this product. For information on loading paper in either of these accessories, read and follow the instructions that came with the accessory. Load envelopes You can load one or more envelopes into the input tray of your HP all-in-one.
Load originals and load paper Chapter 5 Load other types of paper The following table provides guidelines for loading certain types of paper. For best results, adjust the paper settings each time you change paper sizes or paper types. For information on changing paper settings, see the onscreen HP Image Zone Help. Note Not all paper sizes and paper types are available with all the functions on the HP all-in-one.
Paper Tips (for printing from a software application only) 2 Remove all paper from the input tray. Note Leave the output tray off of the HP all-in-one while the banner prints to prevent the continuous banner paper from tearing. 3 Verify that the stack of banner paper contains at least five pages in the stack. Note If you use non-HP banner paper, make sure you use 20-lb. paper.
Load originals and load paper Chapter 5 44 HP Photosmart 2600/2700 series all-in-one
6 Use a memory card or PictBridge camera The HP all-in-one can access the memory cards used in most digital cameras so you can print, store, manage, and share your photos. You can insert the memory card into the HP all-in-one, or connect your camera directly, letting the HP all-in-one read the contents of the memory card while it is still in the camera.
Chapter 6 ● ● Bottom right slot: Memory Stick, Magic Gate Memory Stick, Memory Stick Duo (with user-supplied adapter), Memory Stick Pro PictBridge camera port (below the memory card slots): compatible with any USBequipped digital camera that supports PictBridge Memory Card and PictBridge Note The camera port only supports USB-equipped digital cameras that support PictBridge.
memory card from the camera and insert it in the appropriate memory card slot on the HP all-in-one. Note You can only use one memory card in your HP all-in-one at a time. 1 Insert the memory card into the appropriate slot on your HP all-in-one. When the memory card is inserted correctly, the Photo button on the control panel begins to blink. Reading photos... appears on the color graphics display. The status light next to the memory card slots blinks green when the card is being accessed.
Chapter 6 Print photos from a proof sheet A proof sheet is a simple and convenient way to select photos and make prints directly from a memory card without the need for a computer. A proof sheet, which might be several pages long, shows thumbnail views of photos stored on the memory card. The file name, index number, and date appear under each thumbnail. Proof sheets are also a quick way to create a printed catalog of your photos.
Complete the proof sheet After you have printed a proof sheet, you can use it to select the photos you want to print. Note You might want to use a photo print cartridge for superior print quality. With the tri-color and photo print cartridges installed, you have a six-ink system. For more information, see Use a photo print cartridge. Memory Card and PictBridge 1 2 Select the photos to print by using a dark pen or pencil to fill in the circles located under the thumbnail images on the proof sheet.
Memory Card and PictBridge Chapter 6 2 3 Load 10 by 15 cm (4 by 6 inch) photo paper in the input tray. Make sure the same memory card you used to print the proof sheet is still in the slot when you scan that proof sheet. Press Proof Sheet, and then press 2. This displays the Proof Sheet Menu and then selects Scan Proof Sheet. The HP all-in-one scans the proof sheet and prints the selected photos.
Setting Description 2. Image Size Lets you set the size at which you want the image printed. Most choices are self-explanatory, but two require some explanation: Fill Entire Page and Fit to Page. 3. Tray Select Lets you select the input tray (front or rear) that the HP all-in-one should use. This setting is only available if a rear tray is detected when you turn on the HP all-inone. 4. Paper Size Lets you select the paper size for the current print job.
Chapter 6 Setting Description 8. Digital Flash Lets you make dark photos appear lighter. Digital Flash affects only printed photos. It does not change the appearance of photos on the color graphics display or the actual image file on the memory card. Digital Flash is turned off by default. 9. Set New Defaults Lets you save the current Print Options settings as the new defaults. Change print options Memory Card and PictBridge You change each of the Print Options menu settings in the same way.
Purpose 1. Photo Brightness Lets you make the displayed image lighter or darker. Press to make the image darker. Press to make it lighter. 2. Color Effect Displays a menu of special color effects you can apply to the image. No Effect leaves the image untouched. Sepia applies a brown tone found in photos from the 1900s. Antique is similar to Sepia, but with pale colors added so the image looks hand-tinted. Black & White provides the same output as if you pressed Start Black. 3.
Chapter 6 You can do more than print your photos if you use the HP Image Zone software. This software lets you use photos for iron-on transfers, posters, banners, stickers, and other creative projects. For more information, see the onscreen HP Image Zone Help. Print individual photos You can print photos directly from the control panel without using a proof sheet. 1 Memory Card and PictBridge 2 Insert the memory card into the appropriate slot on your HP all-in-one. The Photo button lights up.
Deselect photos You can deselect photos from the control panel. ➔ Do one of the following: – – Press OK to deselect the currently selected photo shown in the display. Press Cancel to deselect all photos and return to the idle screen. Print photos from a PictBridge-compatible digital camera The HP all-in-one supports the PictBridge standard, which lets you connect any PictBridge-compatible camera to the camera port and print photos contained on the memory card in the camera.
Chapter 6 DPOF file that identifies which photos have been tagged for printing. Your HP all-in-one can read the DPOF file from the memory card so you do not have to reselect the photos to print. Note Not all digital cameras allow you to tag your photos for printing. See your digital camera documentation to see if it supports DPOF. Your HP all-in-one supports DPOF file format 1.1.
Share photos through HP Instant Share The HP all-in-one and its software can help you share photos with friends and family members using a technology called HP Instant Share. You can use HP Instant Share to: ● ● ● Share photos with friends and relatives through e-mail. Create online albums. Order printed photos online. Note Not all countries/regions can order printed photos online. Note If you set up HP Instant Share on a network, you will not be able to use HP Instant Share on a USB-connected device.
Chapter 6 Share photos from a memory card with friends and relatives (networkconnected) Your HP all-in-one allows you to share photos immediately upon inserting a memory card. Simply insert the memory card into the appropriate card slot, select one or more photos, and press Photo on the control panel. Before you can share photos on your memory card on a network-connected HP all-inone, you must first have HP Instant Share set up on the device.
7 Use the copy features The HP all-in-one allows you to produce high-quality color and black-and-white copies on a variety of paper types, including transparencies. You can enlarge or reduce the size of an original to fit a specific paper size, adjust the darkness and color intensity of the copy, and use special features to make high-quality copies of photos, including 10 by 15 cm (4 by 6 inch) borderless copies.
Chapter 7 (continued) Paper type Suggested paper size settings Photo papers 10x15 cm or 10x15 cm Borderless 4x6 inches or 4x6 Borderless 5x7 inches or 5x7 Borderless Letter or Letter Borderless A4 or A4 Borderless L-size or L-size Borderless Hagaki cards Hagaki or Hagaki Borderless Transparency films Letter or A4 1 2 3 Press Copy, and then press 4. This displays the Copy Menu and then selects Paper Size. Press until the appropriate paper size appears. Press OK to choose the displayed paper size.
(continued) Paper type Control panel setting HP Iron-On Transfer (for color fabrics) Iron-On HP Iron-On Transfer (for light or white fabrics) Iron-On Mirrored HP Premium Paper Premium Inkjet Other inkjet paper Premium Inkjet HP Professional Brochure & Flyer Paper (Glossy) Brochure Glossy HP Professional Brochure & Flyer Paper (Matte) Brochure Matte HP Premium or Premium Plus Inkjet Transparency Film Transparency Other transparency film Transparency Plain Hagaki Plain Paper Glossy Hagaki
Chapter 7 Change default copy settings When you change copy settings from the control panel, the settings apply only to the current copy job. To apply copy settings to all future copy jobs, you can save the settings as defaults. When you change copy settings from the control panel or the HP Director, the settings apply only to the current copy job. To apply copy settings to all future copy jobs, you can save the settings as defaults. 1 2 3 Make any needed changes to the settings in the Copy Menu.
1 2 3 4 5 6 Make sure you have paper loaded in the input tray. Load the first page of your original face down on the right front corner of the glass. Press Copy, if not already lit. Press Start Copy Black. Remove the first page from the glass and load the second page. Press Start Copy Black. Make a 10by 15cm (4by 6inch) borderless copy of a photo For the best quality when copying a photo, load photo paper in the input tray and change your copy settings for the correct paper type and photo enhancement.
Chapter 7 cartridges installed, you have a six-ink system. For more information, see Use a photo print cartridge. Note In order to achieve a borderless print without changing the proportions of the original, the HP all-in-one might crop some of the image around the margins. In most cases, this cropping will not be noticeable. 1 2 3 4 5 Load letter or A4 photo paper in the input tray. Load your original photo face down on the right front corner of the glass.
3 4 5 6 7 Position the photo on the glass so the long edge of the photo is along the front edge of the glass. Press Copy to display the Copy Menu. Press 2, and then press 5. This displays the Reduce/Enlarge menu and then selects Image Sizes. Press to highlight the size in which you want to copy the photo, and then press OK.
Chapter 7 3 4 Press Copy, and then press 7. This displays the Copy Menu and then selects Lighter/Darker. The range of Lighter/Darker values appears as a scale on the color graphics display. Press to darken the copy, and then press OK. Note You can also press 5 6 Press 9 to select Color Intensity from the Copy Menu. The range of color intensity values appears as a scale on the color graphics display. Press to make the image more vivid, and then press OK. Note You can also press 7 to lighten the copy.
2 3 4 5 Load your original photo face down on the right front corner of the glass. Position the photo on the glass so the long edge of the photo is along the front edge of the glass. Press Copy, and then press 8. This displays the Copy Menu and then selects Enhancements. Press to highlight the Photo enhancement setting, and then press OK. Press Start Copy Color.
Chapter 7 Prepare a color iron-on transfer You can copy an image or text onto an iron-on transfer, then iron it onto a T-shirt, pillow cover, place mat, or other piece of fabric. Tip Practice applying a iron-on transfer on an old garment first. 1 2 3 4 Load the iron-on transfer paper in the input tray. Load your original face down on the right front corner of the glass. If you are copying a photo, position the photo on the glass so the long edge of the photo is along the front edge of the glass.
8 Use the scan features This chapter contains information on scanning to an application, to an HP Instant Share destination, and to a memory card. Scanning is the process of converting text and pictures into an electronic format for your computer. You can scan just about anything: photos, magazine articles, text documents, and even 3D objects, as long as you are careful not to scratch the glass on your HP all-in-one. Scanning to a memory card makes your scanned images even more portable.
Chapter 8 Note The menus shown in this section may vary in content depending on your computer's operating system and which applications you set up as scan destinations in the HP Image Zone. Scan an original (USB-connected) Follow these steps if your HP all-in-one is directly connected to a computer through a USB cable. 1 2 3 4 Load your original face down in the right front corner of the glass. Press Scan, if it is not already lit.
5 6 To select an application to receive the scan, press its number on the control panel or use the arrow keys to highlight it and then press OK or Start Color. To force the scan to be in black and white, press Start Black instead of OK. If you chose the HP Image Zone, a preview image of the scan appears in the HP Scan window on the computer, where you can edit it. Make any desired edits to the preview image in the HP Scan window. When you finish, click Accept.
Chapter 8 Share a scanned image with friends and relatives (network-connected) Share a scanned image by pressing Scan on the control panel. To use the Scan button, place an image face down on the glass, select a destination to which you want to send the image, and start the scan. Before you can share a scanned image on a network-connected HP all-in-one, you must first have HP Image Zone installed on your computer.
3 A Scan Menu appears, listing various options or destinations. Press 3 to select Memory Card or use the arrow keys to highlight it and then press OK. The HP all-in-one scans the image and saves the file to the memory card in the JPEG format. Stop scanning ➔ To stop scanning, press Cancel on the control panel.
Scan Chapter 8 74 HP Photosmart 2600/2700 series all-in-one
Print from your computer The HP all-in-one can be used with any software application that allows printing. The instructions vary slightly depending on whether you are printing from a Windows PC or a Macintosh. Make sure you follow the instructions for your operating system in this chapter.
Chapter 9 Print from your computer To print from the software application you used to create your document (Macintosh users) 1 2 3 4 Make sure you have paper loaded in the input tray. Select the HP all-in-one in the Chooser (OS 9), Print Center (OS 10.2 or earlier), or Printer Setup Utility (OS 10.3 or later) before you begin printing. From the File menu in your software application, choose Page Setup. The Page Setup dialog box appears, allowing you to specify the paper size, orientation, and scaling.
Use the Page Setup and Print dialog boxes to change the settings for your print job. Which dialog box you use depends on which setting you want to change. To change the paper size, orientation, or scaling percentage 1 2 3 Select the HP all-in-one in the Chooser (OS 9), Print Center (OS 10.2 or earlier), or Printer Setup Utility (OS 10.3 or later) before you begin printing. From the File menu in your software application, choose Page Setup.
Print from your computer Chapter 9 78 HP Photosmart 2600/2700 series all-in-one
10 Fax setup After completing all steps in the Setup Guide, use the instructions in this chapter to complete your fax setup. Please keep your Setup Guide for later use. In this chapter, you will learn how to set up your HP all-in-one so that faxing works successfully with equipment and services you might already have on the same phone line as your HP all-in-one. Before you begin setting up your HP all-in-one for faxing, determine which kind of phone system your country/region uses.
Chapter 10 Choose the right fax setup for your home or office To fax successfully, you need to know what types of equipment and services (if any) share the same phone line with your HP all-in-one. This is important because you might need to connect some of your existing office equipment directly to your HP all-in-one, and you might also need to change some fax settings before you can fax successfully.
4 5 Do you receive voice calls at the same phone number you will use for fax calls on your HP all-in-one? ❑ Yes, I receive voice calls. ❑ No. Please continue answering questions. Do you have a PC modem on the same phone line as your HP all-in-one? ❑ Yes, I have a PC modem. ❑ No. If you answer Yes to any of the following questions, you are using a PC modem: – – – 7 Please continue answering questions.
Chapter 10 Other equipment/services sharing your fax line Recommended fax setup for Recommended fax setup parallel-type phone systems for serial-type phone systems None Case A: Separate fax line (no voice calls received) (You answered No to all questions.) Case A: Separate fax line (no voice calls received) DSL service Case B: Set up your HP all-in- Case B: Set up your HP allin-one with DSL (You answered Yes to question 1 one with DSL only.
(continued) Other equipment/services sharing your fax line Recommended fax setup for Recommended fax setup parallel-type phone systems for serial-type phone systems (You answered Yes to questions 4, 5, and 7 only.) Case A: Separate fax line (no voice calls received) If you have a separate phone line on which you receive no voice calls, and you have no other equipment connected on this phone line, set up your HP all-in-one as described in this section.
Chapter 10 When the phone rings, your HP all-in-one will answer automatically after the number of rings you set in the Rings to Answer setting. Then it will begin emitting fax reception tones to the sending fax machine and receive the fax. Case B: Set up your HP all-in-one with DSL If you have a DSL service through your telephone company, use the instructions in this section to connect a DSL filter between the telephone wall jack and your HP all-in-one.
Case C: Set up your HP all-in-one with a PBX phone system or an ISDN line If you are using either a PBX phone system or an ISDN converter/terminal adapter, make sure you do the following: ● If you are using either a PBX or an ISDN converter/terminal adaptor, connect the HP all-in-one to the port that is designated for fax and phone use. Also, make sure that the terminal adapter is set to the correct switch type for your country/region, if possible.
Chapter 10 Back view of the HP all-in-one 1 Telephone wall jack 2 Phone cord supplied in the box with your HP all-in-one connected to the "1-LINE" port Fax setup To set up your HP all-in-one with a distinctive ring service 1 Using the phone cord supplied in the box with your HP all-in-one, connect one end to your telephone wall jack, then connect the other end to the port labeled "1-LINE" on the back of your HP all-in-one.
(Rings to Answer setting). Then it will begin emitting fax reception tones to the sending fax machine and receive the fax. Case E: Shared voice/fax line If you receive both voice calls and fax calls at the same phone number, and you have no other office equipment (or voice mail) on this phone line, set up your HP all-in-one as described in this section.
Chapter 10 – distinguish between fax and voice calls in this case; if you suspect the call is a voice call, you will need to answer it before the HP all-in-one answers the call. If you set up the HP all-in-one to answer faxes manually, you must be available to respond in person to incoming fax calls or your HP all-in-one cannot receive faxes. a Press Setup, press 4, and then press 3. This displays the Basic Fax Setup menu and then selects Auto Answer.
Caution If you do not use the supplied cord to connect from the telephone wall jack to your HP all-in-one, you might not be able to fax successfully. This special phone cord is different from the phone cords you might already have in your home or office. If the supplied phone cord is too short, see The phone cord that came with my HP all-in-one is not long enough for information on extending it. 2 Set up the HP all-in-one to answer incoming calls manually: a Press Setup, press 4, and then press 3.
Chapter 10 2 3 Find the phone cord that connects from the back of your computer (your PC modem) to a telephone wall jack. Disconnect the cord from the telephone wall jack and plug it into the port labeled "2-EXT" on the back of your HP all-in-one. Using the phone cord supplied in the box with your HP all-in-one, connect one end to your telephone wall jack, then connect the other end to the port labeled "1-LINE" on the back of your HP all-in-one.
● front and two RJ-11 ports on the back. Do not use a 2-line phone splitter, a serial splitter, or a parallel splitter which has two RJ-11 ports on the front and a plug on the back.) You will also need three additional phone cords. You can purchase a parallel splitter and additional phone cords from an electronics store that carries phone accessories. If your computer has two phone ports, see Set up your HP all-in-one to a computer with two phone ports.
Chapter 10 3 4 5 Remove the white plug from the port labeled "2-EXT" on the back of your HP allin-one. Using another phone cord, connect one end to the port labeled "2-EXT" on the back of your HP all-in-one. Connect the other end of the phone cord to the parallel splitter on the side with the single phone port. If your PC modem software is set to receive faxes to your computer automatically, turn off that setting.
Back view of the HP all-in-one Telephone wall jack 2 "IN" phone port on your computer 3 "OUT" phone port on your computer 4 Telephone 5 Computer with modem 6 Phone cord supplied in the box with your HP all-in-one connected to the "1-LINE" port Fax setup 1 To set up your HP all-in-one to a computer with two phone ports 1 2 3 4 Remove the white plug from the port labeled "2-EXT" on the back of your HP allin-one.
Chapter 10 – distinguish between fax and voice calls in this case; if you suspect the call is a voice call, you will need to answer it before the HP all-in-one answers the call. If you set up the HP all-in-one to answer faxes manually, you must be available to respond in person to incoming fax calls or your HP all-in-one cannot receive faxes. a Press Setup, press 4, and then press 3. This displays the Basic Fax Setup menu and then selects Auto Answer.
Note If you do not connect your answering machine directly to your HP all-in-one, fax tones from a sending fax machine might be recorded on your answering machine, and you probably will not be able to receive faxes with your HP all-in-one. 3 Using the phone cord supplied in the box with your HP all-in-one, connect one end to your telephone wall jack, then connect the other end to the port labeled "1-LINE" on the back of your HP all-in-one.
Chapter 10 There are two different ways to set up your HP all-in-one with your computer based on the number of phone ports on your computer. Before you begin, check your computer to see if it has one or two phone ports: ● ● If your computer has only one phone port, see the next section, Set up your HP all-in-one to a computer with one phone port. You will need to purchase a parallel splitter (also called a coupler) in order to send and receive faxes successfully and use your PC modem.
Caution If you do not use the supplied cord to connect from the telephone wall jack to your HP all-in-one, you might not be able to fax successfully. This special phone cord is different from the phone cords you might already have in your home or office. If the supplied phone cord is too short, see The phone cord that came with my HP all-in-one is not long enough for information on extending it. 3 4 5 Remove the white plug from the port labeled "2-EXT" on the back of your HP allin-one.
Chapter 10 Fax setup Back view of the HP all-in-one 1 Telephone wall jack 2 "IN" phone port on your computer 3 "OUT" phone port on your computer 4 Telephone 5 Answering machine 6 Computer with modem 7 Phone cord supplied in the box with your HP all-in-one connected to the "1-LINE" port To set up your HP all-in-one to a computer with two phone ports 1 2 3 Remove the white plug from the port labeled "2-EXT" on the back of your HP allin-one.
5 6 (Optional) If your answering machine does not have a built-in phone, for convenience you might want to connect a phone to the back of your answering machine at the "OUT" port. If your PC modem software is set to receive faxes to your computer automatically, turn off that setting. Caution If you do not turn off the auto fax receive setting in your PC modem software, your HP all-in-one will not be able to receive faxes.
Chapter 10 ● successfully and use your PC modem. (A parallel splitter has one RJ-11 port on the front and two RJ-11 ports on the back. Do not use a 2-line phone splitter, a serial splitter, or a parallel splitter which has two RJ-11 ports on the front and a plug on the back.) You will also need three additional phone cords. You can purchase a parallel splitter and additional phone cords from an electronics store.
4 5 phone cord that came with my HP all-in-one is not long enough for information on extending it. Remove the white plug from the port labeled "2-EXT" on the back of your HP allin-one. If your PC modem software is set to receive faxes to your computer automatically, turn off that setting. Caution If you do not turn off the auto fax receive setting in your PC modem software, your HP all-in-one will not be able to receive faxes.
Chapter 10 2 3 4 Find the phone cord that connects from the back of your computer (your PC modem) to a telephone wall jack. Disconnect the cord from the telephone wall jack and plug it into the port labeled "2-EXT" on the back of your HP all-in-one. Connect a phone to the "OUT" port on the back of your PC modem.
3 4 5 Press Setup. Press 6, then press 5. This displays the Tools menu and then selects Run Fax Test. The HP all-in-one displays the status of the test on the color graphics display and prints a report. Review the report. – – 6 If the test passes and you are still having problems faxing, check the fax settings listed in the report to verify the settings are correct. A blank or incorrect fax setting can cause problems faxing.
Fax setup Chapter 10 104 HP Photosmart 2600/2700 series all-in-one
11 Use the fax features You can use your HP all-in-one to send and receive faxes, including color faxes. You can set up speed dials to send faxes quickly and easily to frequently used numbers. From the control panel, you can also set a number of fax options, such as resolution. You should explore the HP Director that came with your HP Image Zone software to take full advantage of all of its features.
Chapter 11 (continued) Equipment/services sharing your fax line Recommended Auto Answer setting Description number of rings, see Set the number of rings before answering. A shared voice and fax line and no answering machine. Off (You have a shared phone line in which you receive both voice and fax calls.) The HP all-in-one will not automatically answer calls. You must receive all faxes manually by pressing Start Black or Start Color.
Set the answer mode The answer mode determines whether your HP all-in-one answers incoming calls or not. If you set up the HP all-in-one to answer faxes automatically (the Auto Answer option is set to Yes), it answers all incoming calls and receives faxes. If you set up the HP all-in-one to answer faxes manually (the Auto Answer option is set to Off), you must be available to respond in person to the incoming fax call, or your HP all-in-one will not receive faxes.
Chapter 11 After all the pages are scanned, the HP all-in-one sends the fax. Tip You can also send a fax in color, such as a photo, from your HP all-in-one. Just press Start Color instead of Start Black. Did you know that you can send a fax from your computer by using the HP Director that came with your HP Image Zone software? You can also create and attach a computer-generated cover page to send with your fax. It's easy.
To send a fax manually from a phone 1 2 Load the first page face down on the right front corner of the glass. Dial the number by using the keypad on the phone that is connected to your HP all-in-one. Note You must use the keypad on the phone to dial the number. Do not use the keypad on the control panel of the HP all-in-one. 3 4 5 6 Once you are ready to send the fax, press Fax. The Fax Mode screen appears. Press 1 to send a new fax. Press Start Black.
Chapter 11 3 4 5 6 7 Press to redial the last number dialed. Press Start Black. If the most recently sent black-and-white fax is stored in memory, the Fax Mode screen appears. Press 1 to send a new fax. Press Start Black. If you have another page to fax, when prompted, press 1. Load it face down on the right front corner of the glass, and then press OK. If you do not have another page to fax, press 2. The HP all-in-one sends the fax.
4 5 6 7 Press Start Black again. The HP all-in-one scans the page into memory. If you have another page to fax, when prompted, press 1. Load the next page face down on the right front corner of the glass, and then press OK. If you do not have another page to fax, press 2. The Enter Fax Number screen appears. Once you hear the dial tone, enter the number by using the keypad on the control panel. Follow any prompts that might occur. Your fax is sent when the receiving fax machine answers.
Chapter 11 Receive a fax manually If you set up your HP all-in-one to receive faxes manually (the Auto Answer option is set to Off) or you answer the phone and hear fax tones, use the instructions in this section to receive faxes. You can receive faxes manually from a phone that is: ● ● Directly connected to the HP all-in-one (on the "2-EXT" port) On the same phone line, but is not connected to the HP all-in-one 1 Make sure the HP all-in-one is turned on and you have paper loaded in the input tray.
Note If your HP all-in-one loses power, you will need to reset the date and time. 1 2 3 4 5 Press Setup. Press 4, and then press 1. This displays the Basic Fax Setup menu and then selects Date and Time. Enter the month, day, and year by pressing the appropriate numbers on the keypad. Depending on your country/region setting, you might enter the date in a different order.
Chapter 11 pause before dialing the remainder of the number. A pause is useful if you need to access an outside line before dialing the fax number. Note If you want to enter a symbol in your fax number, such as a dash, you will need to enter the symbol by using the keypad. Enter text using the visual keyboard You can enter text or symbols by using the visual keyboard that automatically appears on the color graphics display when you need to enter text.
Tip The cursor automatically advances to the right after a few seconds. ● ● ● ● ● To insert a space, press Space (#). To enter a pause, press Symbols (*). A dash appears in the number sequence. To enter a symbol, such as @, press the Symbols (*) button repeatedly to scroll through the list of available symbols: asterisk (*), dash (-), ampersand (&), period (.
Chapter 11 2 This displays the Print Report menu. Press to scroll through the following report types: – – – – – 3 1. Fax Report Setup: prints the automatic fax reports as described in Generate reports automatically. 2. Last Transaction: prints details of the last fax transaction. 3. Fax Log: prints a log of approximately the last 30 fax transactions. 4. Speed Dial List: prints a list of programmed speed-dial entries. 5.
4 5 6 7 8 9 When the current fax number appears, press to erase it. Enter the new fax number. Press OK to save the new number. The visual keyboard automatically appears on the color graphics display. Use the visual keyboard to change the name. For more information on using the visual keyboard, see Enter text and symbols. Press OK. Press 1 to update another speed-dial entry, or press Cancel to exit. Delete speed-dial entries You can delete an individual or group speed-dial entry. 1 2 3 4 Press Setup.
Chapter 11 Note If you press Start Color, the fax will be sent using the Fine setting. 7 8 9 If the most recently sent black-and-white fax is stored in memory, the Fax Mode screen appears. Press 1 to send a new fax. Press Start Black. If you have another page to fax, when prompted, press 1. Load the next face down on the right front corner of the glass, and then press OK. If you do not have another page to fax, press 2.
Set the paper size for received faxes You can select the paper size for received faxes. The paper size you select should match what is loaded in your input tray. Faxes can be printed on letter, A4, or legal paper only. Note If an incorrect paper size is loaded in the input tray when a fax is received, the fax does not print and an error message appears on the color graphics display. Load letter, A4, or legal paper, and then press OK to print the fax. 1 2 3 Press Setup. Press 4, and then press 5.
Chapter 11 triple rings for the different numbers. You can set up your HP all-in-one to answer incoming calls that have a specific ring pattern. If you connect your HP all-in-one to a line with distinctive ringing, have your telephone company assign one ring pattern to voice calls and another ring pattern to fax calls. We recommend that you request double or triple rings for a fax number. When the HP allin-one detects the specified ring pattern, it will answer the call and receive the fax.
3 4 This displays the Advanced Fax Setup menu and then selects Automatic Reduction. Press to select Off or On. Press OK. Set backup fax reception The HP all-in-one stores all received faxes in memory. If there is an error condition that prevents the HP all-in-one from printing the faxes, Backup Fax Reception allows you to continue receiving faxes. During the error condition, with Backup Fax Reception enabled, the faxes are stored in memory.
Chapter 11 Turn ECM off only if it increases phone charges substantially, and you can accept poorer quality in exchange for reduced charges. The following rules apply to ECM: ● ● ● If you turn ECM off, this applies only to faxes that you send. This does not apply to faxes that you receive. If you turn ECM off, set the Fax Speed to Medium. If the Fax Speed is set to Fast, the fax will automatically be sent with ECM on. For information on changing the Fax Speed, see Set the fax speed.
Reprint or delete the faxes in memory You can reprint or delete the faxes stored in memory. You might need to reprint a fax in memory if your HP all-in-one runs out of paper while receiving a fax. Or, if the memory of the HP all-in-one becomes full, you might need to clear it in order to continue receiving faxes. Note The HP all-in-one stores all faxes it receives in memory, even when the faxes are printed. This allows you to reprint the faxes later, if needed.
Chapter 11 setting from High (the default) to Medium. For information on changing this setting, see Set the fax speed. You should also check with your telephone company to make sure their Internet phone service supports faxing. If they do not support faxing, you will not be able to send and receive faxes through the Internet. Stop faxing You can cancel a fax you are sending or receiving at any time.
12 Use HP Instant Share (USB) HP Instant Share makes it easy to share photos with family and friends. Just scan a photo or insert a memory card into the appropriate card slot on your HP all-in-one, select one or more photos to share, select a destination for your photos, and then send the photos on their way. You can even upload your photos to an online photo album or an online photo finishing service. Availability of services varies by country/region.
Chapter 12 Get started You must have the following to use HP Instant Share with your HP all-in-one: ● ● ● An HP all-in-one connected to a computer with a USB cable Internet access through the computer to which the HP all-in-one is connected Based on your operating system: – – Windows: HP Image Zone software installed on your computer Macintosh: HP Image Zone software installed on your computer, including the HP Instant Share client application software For more information, see the Setup Guide that came
Note If you are using a Macintosh OS earlier than X v10.1.5 (including OS 9 v9.1.5), your photos are uploaded to the HP Gallery on your Macintosh. Click E-mail. Send the photos as an e-mail attachment by following the prompts on your computer screen. 4 Follow the steps appropriate for your operating system: If you are using a Windows-based computer: a From either the Control or Work areas of the HP Instant Share tab, click the link or icon of the service you want to use to send your photos.
Chapter 12 3 4 Press 1 to select Memory card. The first photo on your memory card appears on the color graphics display. Select one or more photos. Note For more information on selecting photos, see Use a memory card or PictBridge camera. 5 Follow the steps (starting with step 3) in To send photos immediately upon inserting your memory card. Send a scanned image Share a scanned image by pressing HP Instant Share on the control panel.
If you are using a Macintosh: a b c d 5 Make sure the scanned image you want to share displays in the HP Instant Share window. Use the - button to remove photos, or the + button to add photos to the window. Click Continue and follow the onscreen instructions. From the HP Instant Share services list, select the service you want to use to send your scanned image. Follow the onscreen instructions.
Chapter 12 2 The HP Image Zone window opens on your computer. The My Images tab appears in the window. Select one or more images from the folder(s) in which they are stored. For more information, see the onscreen HP Image Zone Help. Note Use the HP Image Zone image editing tools to edit your images and achieve the results you want. For more information, see the onscreen HP Image Zone Help. 3 4 Click the HP Instant Share tab. The HP Instant Share tab appears in the HP Image Zone window.
3 4 Choose HP Instant Share from the list of applications. The HP Instant Share client application software opens on your computer. Use the + button to add an image to the window, or the - button to remove an image. Note For more information on using the HP Instant Share client application software, see the onscreen HP Image Zone Help. 5 6 7 8 9 Make sure the images you want to share display in the HP Instant Share window. Click Continue and follow the onscreen instructions.
Chapter 12 4 For more information, see the onscreen HP Photo and Imaging Help. Click E-mail. Use HP Instant Share (USB) The e-mail program on your Macintosh opens. Share the images as an e-mail attachment by following the prompts on your computer screen.
Use HP Instant Share (networked) HP Instant Share makes it easy to share photos with family and friends. Just scan a photo or insert a memory card into the appropriate card slot on your HP all-in-one, select one or more photos to share, select a destination for your photos, and then send the photos on their way. You can even upload your photos to an online photo album or an online photo finishing service. Availability of services varies by country/region.
Use HP Instant Share (networked) Chapter 13 HP Instant Share Receive HP Instant Share Receive lets you receive images from any friend or relative who has accessed the HP Instant Share service and obtained an HP Passport user ID and password. Receive images from any sender or a specified group of senders You can receive images from any sender with an HP Passport account (Open mode) or a specified group of senders (Private mode).
HP remote printing lets you print from a Windows application to a network-connected device in a separate location. For example, you can use the HP remote printer driver to print from your laptop at a coffee shop to your HP all-in-one at home. You can also print to your device while working from home over a virtual private network (VPN). For more information, see Remote print documents.
Use HP Instant Share (networked) Chapter 13 network-connected device, an online photo album, or an online photo finishing service. Availability of services varies by country/region. Note Although destinations are created on the HP Instant Share service, they are accessed through the HP all-in-one. To create destinations 1 2 3 Press HP Instant Share on the control panel of your HP all-in-one. The HP Instant Share menu appears on the color graphics display. Press 3to select Add New Destination.
When you add a sender to the list, grant one of the following access privileges: – – – Allow: Allows images received from a sender to be previewed prior to printing. Auto print: Allows images received from a sender to print automatically to your device. Block: Ensures you do not receive unwanted images from a sender. To use the access list 1 2 3 Press HP Instant Share on the control panel of your HP all-in-one. The HP Instant Share menu appears on the color graphics display. Press 3, and then press 5.
Use HP Instant Share (networked) Chapter 13 Send photos from a memory card Your HP all-in-one gives you the option to send photos immediately upon inserting a memory card, or insert the memory card and send photos at a later time. To send photos immediately, insert the memory card into the appropriate card slot, select one or more photos, and press HP Instant Share on the control panel.
3 4 5 6 7 8 Send photos from a destination file If your HP digital camera supports HP Instant Share, it lets you assign photos to destinations on a memory card. The assigned photos are stored in a destination file. When you remove the memory card from the camera and place it in the appropriate card slot on your HP all-in-one, the HP all-in-one reads the memory card and forwards the photos to their assigned destinations.
Use HP Instant Share (networked) Chapter 13 Note The device name is assigned when you set up your HP Instant Share account and register your HP all-in-one. The device name is not case sensitive. 2 3 4 Verify that the recipient either is receiving in Open mode or has included your HP Passport user ID in the access list for the receiving device. For more information, see Receive from any sender (Open mode) and Use the HP Instant Share access list.
Online Albums Online photo finishing (availability varies by country/region) Note You cannot receive image collections using the HP Image Zone software. If you want to share images using HP Instant Share E-mail (send to a device), perform the tasks in the bullets below: ● Ask the recipient for the name he assigned to his network-connected device. Note The device name is assigned when you set up your HP Instant Share account and register your HP all-in-one. For more information, see Get started.
Use HP Instant Share (networked) Chapter 13 2 3 4 5 6 7 8 The HP Image Zone opens on your desktop. In the HP Image Zone, click the Services button at the top of the window. A list of applications appears in the lower part of the HP Image Zone. Choose HP Instant Share from the list of applications. The HP Instant Share client application software opens on your computer. Add the images you want to share to the HP Instant Share window.
4 Press 1 to select Receive Options. The Receive Options menu appears. Press 2 to select Open, receive from any sender. By default, your HP all-in-one is set to allow you to preview images in a collection before printing. To automatically print images received, see To automatically print received images.
Use HP Instant Share (networked) Chapter 13 ● information about the collection is displayed in the Received collections list in the HP all-in-one. If auto checking is not enabled, or if you want to check to see if you have received a collection between auto check intervals, press HP Instant Share and select Receive from the HP Instant Share menu. Selecting Receive triggers your HP all-in-one to check for new image collections and download the information to your device's Received collection list.
3 4 5 6 The HP Instant Share menu appears on the color graphics display. Press 2 to select Receive. The HP all-in-one queries the HP Instant Share service to see if you have received an image collection. If a collection is found, it is downloaded to your device. The Received collections list appears on the color graphics display. Use the and arrows to select a collection to view. Press OK. Select one or more images from the collection. Press Start Color, Start Black, or Photo.
Use HP Instant Share (networked) Chapter 13 Images sent from a camera or memory card are forwarded to a receiving device without print information. When an image, or collection of images, is received without print information, the items are printed according to the following rules: ● ● ● If the image or collection is set to auto print, the HP all-in-one uses the remote print options defined in the Instant Share Options menu.
Your HP all-in-one lets you cancel any action at any time. Simply press Cancel to halt receive, preview, and print jobs. ● ● ● If you select Receive from the HP Instant Share menu and then press Cancel, your device stops checking to see if new image collections have been received by the HP Instant Share service. You are returned to the HP Instant Share menu. If you are previewing a collection of images and press Cancel, any images you selected for print are deselected.
Use HP Instant Share (networked) Chapter 13 Note To download the HP remote printer driver from the HP website, make sure you use a broadband connection. Do not use a dial-up connection. It will take approximately 3 to 5 minutes to download the driver using a broadband connection. To use the HP remote printer driver 1 2 3 4 5 6 From a Windows application, select File and then Print. The Print window appears on your computer screen. Select the printer named HP remote printers.
3 The HP Instant Share menu appears on the color graphics display. Press 3 to select HP Instant Share Options. The Instant Share Options menu appears on the color graphics display. Use the and arrows to highlight the option you want to access. Options are described in the table below.
Use HP Instant Share (networked) Chapter 13 (continued) Instant Share Options Remote Print Size Selecting Remote Print Size lets you set the print size for received images. For more information, see Set print options. Reset HP Instant Share Selecting Reset HP Instant Share lets you reset your HP Instant Share device settings to factory defaults. This means your HP all-in-one is no longer registered with HP Instant Share.
14 Order supplies You can order recommended types of HP paper, print cartridges, and HP all-in-one accessories online from the HP website. Order paper, transparency film, or other media To order media such as HP Premium Paper, HP Premium Plus Photo Paper, HP Premium Inkjet Transparency Film, or HP Iron-On Transfer, go to www.hp.com. If prompted, choose your country/region, follow the prompts to select your product, and then click one of the shopping links on the page.
Chapter 14 Depending on your country/region, your HP all-in-one might support the following accessories: Accessory and HP model number Description HP Automatic Two-sided Printing Accessory Enables you to automatically print on both sides of a sheet of paper. With this accessory installed you can print on both sides of the page without having to manually flip and reload the pages in the middle of your print job.
(continued) Country/region Number for ordering Australia 131047 Europe +49 180 5 290220 (Germany) +44 870 606 9081 (U.K.) New Zealand 0800 441 147 South Africa +27 (0)11 8061030 U.S.
Order supplies Chapter 14 154 HP Photosmart 2600/2700 series all-in-one
15 Maintain your HP all-in-one The HP all-in-one requires little maintenance. Sometimes you might want to clean the glass and lid backing to remove surface dust and ensure that your copies and scans remain clear. You will also need to replace, align, or clean your print cartridges occasionally. This chapter provides instructions for keeping your HP all-in-one in top working condition. Perform these simple maintenance procedures as necessary.
Chapter 15 Warning Be careful not to spill alcohol on the glass or painted parts of the HP all-in-one, as this might damage the device. Clean the exterior Use a soft cloth or slightly moistened sponge to wipe dust, smudges, and stains off the case. The interior of the HP all-in-one does not require cleaning. Keep fluids away from the control panel and the interior of the HP all-in-one.
Print a self-test report If you are experiencing problems with printing, print a self-test report before you replace the print cartridges. This report provides useful information on several aspects of your device, including your print cartridges. Load letter, A4, or legal unused plain white paper into the input tray. Press Setup. Press 2, then press 5. This displays the Print Report menu and then selects Self-Test Report.
Chapter 15 Work with print cartridges To ensure the best print quality from your HP all-in-one, you will need to perform some simple maintenance procedures. This section provides guidelines for handling the print cartridges and instructions for replacing, aligning, and cleaning the print cartridges. Handle the print cartridges Before you replace or clean a print cartridge, you should know the part names and how to handle the print cartridges.
Tip You can also use these instructions to replace the black print cartridge with a photo or gray photo print cartridge for printing high-quality color or black-and-white photos. To find out the reorder number for all the print cartridges that your HP all-in-one supports, see Order print cartridges. To order print cartridges for your HP all-in-one, go to www.hp.com. If prompted, choose your country/region, follow the prompts to select your product, and then click one of the shopping links on the page.
Maintain your HP all-in-one Chapter 15 Print cartridge latch for the tri-color print cartridge 2 Print cartridge latch for the black, photo, and gray photo print cartridges 4 Push down on the print cartridge to release it, and then pull it toward you out of its slot. 5 If you are removing the black print cartridge in order to install the photo or gray photo print cartridge, store the black print cartridge in the print cartridge protector. For more information, see Use the print cartridge protector.
1 Copper-colored contacts 2 Plastic tape with pink pull tab (must be removed before installing) 3 Ink nozzles under tape Caution Do not touch the copper-colored contacts or ink nozzles. Touching these parts can result in clogs, ink failure, and bad electrical connections. Slide the new print cartridge down the ramp and into the empty slot. Push the print cartridge forward until it clicks into place.
Chapter 15 9 Close the print-carriage access door. Maintain your HP all-in-one Use a photo print cartridge You can optimize the quality of the color photos you print and copy with your HP all-inone by purchasing a photo print cartridge. Remove the black print cartridge and insert the photo print cartridge in its place. With the tri-color print cartridge and photo print cartridge installed, you have a six-ink system, which provides enhanced quality color photos.
When you want to print regular text documents, swap the black print cartridge back in. Use a print cartridge protector to keep your print cartridge secure when it is not being used. ● ● ● For more information on purchasing a gray photo print cartridge, see Order print cartridges. For more information on replacing print cartridges, see Replace the print cartridges. For more information on using the print cartridge protector, see Use the print cartridge protector.
Chapter 15 Align the print cartridges The HP all-in-one prompts you to align cartridges every time you install or replace a print cartridge. You can also align the print cartridges at any time from the control panel or by using the HP Image Zone software on your computer. Aligning the print cartridges ensures high-quality output. Note If you remove and reinstall the same print cartridge, the HP all-in-one will not prompt you to align the print cartridges.
Clean the print cartridges Use this feature when the self-test report shows streaking or white lines through any of the lines of color. Do not clean print cartridges unnecessarily, as this wastes ink and shortens the life of the ink nozzles. To clean the print cartridges from the control panel 1 2 3 Load letter or A4 unused plain white paper into the input tray. Press Setup. Press 6, then press 1. This displays the Tools menu and then selects Clean Print Cartridge.
Chapter 15 Note Do not remove both print cartridges at the same time. Remove and clean each print cartridge one at a time. Do not leave a print cartridge outside the HP all-in-one for more than 30 minutes. 4 5 6 7 Inspect the print cartridge contacts for ink and debris buildup. Dip a clean foam rubber swab or lint-free cloth into distilled water, and squeeze any excess water from it. Hold the print cartridge by its sides. Clean only the copper-colored contacts.
To clean the area around the ink nozzles 1 2 Turn on the HP all-in-one and open the print-carriage access door. The print carriage is on the far right side of the HP all-in-one. Wait until the print carriage is idle and silent, and then unplug the power cord from the back of the HP all-in-one. Note When you unplug the power cord, the date and time are erased. You will need to reset the date and time later, when you plug the power cord back in. For more information, see Set the date and time.
Chapter 15 HP all-in-one has not been used within that specified period, it turns the light bulb off to preserve power. You can exit this mode by pressing any button on the control panel. Your HP all-in-one is automatically set to enter power save mode after 12 hours. Follow these steps if you want the HP all-in-one to enter this mode earlier. 1 2 3 Press Setup. Press 7, then press 2. This displays the Preferences menu and then selects Set Power Save Mode Time.
16 Troubleshooting information This chapter contains troubleshooting information for the HP all-in-one. Specific information is provided for installation and configuration issues, and some operational topics. For more troubleshooting information, see the onscreen HP Image Zone Help file that came with your software. Many issues are caused when the HP all-in-one is connected to the computer using a USB cable before the HP all-in-one software is installed on the computer.
Chapter 16 – – 2 If you are unable to solve the problem using the information in the documentation, visit www.hp.com/support to do the following: – – – – 3 4 Readme file: The Readme file contains information on possible installation problems and system requirements. For more information, see View the Readme file. Network Guide: The Network Guide explains how to set up your HP all-in-one on a network. Access online support pages. Send HP an e-mail message for answers to your questions.
I connected the USB cable, but I am having problems using the HP all-in-one with my computer Solution You must first install the software that came with your HP all-in-one before connecting the USB cable. During installation, do not plug in the USB cable until prompted by the onscreen instructions. Connecting the USB cable before prompted can cause errors. Once you have installed the software, connecting your computer to your HP all-inone with a USB cable is straightforward.
Chapter 16 The color graphics display shows the wrong language Solution Usually, you set the language and country/region when you first set up the HP allin-one. However, you can change these settings at any time by using the following procedure: 1 2 3 4 5 6 Press Setup. Press 7, and then press 1. This selects Preferences, and then selects Set Language & Country/Region. A list of languages appears. You can scroll through the list of languages by pressing the and arrows.
3 4 5 6 A list of languages appears. You can scroll through the list of languages by pressing the and arrows. When your language is highlighted, press OK. When prompted, press 1 for Yes or 2 for No. The countries/regions for the selected language appear. Press or to scroll through the list. When the language you want to select is highlighted, press OK. When prompted, press 1 for Yes or 2 for No.
Chapter 16 1 Copper-colored contacts 2 Plastic tape with pink pull tab (must be removed before installing) 3 Ink nozzles under tape Reinsert the print cartridges and verify that they are fully inserted and locked in place. Cause The contacts on the print cartridge are not touching the contacts in the print carriage. Solution Remove and then reinsert the print cartridges. Verify that they are fully inserted and locked in place. Cause The print cartridge or sensor is defective.
● ● ● ● ● ● you experience problems, the USB cable might need to be replaced. Also verify that the cable does not exceed 3 meters (9.8 feet) in length. Make sure your computer is USB ready. Some operating systems, such as Windows 95 and Windows NT, do not support USB connections. Check the documentation that came with your operating system for more information. Check the connection from your HP all-in-one to your computer.
Chapter 16 During a normal installation of the HP all-in-one software, the following events occur: 1 2 3 4 5 6 7 8 The HP all-in-one CD-ROM runs automatically. The software installs. Files are copied to your hard drive. You are requested to connect the HP all-in-one to your computer. A green OK and check mark appear on an installation wizard screen. You are requested to restart your computer. The Fax Setup wizard runs. The registration process runs.
3 4 Click Retry to retry the plug and play setup. If this does not work, continue to the next step. Verify that the USB cable is set up properly as follows: – – – – 5 6 Unplug the USB cable and plug it in again. Do not attach the USB cable to a keyboard or non-powered hub. Verify that the USB cable is 3 meters or less in length. If you have several USB devices attached to your computer, you might want to unplug the other devices during the installation.
Chapter 16 Solution Launch the fax wizard as follows: 1 2 Start the HP Director. For more information, see the onscreen HP Image Zone Help that came with your software. Click the Settings menu, select Fax Settings and Setup, then select Fax Setup Wizard.
6 Restart your computer. Note It is important that you disconnect your HP all-in-one before restarting your computer. Do not connect the HP all-in-one to your computer until after you have reinstalled the software. 7 To reinstall the software, insert the HP all-in-one CD-ROM into your computer’s CD-ROM drive, and follow the onscreen instructions and the instructions provided in the Setup Guide that came with your HP all-in-one.
Chapter 16 5 6 7 Run the HP Photosmart 2600/2700 series all-in-one software Setup program again. Launch Reinstall. Follow the onscreen instructions and the instructions provided in the Setup Guide that came with your HP all-in-one. To uninstall from a Macintosh computer 1 2 3 4 Disconnect the HP all-in-one from your Macintosh. Double-click the Applications: HP All-in-One Software folder. Double-click HP Uninstaller. Follow the onscreen instructions.
3 Review the report. – – 4 If the test passes and you are still having problems faxing, check the fax settings listed in the report to verify the settings are correct. A blank or incorrect fax setting can cause faxing problems. If the test fails, review the report for information on how to fix any problems found. For more information, you can also see the next section, The fax test failed. Press OK to return to the Setup Menu.
Chapter 16 ● ● ● ● plug in the phone cord that came with your HP all-in-one, run the fax test again. Make sure you have correctly connected the HP all-in-one to the telephone wall jack. Using the phone cord supplied in the box with your HP all-in-one, connect one end to your telephone wall jack, then connect the other end to the port labeled "1-LINE" on the back of your HP all-in-one. For more information on setting up your HP all-in-one for faxing, see Fax setup.
● port labeled "1-LINE" on the back of your HP all-in-one. For more information on setting up your HP all-in-one for faxing, see Fax setup. Other equipment, which uses the same phone line as the HP all-in-one, might be causing the test to fail. To find out if other equipment is causing a problem, disconnect everything from the phone line, and then run the test again.
Chapter 16 ● setting is incorrect, press OK and follow the prompts on the color graphics display to change it. Make sure you connect your HP all-in-one to an analog phone line or you will not be able to send or receive faxes. To check if your phone line is digital, connect a regular analog phone to the line and listen for a dial tone. If you do not hear a normal sounding dial tone, it might be a phone line set up for digital phones.
● ● ● ● ● User Guide 185 Troubleshooting information ● If you used the 4-wire phone cord, disconnect it, find the supplied 2-wire cord, and then connect the 2-wire cord to the port labeled "1-LINE" on the back of your HP all-in-one. For more information on connecting this phone cord and setting up your HP all-in-one for faxing, see Fax setup. If the supplied phone cord is not long enough, you can extend it. For information see The phone cord that came with my HP all-in-one is not long enough.
Chapter 16 ● something similar. For information on setting up your HP all-in-one with a PBX phone system or ISDN line, see Fax setup. If your HP all-in-one shares the same phone line with a DSL service, the DSL modem might not be properly grounded. If the DSL modem is not properly grounded, it can create noise on the phone line. Phone lines with poor sound quality (noise) can cause faxing problems.
Solution ● ● ● ● ● If you are not using a distinctive ring service, check to make sure that the Answer Ring Pattern feature on your HP all-in-one is set to All Rings. For information, see Change the answer ring pattern (distinctive ringing). If Auto Answer is set to Off, you will need to manually receive faxes; otherwise, your HP all-in-one will not receive the fax. For information on receiving faxes manually, see Receive a fax manually.
Chapter 16 of your outgoing message, record an additional 4 - 5 seconds of silence with no background noise. Try to receive a fax again. Note Some digital answering machines might not retain the recorded silence at the end of your outgoing message. Play back your outgoing message to check. ● ● If your HP all-in-one shares the same phone line with other types of phone equipment, such as an answering machine, a PC modem, or multi-port switch box, the fax signal level might be reduced.
answering machine will answer the call and the HP all-in-one will monitor the line. If the HP all-in-one detects fax tones, the HP all-in-one will receive the fax. If the call is a voice call, the answering machine will record the incoming message. For information on setting the number of rings to answer, see Set the number of rings before answering.
Chapter 16 1 Telephone wall jack 2 Coupler 3 Phone cord supplied in the box with the HP all-in-one I am having problems faxing over the Internet Solution Check the following: ● ● ● The FoIP service might not work properly when the HP all-in-one is sending and receiving faxes at high speed (33600bps). If you experience problems sending and receiving faxes, use a slower fax speed. You can do this by changing the Fax Speed setting from High (the default) to Medium.
Solution HP Instant Share cannot be set up on your HP all-in-one. The HP Instant Share feature is not installed. ➔ To enable the HP Instant Share feature, insert the installation CD that came with your product and select Typical (Recommended). – – If you need an installation CD for an HP Photosmart 2600 series all-inone, you can order one from www.hp.com/support. If you need an installation CD for an HP Photosmart 2700 series all-inone, you can order one from www.hp.com/support.
Chapter 16 Destinations not set up on device. Refer to manual for Help. Solution The HP Instant Share service did not find any destinations. No destinations were configured. ➔ Create destinations to designate locations to which you want to send images. A destination, for example, can be an e-mail address, a friend or relative's network-connected device, an online photo album, or an online photo finishing service. Availability of services varies by country/region.
To access the troubleshooting information from a Windows computer, go to the HP Director, click Help, and then choose Troubleshooting and Support. Troubleshooting is also available through the Help button that appears on some error messages. To access troubleshooting information from Macintosh OS X v10.1.
Chapter 16 Paper has jammed the optional two-sided printing accessory Solution You might need to remove the two-sided printing accessory. For more information, see the printed guide that came with your two-sided printing accessory. Note If you turned the HP all-in-one off before clearing the paper jam, turn it back on, and then restart your printing or copying job. Print cartridge troubleshooting If you are experiencing problems with printing, you might have a problem with one of the print cartridges.
To shut down your HP all-in-one 1 2 Turn off the HP all-in-one by using the On button located on the control panel. Unplug the power cord from the back of the HP all-in-one. Connection errors Use this section to solve the following errors generated when your HP all-in-one fails to connect to the HP Instant Share service. No network connection. See documentation. Solution Wired network Network cables are loose or disconnected.
Chapter 16 Solution Your HP all-in-one was connected to a network at one time. It is now directly connected to a computer using a USB cable. The HP Instant Share application is reading the previous network settings. ➔ If you are trying to use HP Instant Share while using a USB cable, reset the network settings on the HP all-in-one or access HP Instant Share from the HP Image Zone software on your computer.
Solution The HP Instant Share service is not responding. Either the service is down for maintenance, the proxy settings are inaccurate, or one or more of your network cables are disconnected. ➔ Try one of the following: – – – Check your proxy settings (see the procedure below). Check your network connections. For more information, see the Network Guide that came with your HP all-in-one. Try the task again later. Note Your HP all-in-one does not support proxies that require authentication.
Chapter 16 2 For more information, see To check the DNS IP address. If the DNS IP address is valid, try connecting again later. Failed to connect to HP Instant Share. Check proxy address. Solution The DNS server could not resolve the proxy URL to an IP address. 1 2 Verify the proxy information used by your HP all-in-one. For more information, see To check your proxy settings. If the proxy information is valid, try connecting again later. Connection lost to HP Instant Share service.
HP Instant Share storage limit exceeded. Refer to manual for Help. Solution The job you were sending failed. Allotted disk space has been exceeded on the HP Instant Share service. Note Older files are automatically deleted from your account. This error will go away in a few days or weeks. To remove files from the HP Instant Share service 1 2 3 Press HP Instant Share on the control panel of your HP all-in-one. The HP Instant Share menu appears on the color graphics display. Press 3, and then press 5.
Chapter 16 HP Instant Share Error Report messages If you encounter a problem while sending images to a destination, an HP Instant Share Error Report prints on your HP all-in-one. Use this section to solve possible file problems shown on the Error Report. Unsupported file format Solution One of the files sent to the HP Instant Share service is not one of the supported file types. ➔ Convert the file to a JPEG and try the task again. Corrupted file Solution The file you sent is corrupted.
Fax troubleshooting Tip For additional fax troubleshooting topics, such as problems with your printouts or slow fax reception, see the onscreen Troubleshooting Help that came with your HP Image Zone software.
Chapter 16 To use device update 1 Do one of the following: – – 2 3 4 5 6 Double-click the update .exe file you downloaded from www.hp.com/support. When prompted, accept the device update found by the Software Update utility. The Device Update Wizard opens on your computer. At the Welcome screen, click Next. The Select a Device screen appears. Select your HP all-in-one from the list, and then click Next. The Important Information screen appears.
Get HP support Hewlett-Packard provides Internet and phone support for your HP all-in-one. This chapter provides information on how to get support from the Internet, contact HP customer support, access your serial number and service ID, and prepare your HP all-in-one for shipment. If you are unable to find the answer you need in the printed or onscreen documentation supplied with your product, you can contact one of the HP support services listed in the following pages.
Chapter 17 Get HP support Note If your HP all-in-one is not turning on, you can view the serial number by looking at the top sticker above the rear USB port. The serial number is the 10-character code in the upper left corner of the sticker. 1 2 3 4 5 Press and hold OK. While holding OK, press 4. This displays the Information Menu. Press until Model Number appears and then press OK. This displays the service ID. Write down the complete service ID. Press Cancel and then until Serial Number appears.
(continued) HP technical support Country/Region HP technical support Bolivia 800-100247 New Zealand 0800 441 147 Brazil (Demais Localidades) 0800 157751 Nigeria +234 1 3204 999 Brazil (Grande São Paulo) (11) 3747 7799 Norway2 +47 815 62 070 Brunei fax to: +65-6275-6707 Oman +971 4 883 8454 Cambodia fax to: +65-6275-6707 Pakistan fax to: +65-6275-6707 Canada during warranty (905) 206 4663 Palestine +971 4 883 8454 Canada post-warranty (per-call charge) 1-877-621-4722 Panama 001-
Chapter 17 Get HP support (continued) Country/Region HP technical support Country/Region HP technical support Greece, inside country/ region 801 11 22 55 47 Sweden +46 (0)77 120 4765 Greece, international +30 210 6073603 Switzerland 3 +41 0848 672 672 Guatemala 1800-995-5105 Taiwan +886 (2) 8722-8000, 0800 010 055 Hong Kong SAR +(852) 2802 4098 Thailand 0-2353-9000 Hungary +36 1 382 1111 Trinidad & Tobago 1-800-711-2884 India 91-80-8526900 Tunisia1 +216 71 89 12 22 India (toll
Call HP Korea customer support Get HP support Call HP Japan customer support TEL : 0570-000-511 03-3335-9800 FAX : 03-3335-8338 9:00 17:00 10:00 17:00 1/1 3 FAX User Guide 207
Chapter 17 Get HP support HP Quick Exchange Service (Japan) HP Quick Exchange Service 0570-000511 :03-3335-9800 : 9:00 10:00 5:00 1 1 3 5:00 : Prepare your HP all-in-one for shipment If after contacting HP Customer Support or returning to the point of purchase, you are requested to send your HP all-in-one in for service, remove the print cartridges and pack the HP all-in-one in the original packing materials to avoid further damage.
5 Close the print-carriage access door and wait a few minutes for the print carriage to move back to its home position (on the right side). Get HP support Note Make sure the scanner has returned to its parked position before turning off the HP all-in-one. 6 7 Press the On button to turn off the HP all-in-one. Unplug the power cord, and then disconnect it from the HP all-in-one. Do not return the power cord with the HP all-in-one.
Get HP support Chapter 17 4 5 6 7 8 Open the print-carriage access door, and then remove the print cartridges from their slots and lower the latches. Remove both print cartridges and lower both latches. Failure to do so might damage your HP all-in-one. Place the print cartridges in print cartridge protectors or an airtight plastic container so they will not dry out, and put them aside. Do not send them with the HP all-in-one unless the HP customer support call agent instructs you to.
2 Retain the control panel overlay. Do not return the control panel overlay with the HP all-inone. Warning The replacement HP all-in-one might not come with a control panel overlay. Store your control panel overlay in a safe place, and when the replacement HP all-in-one arrives, reattach your control panel overlay. You must attach your control panel overlay to use the control panel functions on the replacement HP allin-one.
Get HP support Chapter 17 212 HP Photosmart 2600/2700 series all-in-one
18 Warranty information Your HP all-in-one comes with a limited warranty that is described in this section. Information about how to obtain warranty service and how you can upgrade your standard factory warranty is also provided. This chapter provides information on duration of limited warranty, warranty service, warranty upgrades, returning you HP all-in-one for service, and contains the Hewlett-Packard limited global warranty statement.
Chapter 18 Hewlett-Packard limited global warranty statement The following information specifies the HP limited global warranty. Extent of limited warranty Warranty information Hewlett-Packard ("HP") warrants to the end-user customer ("Customer") that each HP Photosmart 2600/2700 series all-in-one product ("Product"), including related software, accessories, media, and supplies, shall be free from defects in material and workmanship for the duration, which begins on the date of purchase by the Customer.
OR ANY OTHER LEGAL THEORY AND WHETHER ADVISED OF THE POSSIBILITY OF SUCH DAMAGES. Local law Limited warranty information for EU countries/regions Listed below are the names and addresses of the HP entities which grant HP's Limited Warranty (manufacturer's warranty) in EU countries/regions. You may also have statutory legal rights against the seller on the basis of the purchase agreement in addition to the manufacturer's warranty, which are not restricted by this manufacturer's warranty.
Chapter 18 (continued) Deutschland Österreich Hewlett-Packard GmbH Hewlett-Packard Ges.m.b.H. Herrenberger Straße 110-140 Lieblgasse 1 D-71034 Böblingen A-1222 Wien España Suomi Hewlett-Packard Española S.A. Hewlett-Packard Oy Carretera Nacional VI Piispankalliontie 17 km 16.500 FIN-02200 Espoo 28230 Las Rozas Warranty information E-Madrid Greece Sverige Hewlett-Packard Hellas Hewlett-Packard Sverige AB 265, Mesogion Avenue Skalholtsgatan 15451 N.
19 Technical information This chapter provides information on accessing system requirements, paper specifications, print specifications, copy specifications, memory card specifications, scan specifications, physical specifications, power specifications, environmental specifications, regulatory notices, and the declaration of conformity for your HP all-in-one. System requirements Software system requirements are located in the Readme file.
Chapter 19 Paper sizes Type Size Paper Letter: 216 by 279 mm (8.5 by 11 inches) A4: 210 by 297 mm (8.27 by 11.7 inches) A5: 148 by 210 mm (5.8 by 8.3 inches) Executive: 184.2 by 266.7 mm (7.25 by 10.5 inches) Legal1: 216 by 356 mm (8.5 by 14 inches) Banner HP Banner Paper, 90 g/m2 (24 lb. Bond), A (C1820A) and A4 Size Third Party Z-Fold Computer Paper, 60-90 g/m2 (16-24 lb. Bond), A and A4 size, with tractor perforations removed Envelopes U.S. #10: 104 by 241 mm (4.125 by 9.
(continued) Top (leading edge) Bottom (trailing edge)1 Left Right ISO (A4, A5) and JIS (B5) 1.8 mm (0.07 inches) 6.0 mm (0.2 inches) 3.2 mm (0.13 inches) 3.2 mm (0.13 inches) Envelopes 1.8 mm (0.07 inches) 14.3 mm (0.5 inches) 3.2 mm (0.13 inches) 3.2 mm (0.13 inches) Index Card (3 by 5 inch, 4 by 6 inch, 5 by 8 inch) 1.8 mm (0.07 inches) 6.0 mm (0.2 inches) 3.2 mm (0.13 inches) 3.2 mm (0.13 inches) Non-index 4 by 6 inch card 3.2 mm (0.13 inches) 3 mm (0.12 inches) 3.2 mm (0.
Chapter 19 (continued) Mode Color 1 2 Resolution (dpi) Speed (ppm) on Speed plain paper (seconds) 4 by 6 inch borderless photo 300 by 300 20 27 Up to 4800 by 1200 optimized dpi color printing. Adding a photo print cartridge increases print quality PhotoREt color printing with photo paper.
(continued) Color Photo (dpi) Fine (dpi) Standard (dpi) 200 by 200 200 by 200 200 by 200 Memory card specifications ● ● ● Maximum recommended number of files on a memory card: 1,000 Maximum recommended individual file size: 12 megapixel maximum, 8 MB maximum Maximum recommended memory card size: 1 GB (solid state only) Note Approaching any of the recommended maximums on a memory card might cause the performance of the HP all-in-one to be slower than expected.
Chapter 19 ● ● In the presence of high electromagnetic fields it is possible the output from the HP all-in-one may be slightly distorted HP recommends using a USB cable less than or equal to 3 m (10 feet) in length to minimize injected noise due to potential high electromagnetic fields Additional specifications Memory: 16 MB ROM, 64 MB DRAM If you have Internet access, you can get acoustic information from the HP website. Go to: www.hp.com/support.
Recycling program HP offers an increasing number of product return and recycling programs in many countries, as well as partnering with some of the largest electronic recycling centers throughout the world. HP also conserves resources by refurbishing and reselling some of its most popular products.
Chapter 19 This equipment includes automatic dialing capability. When programming and/or making test calls to emergency numbers: ● Remain on the line and explain to the dispatcher the reason for the call. ● Perform such activities in the off-peak hours, such as early morning or late evening. Note The FCC hearing aid compatibility rules for telephones are not applicable to this equipment.
Note à l’attention des utilisateurs du réseau téléphonique Canadien/notice to users of the Canadian telephone network Cet appareil est conforme aux spécifications techniques des équipements terminaux d’Industrie Canada. Le numéro d’enregistrement atteste de la conformité de l’appareil.
Chapter 19 This equipment is designed for DTMF tone dialing and loop disconnect dialing. In the unlikely event of problems with loop disconnect dialing, it is recommended to use this equipment only with the DTMF tone dial setting. Notice to users of the German telephone network This HP fax product is designed to connect only to the analogue public-switched telephone network (PSTN). Please connect the TAE N telephone connector plug, provided with the HP allin-one into the wall socket (TAE 6) code N.
ARIB STD-T66 (Japan) Notice to users in Italy License required for use. Verify with your dealer or directly with General Direction for Frequency Planning and Management (Direzione Generale Pianificazione e Gestione Frequenze). E’necessaria una concessione ministeriale anche per l’uso del prodotto. Verifici per favore con il proprio distributore o direttamente presso la Direzione Generale Pianificazione e Gestione Frequenze. For 2.
Chapter 19 Declaration of conformity (European Economic Area) The Declaration of Conformity in this document complies with ISO/IEC Guide 22 and EN 45014. It identifies the product, manufacturer’s name and address, and applicable specifications recognized in the European community.
HP Photosmart 2700series declaration of conformity DECLARATION OF CONFORMITY according to ISO/IEC Guide 22 and EN 45014 Manufacturer’s Name: Hewlett-Packard Company Manufacturer’s Address: 16399 West Bernardo Drive San Diego CA 92127, USA Declares, that the product Regulatory Model Number: SDGOB-0304-02 Product Name: Photosmart 2700 Series (Q3452A) Model Number(s): 2710 (Q5552A/B, Q5545C), 2710xi (Q5544A), 2713 (Q5547C) Power Adapter(s) HP part#: 0950-4483 (domestic), 0950-4484 (international) Radio Mo
Technical information Chapter 19 230 HP Photosmart 2600/2700 series all-in-one
Index Symbols/Numerics 10 by 15 cm photo paper load 39 specifications 217 2-wire phone cord 184, 189 4 by 6 inch photo paper, load 39 4-wire phone cord 184, 189 A A4 paper, load 37 access list, HP Instant Share 136, 148 accessories, order 151 ADSL line.
default settings fax 118 restore 168 destination file send photos 139 destinations create 135 manage 148 device update about 201 Macintosh 202 Windows 201 dial tone test, failure 183 digital camera PictBridge 55 distinctive ringing 85, 105, 119 DNS.
Index e-mail images from HP Image Zone (network) 140 e-mail photos from a memory card (USB) 126 e-mail photos from memory card (network) 138 e-mail photos from the HP Image Zone (USB) 129 Error Report 200 file corrupted 200 file size exceeded 200 general errors 194 HP Image Zone 129, 140 HP remote printing 135, 147 icons 9 login failed 199 manage account 148 manually print images 144 menu 11 minimum install 190 network-connected 58 Not set up 191 online albums 57 Open mode 134, 136, 142 Options menu 148 ove
receive, fax 112 send, fax 108, 110 troubleshoot, fax 186 media.
Index gray photo print cartridge 162 handle 158 order 151 part names 158 photo print cartridge 162 replace 158 store 163 troubleshoot 173, 194 print margin specifications 218 prompt delay time 168 proof sheet fill in 49 menu 11 print 48 scan 49 proxy settings 198 pulse dial 119 Q quality copy 61 Quick Print 55 R Readme file 170 receive faxes manually 112 troubleshooting 184, 186 receive images in HP Instant Share 134, 142 recycling 223 redial fax 109, 120 reduce faxes to fit 120 reduce/enlarge copies fit se
date and time 112 fax 118 print options 76 speed, fax 122 setup answering machine 94, 95 distinctive ringing 85, 119 DSL line 84 fax 79 ISDN line 85 menu 12 menu button 8 PBX system 85 PC modem 89, 90, 95, 99 separate fax line 83 shared phone line 87 test fax 102, 180 troubleshoot fax 180 voice mail 88, 99 shut down your HP all-inone 194 slide show 56 SmartMedia memory card 45 software reinstall 178 troubleshoot installation 175 uninstall 178 software application, print from 75 software update.
Index two-wire phone cord 184, 189 U uninstall software 178 unload images OS 9 HP Image Zone 17 OS X HP Image Zone 15 up arrow 8 USB cable installation 171 V visual keyboard 113 voice mail set up with fax 88, 99, 105 troubleshoot 186 volume, adjust fax 119 W wall jack test, fax 181 warranty upgrades 213 Webscan 24 wired connection icons 9 wireless connection icons ad hoc 9 X xD memory card 45 Z zoom button 8 User Guide 237
Printed on at least 50% total recycled fiber with at least 10% post-consumer paper © 2004 Hewlett-Packard Development Company, L.P. Electronic Edition www.hp.