
User's Guide

# vgcreate /dev/vgname /dev/dsk/cxtydz
3. Create the logical volume(s) for the volume group.
4. Deactivate and export the Volume Groups on the primary system without removing the special
device files.
# vgchange -a n <vgname>
Make sure that you copy the mapfiles to all of the host systems.
# vgexport -s -p -m <mapfilename> <vgname>
5. On the source disk site import the VGs on all of the other systems that might run the
Serviceguard package and backup the LVM configuration.
# vgimport -s -m <mapfilename> <vgname>
# vgchange -a y <vgname>
# vgcfgbackup <vgname>
# vgchange -a n <vgname>
6. On the target disk site import the VGs on all of the systems that might run the Serviceguard
recovery package and backup the LVM configuration.
# pairsplit -g <dev_name> -rw
# vgimport -s -m <mapfilename> <vgname>
# vgchange -a y <vgname>
# vgcfgbackup <vgname>
# vgchange -a n <vgname>
# pairresync -g <dev_name> -c 15
It may be possible to skip the pairsplit/pairresync,. However, the vgimport command
may take longer to complete and this will not activate the volume group to perform the
vgcfgbackup. Perform the vgcfgbackup when the volume group is activated during the
first recovery package activation.
When using the pairresync command to resynchronize PVOL/SVOL Continuous Access
pairs, specify the -c 15 switch to ensure the fastest resynchronization which reduces the
vulnerability of a rolling disaster.
From HP-UX 11i v3 onwards, HP recommends that you use agile DSF naming model for mass
storage devices. For more information on the agile view, mass storage on HP-UX, DSF migration
and LVM Online Disk Replacement, see the following documents that are available at http://
www.hp.com/go/hpux-serviceguard-docs:
• LVM Migration from Legacy to Agile Naming Model
• HP-UX 11i v3 Mass Storage Device Naming
• Serviceguard Migration
• LVM Online Disk Replacement
Creating VxVM Disk Groups using Continuous Access P9000 or XP
If using VERITAS storage, use the following procedure to create disk groups. It is assumed a VERITAS
root disk (rootdg) has already been created on the system where configuring the storage. The
following section shows how to set up VERITAS disk groups. On one node do the following:
1. Create the device pair to be used by the package.
# paircreate -g devgrpA -f never -vl -c 15
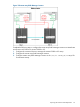
2. Check to make sure the devices are in the PAIR state.
# pairdisplay -g devgrpA
Preparing the Cluster for Data Replication 177