HP Tru64 UNIX Version 5.
© Copyright 2006 — 2009 Hewlett-Packard Development Company, L.P. Confidential computer software. Valid license from HP required for possession, use or copying. Consistent with FAR 12.211 and 12.212, Commercial Computer Software, Computer Software Documentation, and Technical Data for Commercial Items are licensed to the U.S. Government under vendor's standard commercial license. The information contained herein is subject to change without notice.
Table of Contents About This Manual.............................................................................................................9 Audience.................................................................................................................................................9 Changes to This Manual.........................................................................................................................9 Organization......................................................
3 Patch Installation and Removal Instructions...............................................................33 Before You Begin the Installation..........................................................................................................33 Expanding the Patch Kit Tar File..........................................................................................................33 Choosing Single-User or Multi-User Mode...............................................................................
Throwing the Version Switch..........................................................................................................75 Removing Patches............................................................................................................................75 Using the dupclone Script.....................................................................................................................75 Benefits and Detriments of Cloning......................................................
List of Figures 4-1 6 Rolling Upgrade Flow Chart.........................................................................................................
List of Tables 4-1 4-2 4-3 4-4 4-5 4-6 Rolling Upgrade Tasks Supported by Version 5.1A and Version 5.1B..........................................47 Time Estimates for Rolling Upgrade Stages..................................................................................49 Undoing a Stage............................................................................................................................59 Stages and clu_upgrade Versions When Performing a Rolling Upgrade from Version 5.1A......
List of Examples A-1 8 Sample Event Log..........................................................................................................................
About This Manual This manual provides instructions for installing and removing patches that are provided by Hewlett-Packard Company in its Tru64™ UNIX and TruCluster software products patch kits. It also describes baselining techniques and provides other information for working with patches. The information in this guide provides examples and descriptions for the Inclusive patch kit structure, which was introduced with Version 5.1B-2.
• • • • • • The Patch Summary and Release Notes for the patch kit you are working with. Technical Updates for Tru64 UNIX Version 5.0 and Higher Patch Kits or Technical Updates for Tru64 UNIX Versions 4.0F and 4.0G, which report any information about restrictions and problems that may have been discovered since the release of these patch kits.
Variable The name of a placeholder in a command, function, or other syntax display that you replace with an actual value. device names Operating system versions before Version 5.0 use different names than those of Version 5.0 and higher. In general, this manual uses the Version 5.0 names. For example, where a partition name is represented by /dev/disk/dsk3g, the Version 4.0n name might be /dev/rz3g.
1 Patch Process Overview This chapter introduces you to the dupatch utility for installing, removing, and managing patches. See Chapter 3 “Patch Installation and Removal Instructions” for instructions on installing and removing patches from the Tru64 UNIX operating system and the TruCluster software products. Using dupatch The dupatch utility is provided as an interactive and command-line tool for working with Patch kits.
From the patch_kit directory: # cd /patches/pk4/patch_kit # ./dupatch If new patch tools are available they will be loaded and you will see messages similar to the following: * A new version of patch tools required for patch management is now being installed on your system. * Tools updated, invoking the updated Patch Utility... The dupatch utility saves information on the tools that have been loaded to the log file /var/adm/patch/log/Dupatch_load_date.log.
The installation of a patch is blocked if any of the following conditions exist: • • • The underlying software product subset is not installed — for example, if the applicable Tru64 UNIX or TruCluster software release subset is not installed. The setld inventory is inconsistent with the existing system files. This occurs when an operating system or TruCluster software setld subset is installed and individual operating system files that are part of that subset are moved, deleted, or replaced.
Enter your choice: Gathering details of relevant patches, this may take a bit of time Patches installed on the system: ------------------------------(depending upon the number of patches you installed, this may take awhile) - Tru64_UNIX_V5.1B / Commands, Shells, & Utilities Patches: Patch 25022.00 - SP04 OSFDCMT540 Patch 25080.00 - SP04 OSFTCLBASE540 Patch 26022.00 - SP05 OSFDCMT540 Patch 26080.00 - SP05 OSFTCLBASE540 - Tru64_UNIX_V5.1B / Common Desktop Environment (CDE) Patches: Patch 25015.
2) 3) List Customer Specific problem summaries List All problem summaries b) q) Back to Documentation Menu Quit Enter your choice: 3 There may be more patches than can be presented on a single screen. If this is the case, you can choose patches screen by screen or all at once on the last screen. All of the choices you make will be collected for your confirmation before any patches are examined. - Tru64_UNIX_V5.1B / Commands, Shells, & Utilities Patches: 1) Patch 25022.
General Issues and Restrictions This section provides information you must be aware of when installing or removing patches. Be sure to check the Patch Summary and Release Notes document of the kit you are installing for any issues and restrictions that pertain to that installation.
Caution: As with any system update, entering a Ctrl/c during this phase could leave the operating system software environment in an inconsistent and nonrecoverable state. Removing Patches Containing Customized Files If you use dupatch to remove a patch containing a customized file, messages similar to the following may appear in the session log file, /var/adm/patch/log/session.log: - Tru64_UNIX_V5.1B / Network Patches: Patch 25020.00 - SP04 OSFCLINET540 (SSRT3653 SSRT2384 SSRT2275 ...
• The patch kit you want to remove was installed before the NHD kit. For example, if you installed Patch Kit 2 and then installed NHD-7, you cannot remove that patch kit. However, if you later installed Patch Kit 4, you can remove that patch kit. • The patch kit was installed with NHD-7. Beginning with the release of Patch Kit 3, patch kits were incorporated into the NHD-7 kits. As a result, when you installed NHD-7, you automatically installed the current patch kit. These patch kits cannot be removed.
>>> boot -fl s 2. Run the script: # /etc/dn_fix_dat.sh 3. Reboot normally. If you also need to reverse the version switch as described in “Version Switches”, run the /etc/ dn_fix_dat.sh script after step 5 in that process. Note: If during the dupatch installation and deletion processes you see a Special Instruction about running this script, you should ignore that instruction unless your system meets the requirement described here.
2 Preparing for the Installation This chapter describes information you need to be aware of before you install a patch kit. It also describes the steps to take for tasks such as performing a preinstallation check and a baselining operation. Performing a Patch Preinstallation Check To minimize system down time, you can perform the preinstallation check on a system running in multi-user mode, even if you will perform the actual installation in single-user mode.
Tru64 Unix License Agreement To read the license again, type 'license'. Do you accept the license agreement? (y/n) : y Checking patch kit for transmission errors during download... Finished Checking patch kit checksums Gathering patch information... (depending upon the size of the patch kit, this may take awhile) *** Start of Special Instructions *** End of Special Instructions *** *** Press RETURN to proceed... 4.
Your name: Betty Enter any notes about this operation that you would like stored for future reference (To end your input, enter a "."): : preinstall check for patch kit 5 : . 7. The program lists any patches that fail the prerequisite and applicability checks, and asks how you want to proceed. You have the following choices: Checking patch prerequisites and patch file applicability...
system files or why missing files are no longer present on your system. Changing the system without this knowledge could leave your operating system or layered product software environment in an inconsistent and nonoperational state. For example, a file whose origin is unknown that is blocking the installation of a Release patch could be part of a manually installed Customer-Specific Patch (CSP) that is not contained in the Release patch.
Phase 3 – Identifying Manually Installed Patches Phase 3 reports patches that exactly match existing files on your system that are not marked as installed by the system inventory. For example, in earlier kits, TruCluster software Release patches were installed manually. This phase will report any manually installed Release patch files that exactly match a patch contained in the current dupatch-based TruCluster software patch kit.
Manually Installed Release Patches For some software products, manual installation has been the practiced method for patch installation. For example, patches for TruCluster software used to be installed manually. You must determine whether the fixes delivered by the manually installed Release patches are included in the current dupatch-based Release Patch Kit before enabling dupatch to overwrite any unknown or missing system files.
Phase 7 – Enable patches with File Applicability Conflicts Phase 7 allows you to install patches whose inventory does not match the installed system when the system file changed originates from a CSP. Failing to determine the origin of the files that are in conflict can cause your operating system to be compromised. We therefore recommend that you track down the origin of those files.
• Phase 5 reports patches that do not pass installation applicability tests due to the current state of your system. The installation of these patches is prevented by missing or unknown system files. The dupatch utility reports the known information about the files contained in each patch and asks if you want to enable the installation: Do you want to enable the installation of any of these patches? [y/n]: Answer n until you know the origin of the files that are preventing the patch installation.
of the listed files before enabling a patch for installation. Do you want to enable the installation of these patches? [y/n]: y *** Installation of the following patches is enabled: (NOTE: You need to include these patches for installation from the installation menu) - Tru64_UNIX_V5.1B / Kernel Patches: Patch 26009.00 - SP05 OSFBASE540 (SSRT3631 SSRT3469 SSRT2439 ...) * Baseline Analysis/Adjustment process completed. ============================================== Press RETURN to get back to the Main Menu...
3 Patch Installation and Removal Instructions This chapter provides instructions for installing and removing patches from the Tru64 UNIX operating system and the TruCluster software products. Although the descriptions and examples in this chapter reflect the installation and removal steps of Release Patch Kits, the steps are basically the same for dupatch-based CSP and ERP kits. “Rolling Upgrade” describes the procedure for patching a TruCluster Server Version 5.
# /usr/sbin/mount /dev/disk/dsk3g /patches # cd /patches # mkdir pk5 Note: If you are installing successive patch kits, place and untar each kit in a separate directory. Copy or ftp the patch kit to the directory you created. For example: # cp T64V51BB26AS0005-20050215.tar 2. /patches/pk5 Untar the patch kit, capturing the process to a log file. For example: # script untar.log # tar -xpvf /patches/pk5/T64V51BB26AS0005-20050215.tar # Ctrl/d 3. View the untar.
7. Run the dupatch utility. You will be asked to specify the path to the patch_kit file. For example: # cd /var/patch/pk5/patch_kit # ./dupatch Enter path to the top of the patch distribution, or enter "q" to quit : . 8. From the Main Menu, enter 1 at the Enter your choice prompt to invoke the patch installation session. For example: Tru64 UNIX Patch Utility (Rev. 48-00) ========================== - This dupatch session is logged in /var/adm/patch/log/session.
q) Quit Enter your choice: 1 2. When the patch installation menu is displayed. Enter 3, at the Enter your choice prompt.
4. You are asked to record your name as the person installing the patches and to add any comments you would like stored for future reference. For example: Your name: Joe C. Enter any notes about this operation that you would like stored for future reference. To end your input, enter a period (.) and press Return. : Installing Patch Kit 5 : . Return 5.
If you answer no, dupatch will build the kernel interactively. This procedure is similar to running the doconfig -c command. The following steps describe this procedure and provide some guidance for making your selections: 1. Enter a new name for the kernel configuration file or accept the default. If you accept the default you will be asked if you want to replace it. For example: *** KERNEL CONFIGURATION AND BUILD PROCEDURE *** Enter a name for the kernel configuration file.
23 Display all options again -------------------------------------------------------------- Enter your choices, choose an overriding action or press to confirm previous selections.
In Multi-User Mode When installing patches in multi-user mode from the command line, you are given a message informing you that a reboot is necessary to complete the patch installation. However, the system does not reboot itself.
With Inclusive Patch Kits you must remove the entire kit rather than individual patches. However, once you have removed any Inclusive Patch Kits installed on your system, you can then remove individual patches from earlier kits. To do this, dupatch recognizes the type of kit you have installed. When you select the patch deletion menu, dupatch lists the most current Inclusive Patch Kit installed on your system as well as any customer-specific patches (CSPs) that depend upon that kit.
# /usr/sbin/versw_enable_delete 3. 4. 5. Shut down the entire cluster or the single system. Reboot the entire cluster or the single system. Run dupatch on your single system or on a cluster using the rolling upgrade procedure to delete the patch kit. Note: The next step requires that you reboot each cluster member to remove the patch kit. Because the no-roll procedure automatically reboots the system after deleting the patches, you would not be able to perform the next steps as required.
If you also need to reverse the version switch as described in “Run Mandatory Script Before Removing New Style Patch Kits”, run the /etc/dn_fix_dat.sh script after step 5 in that process. Running dupatch to Remove Patches The process for removing patches is similar to the one for installing them. The following steps describe the patch removal process for an Inclusive Patch Kit with the system running in single-user mode.
If you delete this patch kit, you MUST run the following script prior to rebooting your system: /etc/dn_fix_dat.sh 3. You are asked to record your name as the person removing the patches and to add any comments you would like stored for future reference in the log file. For example: Your name: Betty Enter any notes about this operation that you would like stored for future reference. To end your input, enter a period (.) and press Return. : Uninstalling V5.1B-3 : . Return Checking patch dependency...
4 Patching a Cluster The following sections describe the procedures for installing the patch kit using the following methods: • Rolling upgrade procedure (“Rolling Upgrade” (page 45)) • No-roll procedure (“No-Roll Patching” (page 73)) • Cloning procedure using the duclone script (“Using the dupclone Script” (page 75)) Rolling Upgrade A rolling upgrade is a software upgrade of a cluster that is performed while the cluster is in operation.
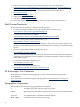
• • • Two mechanisms that support rolling upgrades: tagged files (“Tagged Files”) and version switches (“Version Switch”) Rolling upgrade and layered products (“Rolling Upgrade and Layered Products”) Rolling upgrade and RIS (“Rolling Upgrade and RIS”) Figure 4-1 “Rolling Upgrade Flow Chart” provides a simplified flow chart of the tasks and stages that are part of a rolling upgrade initiated on a Version 5.
Note: A rolling upgrade updates the file systems and disks that the cluster currently uses. The roll does not update the disk or disks that contain the Tru64 UNIX operating system used to create the cluster (the operating system on which you ran clu_create). Although you can boot the original operating system in an emergency when the cluster is down, remember that the differences between the current cluster and the original operating system increase with each cluster update.
Table 4-1 Rolling Upgrade Tasks Supported by Version 5.1A and Version 5.1B (continued) An update installation from Version 5.1A to Version 5.1B followed by the installation of an NHD kit for Version 5.1B An update installation from Version 5.1B to the next release of the base operating system and cluster software followed by the installation of an NHD kit for that next release2 An update installation from Version 5.1A to Version 5.1B, followed by the installation of an NHD kit for Version 5.
Table 4-2 Time Estimates for Rolling Upgrade Stages Stage Duration Preparation Not under program control. Setup 45 - 120 minutes.1 Preinstall 15 - 30 minutes.1 Install The same amount of time it takes to run installupdate, dupatch, nhd_install, or a supported combination of these commands on a single system. Postinstall Less than 1 minute. Roll (per member) Patch: less than 5 minutes. Update installation: about the same amount of time it takes to add a member.2 Switch Less than 1 minute.
d. To determine whether the cluster is ready for an upgrade, run the clu_upgrade -v check setup lead_memberid command on any cluster member. For example: # clu_upgrade -v check setup 2 If a file system needs more free space, use AdvFS utilities such as addvol to add volumes to domains as needed. For disk space requirements, see “Preparation Stage”. For information on managing AdvFS domains, see the Tru64 UNIX AdvFS Administration manual. e. 2.
Note: During the install stage you load the new software on the lead member, in effect rolling that member. When you perform the roll stage, this new software is propagated to the remaining members of the cluster. The clu_upgrade command does not load software during the install stage. The loading of software is controlled by the commands you run: installupdate, dupatch, or nhd_install. See Table 4-1 “Rolling Upgrade Tasks Supported by Version 5.1A and Version 5.
1) Use the cfsmgr command to determine which cluster member is currently serving the root file system. For example: # cfsmgr -v -a server / Domain or filesystem name = / Server Name = polishham Server Status : OK 2) Relocate the root (/) file system to the lead member. For example: # cfsmgr -h polishham -r -a SERVER=provolone / b. Verify that the lead member can serve applications to clients.
c. Roll the member: # clu_upgrade roll If you are performing parallel rolls, use the -f option with the clu_upgrade roll command. This option causes the member to automatically reboot without first prompting for permission: # clu_upgrade -f roll The roll command verifies that rolling the member will not result in a loss of quorum. If a loss of quorum will result, then the roll of the member does not occur and an error message is displayed.
Note: The roll actually takes place during the reboot. The clu_upgrade roll command sets up the it(8) scripts that will be run during the reboot. When you reboot, the it scripts roll the member, build a customized kernel, and then reboot again so the member will be running on its new customized kernel. When the member boots its new customized kernel, it has completed its roll and is no longer running on tagged files. 9. Perform the switch stage (“Switch Stage”).
# clu_upgrade undo postinstall 2. Shut down SERVER1 (Lead Member) then boot single-user mode to run the dupatch patch removal program. Do not shut down to single-user level. Instead, shut down the system and boot to single-user mode: # shutdown -h now P00>> boot -fl s Entering Single-User Mode 3. Perform the following commands on SERVER1: # init s # bcheckrc # lmf reset 4. Perform the dupatch delete procedure.
Halted P00>> On SERVER2 (Member2 or any Non-Lead Member) run enter the clu_upgrade undo install command. It warns to use dupatch, which has already completed, so answer yes. This restores tagged files and may take a few minutes (for example, 20 minutes on an ES45 using EVA5000 SAN storage): # clu_upgrade undo install 6. Boot the Lead Member into multi-user mode and perform undo of the Preinstall Stage. # clu_upgrade undo preinstall 7. Undo Setup Stage.
1. 2. Uninstall the patch kit as described in “Removing Patches”. Run the clu_upgrade undo install command. Note that although you do not have to run the clu_upgrade install command when installing a patch kit or an NHD kit, you must run the clu_upgrade undo install command if you want to remove those kits and undo the install stage. After you run the clu_upgrade undo install, you can continue undoing stages as described in “Undoing a Stage”.
Note: If you rerun the rolling upgrade procedure to remove patches, the prompts you receive during the setup stage will be different from those issued during the initial rolling upgrade.
Note: Before undoing any stage, we recommend that you read the relevant version of the Cluster Release Notes to determine whether there are restrictions related to the undoing of any stage. To undo a stage, use the undo command with the stage that you want to undo. The clu_upgrade command determines whether the specified stage is a valid stage to undo.
The following two tables show at which stages during a rolling upgrade new versions of upgrade commands, if shipped with the kits being installed, become available during a rolling upgrade:2 • • Table 4-4 “Stages and clu_upgrade Versions When Performing a Rolling Upgrade from Version 5.1A” maps commands to stages for a rolling upgrade from Version 5.1A to Version 5.1B, a patch kit, or an NHD kit; or to Version 5.
1 Version 5.1B of Tru64 UNIX and TruCluster software, a patch kit for Version 5.1A, or the installation of an NHD kit on Version 5.1A. Table 4-5 Stages and clu_upgrade Versions When Performing a Rolling Upgrade from Version 5.1B Next Release1 Stage Version 5.1B Comments Preparation X The currently installed (old) version of clu_upgrade is always run in this stage. Setup X The currently installed (old) version of clu_upgrade is always run in this stage.
Note: These sections only describe the stages. Use the procedure in “Rolling Upgrade Procedure” to perform a rolling upgrade.
4. Run the clu_upgrade -v check setup lead_memberid command, which verifies the following information: • No rolling upgrade is in progress. • All members are running the same versions of the base operating system and cluster software. • No members are running on tagged files. • There is adequate free disk space. 5. Verify that each system's firmware will support the new software. Update firmware as needed before starting the rolling upgrade.
Note: The clu_upgrade command verifies whether sufficient space exists at the start of a rolling upgrade. However, nothing prevents a cluster member from consuming disk space during a rolling upgrade, thus creating a situation where a later stage might not have enough disk space. Disk space is dynamic. If you know that a member will be consuming disk space during a rolling upgrade, add additional space before you start the upgrade.
Caution: If, for any reason, during an upgrade you need to create tagged files for a layered product, see “Tagged Files”. • • Sets the sysconfigtab variable rolls_ver_lookup=1 on all members except the lead member. When rolls_ver_lookup=1, a member uses tagged files. As a result, the lead member can upgrade while the remaining members run on the .Old.. files from the current release. Prompts you to reboot all cluster members except the lead member.
Note: If you run clu_upgrade status after running installupdate, clu_upgrade displays a message indicating that the install stage is complete. However, the install stage is not really complete until you run the clu_upgrade postinstall command. The lead member must be in single-user mode to run the installupdate command or the nhd_install command; single-user mode is recommended for the dupatch command. When taking the system to single-user mode, you must halt the system and then boot it to single-user mode.
The clu_upgrade roll command performs the following tasks: • Verifies that the member is not the lead member, that the member has not already been rolled, and that the member is in single-user mode. Verifies that rolling the member will not result in a loss of quorum. Backs up the member's member-specific files. Sets up the it(8) scripts that will be run on reboot to perform the roll. Reboots the member.
The clu_upgrade clean command performs the following tasks: • • • • • • Verifies that the switch stage has completed, that all members are running the same versions of the base operating system and cluster software, and that no members are running on tagged files. Removes all .Old.. files. Removes any on-disk backup archives that clu_upgrade created. If the directory exists, recursively deletes /var/adm/update/TruClusterKit, /var/ adm/update/OSKit, and /var/adm/update/NHDKit.
Note: File system operations on directories are not bound by this tagged file restraint. For example, an ls of a directory on any cluster member during a rolling upgrade lists both versions of a file. However, the output of an ls -ail command on a member that has not rolled is different from the output on a member that has rolled. In the following examples the ls -ail command is run first on a member that has not rolled and then on a member that has rolled.
• subset name. For example, TruCluster software subset names start with the TruCluster software three-letter product code: TCRBASE510, TCRMAN510, and TCRMIGRATE510.) By default, files that are associated with other layered products do not have tagged files created for them. Tagged files are created only for layered products that have been modified to support tagged files during a rolling upgrade.
At the start of a rolling upgrade, each member's active version is the same as its new version. When a member rolls, its new version is updated. After all members have rolled, the switch stage sets the active version to the new version on all members. At the completion of the upgrade, all members' active versions are again the same as their new versions.
Table 4-6 Blocking Layered Products (continued) Product Code Description MME Multimedia Services O3D Open 3D PRX PanoramiX Advanced Developers Kit Notes: The three-letter product codes are the first three letters of subset names. For example, a subset named ATMBASExxx is part of the ATM product (Atom Advanced Developers Kit), which is a blocking layered product.
No-Roll Patching The no-roll patch process lets you install patches on a cluster without performing a rolling upgrade.
========================== This dupatch session is logged in /var/adm/patch/log/session.log Main Menu: --------1) 2) 3) Patch Kit Installation Patch Kit Deletion Patch Kit Documentation 4) 5) Patch Tracking Patch Baseline Analysis/Adjustment h) Help on Command Line Interface q) Quit Enter your choice: 2. 3. From the main menu select the patch installation or patch deletion option. (See “Installing Patches from Multi-User Mode”.
Throwing the Version Switch If a patch applied to the system requires the use of a version switch, you will see a message similar to the following at the end of the dupatch session: ********************************************************************* Patch OSFPAT00074200510 has been identified as needing a version switch. Once the following reboot is complete, please enter the "/var/adm/patch/noroll/noroll_versw" command from any cluster member.
and use one disk for the root and /var file systems, one disk for the /usr file system, and one disk for the quorum; you will need six additional disk drives to use cloning technology. Performing the Cloned Installation To create an exact duplicate of your system on an alternate set of disk drives, you can find a third-party program that will do it for you, or you can use the following list of tasks as a guide for doing it yourself: 1.
# mount cluster_root#root on / type advfs (rw) root1_domain#root on /cluster/members/member1/boot_partition type advfs (rw) cluster_usr#usr on /usr type advfs (rw) cluster_var#var on /var type advfs (rw) root2_domain#root on /cluster/members/member2/boot_partition type advfs (rw) alt_cluster_root#root on /clone type advfs (rw) alt_cluster_usr#usr on /clone/usr type advfs (rw) alt_cluster_var#var on /clone/var type advfs (rw) alt_boot1#root on /clone/cluster/members/member1/boot_partition alt_boot2#root on /
Verifying current software on member 2 Creating master inventory of current system... Getting list of patch subsets to install... . . . FILES cloneroot/usr/adm/dupatch/log/session.log This file captures dupclone activities.
A Viewing Log files The dupatch utility captures patching activities in the following log files: • /var/adm/patch/log/session.log Every time you run dupatch it creates a session log that captures dupatch activities. The session.log files from the previous 25 sessions are saved. The order is first in, first out, with session.log.25 as the oldest file. • /var/adm/patch/log/Dupatch_load_Date.
Example A-1 Sample Event Log DUPATCH_REV>30-01 TYPE>install NAME>mstone USER>mstone DATE>Mon Jul 3 13:03:33 EST 2000 NOTES>Install BL13 patches from CD-ROM > KITLOC>/cdrom/DIGITAL_UNIX_V4.0F/patch_kit/DIGITAL_UNIX_V4.
B Common Error, Warning, and Informational Messages This appendix describes error, warning, and informational messages for the dupatch utility. The following information is provided for each message: Source: The function that generates the message. Problem: A brief description of possible causes for the message. Causes: A summary of situations that cause the message. Action: General recovery guidance. Output: A sample of the message.
Action: Determine why the system file is missing and whether it is safe to enable dupatch to install the blocked patch. See “Creating a Baseline” for more information. Output: Checking patch prerequisites and patch file applicability... (depending upon the number of patches you select, this may take a while) ------------------------------------------------------------------------Problem installing: - DIGITAL_UNIX_V4.0F / Commands, Shells, & Utility Patches: Patch 0236.00 - vi Editor Correction .
Causes: This usually occurs when you miss the selection of all dependent patches. It only occurs in old style patch kits. Action: Through the dupatch Installation Menu, take one of the following actions: • Reselect the patches including the noted dependent patch and attempt reinstallation; dupatch will notify you of other missing dependent patches. • Select all patches and proceed with patch installation. Output: SAMPLE OUTPUT: Checking patch prerequisites and patch file applicability...
* Following patch(es) failed in prerequisite/file applicability check: - TruCluster_V1.6 / Cluster Kernel Patches: Patch 0035.00 - rm_spur Driver Correction Patch Installation Blocked by Disk Space Source: dupatch preinstallation check or installation. Problem: The system disk did not have enough space to install patches. Causes: This occurs when there is not enough disk space in /, /var, or /usr partitions for dupatch to archive the existing system files and move the patched files into place.
Problem: Release patches will not automatically supersede a Customer-Specific patch (CSP). Causes: A file you are trying to update with a Release patch has been previously updated through the installation of a CSP. The Release patch does not have any knowlege as to whether it contains fixes contained in CSPs. Action: Determine if the CSP is included in the Release Patch Kit: • If yes, then you can safely remove the CSP (via dupatch) and reinstall the Release patch .
Patch Removal Messages The following sections describe messages you might see when running the dupatch patch deletion function. Patch Removal Blocked by Missing Patch Backup Files Source: dupatch deletion. Problem: An attempt to remove a specific patch or all patches fails because the backup of the prepatch system files is not available to dupatch. Causes: The /var/adm/patch/backup area does not contain the prepatch system files.
- DIGITAL_UNIX_V4.0F / Library Patches: Patch 0262.00 - libm Corrections No Original Files Restored When Patch Is Removed Source: dupatch deletion. Problem: The removal of a specific patch results in no original system files being restored. Causes: This occurs when a patch delivers files to your system that were not shipped in the initial release of the product. For example, the sample output shows the removal of Tru64 UNIX 4.0F Patch 314.
Patch Removal Fails Because Needed File Is Unavailable Source: dupatch deletion. Problem: An attempt to remove patches fails because the file /var/adm/patch/versionswitch.txt is not available to dupatch. Cause: At least one of the patches selected for deletion in dupatch has a version switch associated with it (defined by having the attribute PATCH_REQUIRES_VERSION_SWITCH set to "Y" in its patch.ctrl file). The versionswitch.txt file is necessary to determine whether the version switch has been thrown.
Problem: The rolling upgrade cannot proceed because required space allocations are not met. Causes: The root (/), /usr, /var, and/or /i18n file systems do not have the required amount of free space. Action: Run the clu_upgrade -undo setup command, free up enough space in the affected file systems to meet the requirements listed in “Preparation Stage”, and rerun the clu_upgrade -undo setup command.
C Using dupatch from the Command Line The dupatch utility provides a command-line interface that allows dupatch to be called by other programs. You can use the command line to invoke all functions except for baselining. The functions have the same operation and definition as the menu-driven interface. For information about using the command-line interface, see the dupatch(8) reference page, which is installed on your system when you install the patch-kit tools and is documented in this appendix.
Notes: • Although a CSP kit can contain multiple patches, not all of them may be installed on your system. • When deleting a CSP patch, also delete any patches that are required by the patch. dupatch Reference Page This section reproduces the dupatch(8) reference page, which is installed on your system with the patch installation tools.
dupatch(8) NAME dupatch -- Installs, deletes and maintains software patch updates to the Tru64 UNIX operating system, the TruCluster software products, and (in later kits) the Worldwide Language Support (WLS) subset. Synopsis /usr/sbin/dupatch /usr/sbin/dupatch -help [-data_file ] [-kit kit_location] [-patch_id ] [-rev] [-product_id] /usr/sbin/dupatch -install -kit kit_location -license -name user_name -note user_note -patch all | patch_id [patch_id ]...
-name user_name -note user_note -product all | product_id [product_id]... -patch all | patch_id [patch_id]... Specifies the name to be recorded in event.log. Enclose the user_name in quotation marks if it contains space characters. Records user-supplied text in the event log. The user_note is a text string enclosed in quotation marks. Required when more than one product is installed. Specifies the installed operating system and TruCluster software when installing patches from an old style patch kit.
Prints the current dupatch revision. -rev Required –delete Options -name user_name -note user_note -product all|product_id [product_id]... -patch all | patch_id [patch_id]... Specifies the name to be recorded in event.log. Enclose the user_name in quotation marks if it contains space characters. Records user-supplied text in the event log. The user_note is a text string enclosed in quotation marks. Mandatory when more than one product is installed.
Description The dupatch utility is an interactive program used to install and delete software patches to the Tru64 UNIX operating system and systems running TruCluster software products. With dupatch you can baseline your system to incorporate any system files that may have been manually installed. You can also use dupatch to obtain a list of installed patches or view the system history of patch installations and deletions.
TRU64_UNIX_V5.1B TRU64_UNIX_V5.1A TRU64_UNIX_V5.1 TRU64_UNIX_V5.0A TRU64_UNIX_V5.0 TRU64_UNIX_V4.0G TRU64__UNIX_V4.0F DIGITAL_UNIX_V4.0D TruCluster_V5.1B TruCluster_V5.1A TruCluster_V5.1 TruCluster_V5.0A TruCluster_V1.6 TruCluster_V1.5 • A product_id specification is not necessary when the system being patched has only one product installed; for example, Tru64 UNIX Version 4.0F with no TruCluster software product.
Specifying a Root Path The root_path you specify with the -root option specifies an alternative root for the specified operation. (The -root option is similar to the -D option of setld.) The following list describes characteristics of the -root option. • The root path must be the root of a complete UFS file system or AdvFS domain. • The default root path is / for all operations.
# dupatch -install -kit /mnt/patch_kit -name Jessica -note \ "Pre-Installation check only on 183.00" -patch 183.00 -precheck_only 3. The following interactive example shows how to install all patches in kit located at /mnt/patch_kit: # dupatch -install -kit /mnt/patch_kit -note "install all patches" -patch all 4. -name Jessica \ The following interactive example shows how to identify all patches installed on system: # dupatch -track -type patch 5.
root-path/usr/.smdb./OSFPAT*.inv root-path/usr/.smdb./OSFPAT*.ctrl root-path/usr/.smdb./OSFPAT*.scp root-path/usr/.smdb./OSFPAT*.lk Lists the subset inventory files. Lists the subset control files. Lists the subset inventory programs. Lists the subset installed lock files.
D Prior Patch Installation Changes Beginning with Version 5.1B-2, we changed to the way Tru64 UNIX patch kits are installed and and removed, and Version 5.1B-3 introduced additional changes. The following sections describe these changes. Changes Made in Version 5.1B-2 If you did not install Version 5.
• • • 102 utility or from the dupatch command line. This feature also works on on pre-Version 5.1B-4 kits. You can delete patches in multi-user mode. You can force the installation of the patch kit even if file conflicts exist. This feature is an extension of the dupatch baselining feature. A new command-line option, Patch Level, provides a single command that provides a full description of the patch kits, CSPs, and ERPs installed on your system.
Glossary baselining A dupatch feature that looks at the files installed on a system, compares them to the files it expects to find, and prevents the installation of any patch files that might cause an incompatibility among system files. Customer-Specific Patch (CSP) Kit A patch kit that is developed and made available to resolve a problem for a specific customer. A Customer-Specific patch is developed with prior knowledge of that customer's unique hardware and software configuration and environment.
rolling upgrade A software upgrade of a cluster that is performed while the cluster is in operation. One member at a time is rolled and returned to operation while the cluster transparently maintains a mixed-version environment for the base operating system, cluster, and Worldwide Language Support (WLS) software. Clients accessing services are not aware that a rolling upgrade is in progress. On Version 5.
Index Symbols .Old.. files, 68 /usr file system rolling upgrade space requirement, 63 /var file system rolling upgrade space requirement, 63 /var/adm/patch/backup, 15, 18, 24, 36, 84, 86 A applicability of patches, 14 applications (see layered products) B backup default location for installed patches, 24 during a rolling upgrade, 62 performing before baselining, 26 relation to patch reversibility, 15 backup directory using as mount point for separate disk partition, 24 baseline.
menu determined by login location, 23 reference page for, 92 restriction on loading new dupatch tools from command line, 91 tracking information with, 15 viewing patch documentation with, 16 dupatch tools installing from command line, 91 restriction on loading from command line using delete, 91 Dupatch_load_date.
removing patches during a rolling upgrade, 54 example of from command line, 91 overview, 40 restriction on using ALL of the above menu item, 41 that contain customized files, 19 using dupatch deletion option, 43 removing temporary patch kit directory, 40 resources (see support) reversibility of patches (see reverting systems to prior state) reverting systems to prior state, 15 RIS registering the default cluster alias, 72 restriction using, 18 roll stage, 66 parallel rolls, 53 rolling patch (see rolling upg