
Installation Instructions

8
1886
Note: The screw was installed for shipping purposes only.
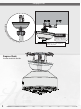
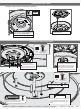
Preparing the Light Fixture
Remove the pre-installed light kit screw and red
ag from the light kit assembly. Save the screw.
It will be needed for light kit installation.
IMPORTANT
Make sure the light kit hood is securely attached
to the mounting plate. Failure to properly secure
all 3 assembly screws could result in the light
kit falling.
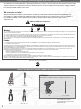
Follow these steps to prepare the light xture for installation.
Red Flag
KEEP
x1
Carefully remove the light kit assembly
from the light kit hood.
Insert the third screw, found in the hardware
bag, into place and then tighten all three screws.
1 of 3
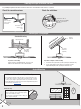
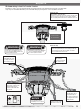
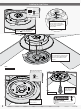
Installing the Light Fixture Hood
Partially install two switch housing
assembly screws ,found in the
hardware bag, into the motor
housing as shown. It does not matter
which two screw holes you choose.
Feed the wire plug through the center hole
of the light kit hood. Align the keyhole slots
in the hood with the two screws you just
installed. Lift the hood so that the keyhole
slots engage the two screws, and twist
counterclockwise to lock the hood into place.
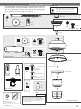
BAG
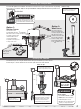
Ceiling Bracket Downrod Hanging Fan Wiring Canopy Blades Light Bulbs/Cage Remote Cradle
Switch Housing
Assembly Screw
2 of 3
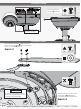
BAG
Switch Housing
Assembly Screw
Light Kit Screw
WARNING
FAN FALL HAZARD
Make sure screws are tight to secure the upper
switch housing to the mounting plate.