Hartland Installation Manual Model: 50326 Indigo Blue 50327 Noble Bronze 50653 Matte Silver Fan weight ±2 lbs: 19.0 lbs (8.6 kg) ©2020 Hunter Fan Co.
Congratulations on purchasing your new Hunter® ceiling fan! The ceiling fan you purchased will provide comfort and performance in your home or office for many years. This instruction manual contains complete instructions for installing and operating your fan. We are proud of our work and appreciate the opportunity to supply you with the best ceiling fan available anywhere in the world. We are here to help! This Instruction Manual is designed to make installation as simple as possible.
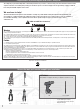
1886 Here is what comes in your box: We recommend that you pull everything out of the box and lay it out. We have grouped the drawn components below with the hardware you’ll need for those parts. The screws below are drawn to scale to make it easier to identify what piece of hardware is needed to install each component. Wood Screw Hunter Pro Tip: Do not discard the hardware bags or mix parts from different bags. Make note of the symbol printed on each hardware bag.
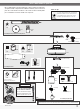
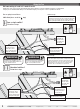
1886 Choosing the Right Installation Location You probably bought this fan with a location in mind. Let’s check below to make sure it is a good fit. Check the room dimensions: Check the outlet box: 30 inches from blade tip to nearest wall or obstruction You must be able to secure the fan to building structure or fan-rated outlet box. 7 feet from bottom edge of blade to the floor Installing the Ceiling Bracket You have two options for installation. Pick which one works best for your location.
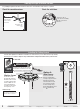
1886 (not to scale) 8” & 3/8” STRIP CUT Hanging the Fan The wires can be cut, but leave at least 8” extending from the top of the canopy. Place the slots over the ceiling plate hooks to hang the fan. Raise the fan and align the slots in the canopy with the hooks on the ceiling plate. Note: To hang the fan, you must tilt the canopy to an almost vertical position so that the canopy slots sit on the ceiling plate hooks. NOTICE Note: Fan style may vary.
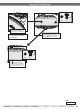
1886 Wiring the Fan We know wiring is hard. Let’s make it easier. Follow these steps to get your fan wired quickly and safely. Follow the route below that best matches your wall switch setup. If you are unfamiliar with wiring or uncomfortable doing it yourself, please contact a qualified electrician. You are going to need these: Hunter Pro Tip: 4 Wire Nuts (these are in the Here is how to connect the wires: Push the bare metal ends of the wires together and slide a wire nut over them.
1886 Hanging the Fan (Continued) 2 of 3 bag Swing the fan up to align the canopy screw holes with the mounting holes on the ceiling plate. Canopy Screws Hold the canopy up with the screw holes aligned. Partially install two canopy screws, found in the hardware bag, into the holes opposite the ceiling plate hooks. Note: The slots in the canopy must remain engaged while swinging the canopy for alignment.
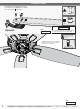
1886 Installing the Blades: Insert grommets found in the hardware bag into the holes in the blades, then secure each blade to a blade arm with screws found in the hardware bag. x15 Blade Screw bag x15 Grommet bag IMPORTANT Repeat x5 Note: Fan style may vary. NOTE: Follow the instructions on the blade. Installing it incorrectly could result in your fan not functioning. ! KEEP DISC D AR Remember the screws that you kept after removing the shipping blocks? You need them here.
1886 1 STEP STEP STEP Assembling the Light 2 3 2 of 6 1 of 6 Light Kit Screw bag bag WARNING FAN FALL HAZARD 5 4 bag Connect the plugs from the upper and lower switch housings. Make sure to line up the colored markings on the connectors. Light Kit Screw STEP STEP Make sure all three screws are tight to secure the upper switch housing to the mounting plate. 2 of 6 STEP Insert a third screw, found in the hardware bag, into place and then tighten all three screws.
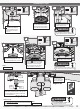
1886 Installing the Pull Chains Light Pull Chain Fan Pull Chain Remove and discard the plastic connectors from the ends of the pull chains (if necessary), then connect the appropriate pull chain pendant to each of the short chains coming from the switch housing. The fan pull chain controls the speed: from high to off. Repeat x2 The light pull chain controls the light fixture: on and off. Note: Fan style may vary.
1886 Troubleshooting Fan Doesn’t Work Excessive Wobbling • Make sure power switch is on. • Pull the pull chain to make sure it is on. • Push the motor reversing switch firmly left or right to ensure that it is engaged. • Check the circuit breaker to ensure the power is turned on. • Make sure the blades spin freely. • Turn off power from the circuit breaker, then loosen the canopy and check all the connections according to the wiring diagram. • Check the plug connection in the switch housing.