
Instructions / Assembly
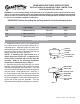

4. Guide the two wires from the light fixture through
the center plug-hole in cover and then thread the
light fixture into the center hole. Hand tighten firmly.
See FIG. 3
5. While holding light fixture up to the fan, attach the
wires from the fan switch housing and the wires
from the light fixture together (black-to-black or
blue-to-black and white-to-white) by twisting the
bare ends of the wires together. Then secure the
splices by threading on the wire nuts provided. Test
the secureness of each splice by pulling on the wire
nut.
6. Re-attach the cover and light fixture to the fan
switch housing using the two brass 8-32 screws,
insuring guide pins are properly located into fan
switch housing.
Caution: Make sure no wires are pinched between
cover and switch housing. Tighten the screws to
secure light fixture.
7. Install glass (not included) by loosening the
thumbscrews on each shadeholder, align glass
inside shadeholder as far as it will go and tighten
thumbscrews equally around the glass. Make sure
the glass is snug and locked-down tight so that the
glass will not rattle when the fan is in operation.
8. Install the appropriate light bulbs.
Do not exceed the maximum wattage indicated
on the light fixture.
9. Connect the fob pull chain to the light pull chain.
FIG. 3
8-32 SCREW
GUIDE PIN
BLACK WIRE
WIRE NUT
BLACK OR
BLUE WIRE
WHITE WIRE
THUMB SCREW
LIGHT FIXTURE
EXAMPLE