
Installation Guide


7
8
1886
1886
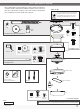
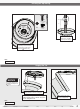
Ceiling Bracket Top housing Hanging Fan Wiring Canopy Blades Light Glass/Bulbs
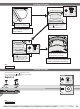
Installing the Bulbs and Glass
ON
Turn Power
Install the included bulbs
into the sockets. When
necessary, replace with
bulbs of same wattage.
Lift the globe and align the notches in
the globe with the tabs in the light kit.
NOTE: Check to ensure
proper engagement.
Attach the globe by lifting and
turning clockwise one third of a
full turn of the glass until it stops.
Notch
Tab
WARNING
GLASS FALL HAZARD
To prevent SERIOUS INJURY or DEATH, make
sure that glass is properly secured.
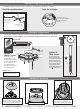
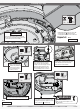
Reversing the Fan
Reverse
Switch
Updraft (clockwise rotation)
creates a more indirect airow.
Updraft airow is great for
moving warm air downward.
Downdraft (counterclockwise
rotation) creates a direct breeze
and maximum cooling effect.
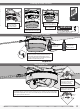
The fan pull chain
controls the speed:
from high to off.
The light pull chain
controls the light
xture: on and off.
Installing the Pull Chains
Repeat x2
Remove and discard the plastic connectors from the ends
of the short pull chain. Feed the pull chains from the fan
switch and the light switch down through the holes in
the upper switch housing as shown. Attach the pull chain
pendants to the light and fan pull chains.
Blade Arm Screw
Ceiling fans work in two directions: downdraft (counterclockwise rotation) and updraft (clockwise rotation).
To change the direction of air ow, turn the fan off and let it come to a complete stop. The reversing switch is
located inside the light xture. It can only be accessed when the glass is removed. Slide the reversing switch
to the opposite position. Restart the fan.