Rev. 0608 Ref.
IGFP-R3, R3P-0608 General Instructions Table of Contents This Booklet Contains Information on: R3: Refrigerated Service Top/Self-Service Front Case R3P: Service Prep Top/Refrigerated Self-Service Front Case R3TO: Service Top only for in-counter installation Shipping Damage All equipment should be thoroughly examined for shipping damage before and during unloading. This equipment has been carefully inspected at our factory and the carrier has assumed responsibility for safe arrival.
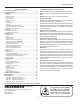
Rev. 0608 Cut and Plan Views 11 1/4" 14 5 /8" " 23 3/4" 18 18 Optional Shelf " 10" 20 5/8" 19 3/8" 12 3/8" 6" 20 5/8" 13 1/2" 36 3/8" 10" 13 1/2" R3 50 3/8" Ref. Service/Self-Service R3P Scale = 1/2" Service Prep / Self Service Case Scale = 1/2" 11 1/4" 26 1/8" 5 /8 " 14 36" 9 1 /2 " 24 3/4" Your Counter 36" R3TO Regrigerated Service /Self Service / Prep Case Scale = 1/2" 10 5/8" Prep Top Area 7 /8" 8" 8" 20 8" 40 1/2" 50 1/4" 12" 20 5/8" 19 3/8" 12" REF.
IGFP-R3, R3P-0608 Installation Location The refrigerated merchandisers have been designed for use only in air conditioned stores where temperature and humidity are maintained at or below 75°F and 55% relative humidity. DO NOT allow air conditioning, electric fans, ovens, open doors or windows (etc.) to create air currents around the merchandiser, as this will impair its correct operation. Product temperature should always be maintained at a constant and proper temperature.
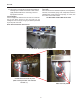
Rev. 0608 Installation (Cont'd) Joint Trim After cases have been leveled and joined, and refrigeration, electrical, and wasted piping work completed, install the splashguards. Fasten along the top edge, or center, with #10 X 3/3” sheet metal screws. DO NOT SEAL JOINT TRIM TO FLOOR! 10. Use finger to smooth silicone as thin as possible at masking tape on inside and outside of rear mullion (apply additional silicone if necessary). Remove tape applied on line #3.
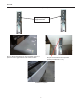
IGFP-R3, R3P-0608 Installation (Cont'd) Wrapping Boards Installation Instructions Step 2: Measure 10 inches from top of the case. Step 1: Measure 6 inches from wrapping board end. Note: Line up 6 inch mark with 10 inch mark. Step 3: Use bracket center hole to align with cross mark. Note: Use pencil/marker to mark hole pattern.
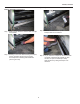
Rev. 0608 Installation (Cont'd) Step 6: Install upper support bracket Step 7: Mount wrap board on top of bracket using a ¼” spacer to have a gap between rear wall and board.
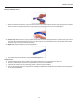
IGFP-R3, R3P-0608 Installation (Cont'd) Bumper Installation Instructions Step 2: Use silicone lubricant to help the bumper slide into the channel. Step 1: Make sure the aluminum channel and end caps are installed. Step 3: Starting on one end: while inserting the bumper, push it up against the end cap to prevent the bumper from shrinking after installation (when it gets cold).
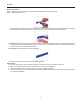
Rev. 0608 Installation (Cont'd) Boston Series 2000 NOTE: Flexible top: Over cut vinyl 1/8" for every 4' section for the flexible top to ensure a proper fit. NOTE: Rigid Top: Do not over cut. 1. Attach the base and end/corner cap to the desired surface by inserting #8 pan head screws through the pre-slotted holes in both the end cap and the base. Insert screws through the two holes of end cap and tighten. 2a. Flexible Top: Butt end of the vinyl top against end/corner cap.
IGFP-R3, R3P-0608 Installation (Cont'd) Boston 2000 Eco Series 1. Attach the base and end/corner cap to the desired surface by inserting #8 pan head screws through the pre-slotted holes in both the end cap and the base. Insert screws through the two holes of end cap and tighten. 2a. Flexible Top: Butt end of the vinyl top against end/corner cap. While applying pressure, bend back vinyl top so that vinyl legs are positioned within the base grooves.
Rev. 0608 Installation (Cont'd) Boston 1000 Series NOTE: Flexible top: Over cut vinyl 1/8" for every 4' section for the flexible top to ensure a proper fit. NOTE: Rigid Top: Do not over cut. Installation 1. Attach the base and end/corner cap to the desired surface by inserting #8 pan head screws through the pre-slotted holes in both the end cap and the base. Insert screws through the two holes of end cap and tighten. 2a. Flexible Top: Butt end of the vinyl top against end/corner cap.
IGFP-R3, R3P-0608 Plumbing Waste Outlet and P-TRAP The waste outlet is located off the center of the case on one side allowing drip piping to be run lengthwise under the fixture. There are 3 drains in each fixture that can be easily located. 1-1/2", 1" and 3/4" P-TRAPS and threaded adapters are supplied with each fixture. The 3 P-TRAPS must be installed to prevent air leakage and insect entrance into the fixture. NOTE: 3.
Rev. 0608 Refrigeration (Cont'd) Electronic Expansion Valve (Optional) A wide variety of electronic expansion valves and case controllers can be utilized. Please refer to EEV and controller manufacturers information sheet. Sensors for electronic expansion valves will be installed on the coil inlet, coil outlet, and in the discharge air. (Some supermarkets require a 4th sensor in the return air). Case controllers will be located in the electrical raceway or under the case.
IGFP-R3, R3P-0608 Electrical (Cont'd) Field Wiring and Serial Plate Amperage Field Wiring must be sized for component amperes printed on the serial plate. Actual ampere draw may be less than specified. Field wiring from the refrigeration control panel to the merchandisers is required for refrigeration thermostats. Most component amperes are listed in the “Case Specs” section, but always check the serial plate.
Rev. 0608 User Information (Cont'd) Non-glare Glass Windex® or Glass Plus® are the only solutions recommended to be used to clean the non-glare glass. The damage to the glass from improper, caustic solutions is irreparable. In addition to cleaning the glass with the recommended product, there are precautions that should be taken when working and cleaning the inside of the case.
IGFP-R3, R3P-0608 Electrical Wiring Diagrams R3 Prep 4' W0180047 6' W0180048 8' W0180049 12' W0180051 R3-P-8-REM 8' W1800167 R3-P-4-REM WALMART 4' W1800172 R3-P-6-REM WALMART 6' W1800173 R3 Top Only - Cold 4' W0180101 6' W0180102 8' W0180103 12' W0180105 4' W1800122 R3TO 2000 S/C TOP ONLY BLOWER 16
Hussmann Corporation, Int'l. 13770 Ramona Avenue Chino, CA. 91710 (909)-590-4910 Lic.#: 644406 ? LIGHT SWITCH TIPPETTE 125-01-0311 DATE: 8/29/07 REVISIONS: #: DESCRIPTION: A Updated dwg; revised load ratings; removed fuse L LIGHT CIRCUIT TAG ORANGE M L1 N ~120 VAC - 60 Hz. MCA= .65A MOP= 15A M R3 & CR3 - 4 PREP CASES R3 & CR3 CASES FAN CIRCUIT TAG BROWN EVAP FAN MOTORS (2) 4W .29A @ 120VAC 0392457 LIGHT CIRCUIT= .26A, 28W DRAWN BY: D.
Hussmann Corporation, Int'l. 13770 Ramona Avenue Chino, CA. 91710 (909)-590-4910 Lic.#: 644406 ? LIGHT SWITCH TIPPETTE 125-01-0311 FP21/830 T5-36" 125-03-1131 L 8/29/07 A Updated dwg; revised load ratings; removed fuse DATE: REVISIONS: #: DESCRIPTION: M FAN MOTOR CIRCUIT TAG BROWN M M R3 & CR3 CASES R3 & CR3 - 6 PREP CASES DRAWN BY: D.QUAN PROJECT TITLE: DATE: 03/17/06 BY: CHECKED BY: PRODUCTION ORDER #: DRAWING TITLE: JR FILE LOCATION: L1 N ~120 VAC - 60 Hz. MCA= 1.
Hussmann Corporation, Int'l. 13770 Ramona Avenue Chino, CA. 91710 (909)-590-4910 Lic.#: 644406 ? LIGHT SWITCH TIPPETTE 125-01-0311 DATE: 8/29/07 A Updated dwg; revised load ratings; removed fuse L LIGHT CIRCUIT TAG ORANGE M L1 N ~120 VAC - 60 Hz. MCA= 1.2A MOP= 15A M M R3 & CR3 - 8 PREP CASES R3 & CR3 CASES FAN CIRCUIT TAG "BOTTOM" BROWN M EVAP FAN MOTORS (4) 4W .29A @ 120VAC 0392457 LIGHT CIRCUIT= .52A, 56W DRAWN BY: D.
Hussmann Corporation, Int'l. 13770 Ramona Avenue Chino, CA. 91710 (909)-590-4910 Lic.#: 644406 ? LIGHT SWITCH TIPPETTE 125-01-0311 F28T5-48" 125-03-1131 L 8/29/07 A Updated dwg; revised load ratings; removed fuse DATE: REVISIONS: #: DESCRIPTION: M FAN MOTOR TAG BROWN M M EVAP FAN MOTORS (6) 4W .29A @ 120VAC 0392457 M R3 & CR3 CASES M R3 & CR3 - 12 PREP CASES DRAWN BY: D.
BLACK #14 WHITE #14 Hussmann Corporation, Int'l. 13770 Ramona Avenue Chino, CA. 91710 (909)-590-4910 Lic.#: 644406 MCA= .59A MOP= 15A L1 N ~120 VAC - 60 Hz ? BUNDLE BROWN LABELED FAN CIRCUIT M REVISIONS: #: DESCRIPTION: MCA= 1.23A MOP= 15A L1 N ~120 VAC - 1Ø - 60 Hz BUNDLE ORANGE LABELED LIGHT CIRCUIT WHITE #14 F28T5-48" 125-03-1131 L M M M N MCA= 2.
Hussmann Corporation, Int'l. 13770 Ramona Avenue Chino, CA. 91710 (909)-590-4910 Lic.#: 644406 ? REVISIONS: #: DESCRIPTION: NOTE: CASE MUST BE GROUNDED LOADING 120 V L1 15.0 L2 L3 CIRCUIT #3 NOTE: CASE MUST BE GROUNDED LOADING 208 V 240V 5.7 L1 5.0 5.7 L2 5.0 L3 CIRCUIT #2 NOTE: CASE MUST BE GROUNDED LOADING 120 V L1 3.
Hussmann Corporation, Int'l. 13770 Ramona Avenue Chino, CA. 91710 (909)-590-4910 Lic.#: 644406 LIGHT SWITCH TIPPETTE 125-01-0311 NOTE: CASE MUST BE GROUNDED ? REVISIONS: #: DESCRIPTION: MCA= .59A MOP= 15A SENSOR 225-01-3072 M BUNDLE BROWN LABELED FAN CIRCUIT M FAN MOTOR 0.29 AMP @ 120VAC (2) 0392457 BLACK #14 WHITE #14 MCA= 0.
Hussmann Corporation, Int'l. 13770 Ramona Avenue Chino, CA. 91710 (909)-590-4910 Lic.#: 644406 F21T5-36" 125-03-1128 ? F21T5-36" 125-03-1128 REVISIONS: #: DESCRIPTION: MCA= .88A MOP= 15A F21T5-36" 125-03-1128 BALLAST 125-01-3266 FULHAM LH3-120-L BUNDLE ORANGE LABELED LIGHT CIRCUIT L F21T5-36" 125-03-1128 BALLAST 125-01-3266 FULHAM LH3-120-L L1 N ~120 VAC - 60 Hz WHITE #14 24 BLACK #14 LIGHT SWITCH TIPPETTE 125-01-0311 NOTE: CASE MUST BE GROUNDED M WHITE #14 MCA= 0.
Hussmann Corporation, Int'l. 13770 Ramona Avenue Chino, CA. 91710 (909)-590-4910 Lic.#: 644406 ? REVISIONS: #: DESCRIPTION: A Updated dwg; revised load ratings LIGHT SWITCH TIPPETTE 125-01-0311 L N BUNDLE ORANGE DATE: 9/4/07 N WHITE # 14 L1 M R3 & CR3 CASES ~120 VAC - 60 Hz. MCA= .36A MOP= 15A L1 N M DRAWING #: AXIAL EVAP FANS 0.16 AMP 11W@ 120VAC (2) 125-01-2011 R3 & CR3 - 4 TOP ONLY COLD CASES DRAWN BY: D.
Hussmann Corporation, Int'l. 13770 Ramona Avenue Chino, CA. 91710 (909)-590-4910 Lic.#: 644406 ? LIGHT SWITCH TIPPETTE 125-01-0311 N ~120 VAC - 60 Hz. MCA= .
Hussmann Corporation, Int'l. 13770 Ramona Avenue Chino, CA. 91710 (909)-590-4910 Lic.#: 644406 ? L N REVISIONS: #: DESCRIPTION: A Updated dwg; revised load ratings; removed fuse BUNDLE WHITE/BLACK LIGHT CIRCUIT= .52A 56W DATE: 9/5/07 BUNDLE ORANGE BALLAST 125-01-3266 FULHAM LH3-120-L ~120 VAC - 60 Hz. MCA= .
Hussmann Corporation, Int'l. 13770 Ramona Avenue Chino, CA. 91710 (909)-590-4910 Lic.#: 644406 ? LIGHT SWITCH TIPPETTE 125-01-0311 LIGHT CIRCUIT= .52A 56W L1 BUNDLE ORANGE L N DATE: 9/5/07 BUNDLE WHITE/BLACK L1 ~120 VAC - 60 Hz. N T-STAT (1) 225-01-0707 BUNDLE BROWN M MCA= 1.0A MOP= 15A M M AXIAL EVAP FANS 0.16 AMP 11W@ 120VAC (6) 125-01-2011 M DRAWING #: M R3 & CR3 - 12 TOP ONLY COLD CASES R3 & CR3 CASES L1 N ~120 VAC - 60 Hz. M WHITE # 14 DRAWN BY: D.
Hussmann Corporation, Int'l. 13770 Ramona Avenue Chino, CA. 91710 (909)-590-4910 Lic.#: 644406 ? L TOP LIGHTING SECTION (1) FP28/835 125-03-1131 BUNDLE ORANGE REVISIONS: #: DESCRIPTION: A Updated dwg; revised load ratings L1 N ~120 VAC - 60 Hz. MCA= .65A MOP= 15A LIGHT SWITCH TIPPETTE 125-01-0311 MCA= 15.6A MOP= 20A BUNDLE BROWN M DATE: 9/4/07 MCA= .36A MOP= 15A L1 N ~120 VAC - 60 Hz. N L1 3 X 4 MCA= 8.3A MOP= 15A ~120 VAC - 60 Hz.
IGFP-R3, R3P-0608 Appendices 1.3 A clogged waste outlet blocks refrigeration. The installer is responsible for the proper installation of the system which dispenses condensate waste through an air gap into the building indirect waste system. 1.
Rev. 0608 Appendices (Cont'd) 1.1 The following recommendations are made for the purpose of arriving at easily taken and understood data which, coupled with other observations, may be used to determine whether a display refrigerator is working as intended: a) INSTRUMENT - A stainless steel stem-type thermometer is recommended and it should have a dial a minimum of 1 inch internal diameter. A test thermometer scaled only in Celsius or dually scaled in Celsius and Fahrenheit shall be accurate to 1°C (1.8°F).
IGFP-R3, R3P-0608 Appendices (Cont'd) d) Care must be taken when cross merchandising products to ensure that potentially hazardous vegetable products are not placed in non refrigerated areas. e) Display and storage equipment doors should be kept closed during periods of inactivity. f) Minimize the transfer time of perishables from storage to display. g) Keep meat under refrigeration in meat cutting and processing area except for the few moments it is being handled in processing.
IGFP-R3, R3P-0608 Service Record Last service date: By: _______________ ___________________________________________________________________________________________________ _______________ ___________________________________________________________________________________________________ _______________ ___________________________________________________________________________________________________ _______________ __________________________________________________________________________________