
User manual


24
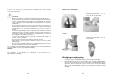
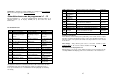
The controls
1 - Socket for mains lead
2 - LCD display
3 / 6 - +/- (Program selection / Time (T)
stimulation level (SP)
4 - ON / OFF button
5 - MODE (function selection:
program, time ,
stimulation level)
7 - REPEAT button
8 - Setting: intensity
for channels A / B / C / D
9 - Leads to
channels A / B / C / D
10 - Battery compartment (on back)
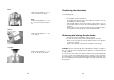
Instructions for use
1. Thoroughly clean the area you are
going to treat.
2. Connect the stimulator to the mains using the connection provided (1) and
to the plug socket or put the batteries in the battery compartment (10) on
the back of the controls (as shown in the diagram inside the compartment).
3. Insert the leads into the appropriate sockets (9) using as many leads as are
necessary (depending on the application: 1 to 4 leads).
4. Join the self-adhering pads with the clips on the leads you are going to use.
5. Remove the protective foil from the self-adhering pads.
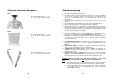
6. Position the pads on the area that is to be stimulated: follow the examples
showing positioning on Pages 9-11. (The poles for the plugs is indicated on
the clip.). Press the electrodes down for a few seconds so that the gel
adheres properly.
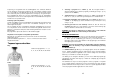
7. Press the ON-/OFF button (4) to start the stimulator. In Display (2) you will
then see the initial setting: Program 1 – 30 Min – 1.
Display (2) will light up. After 20 seconds this light will switch off
automatically. You can turn it on again by pressing any button.
61
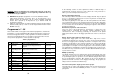
Armen:
aanbevolen programma´s – 1, 2, 3,
4, 5, 15, 21, 24, 26, 27, 28 und 30
Benen:
aanbevolen programma´s – 1, 2, 3,
6, 7, 8, 17, 21, 24, 26, 27, 28 und
30
Gewrichten:
aanbevolen programma´s – 3, 4, 7,
22, 24 und 30