
Installation Guide


FREESTANDING INSTALLATION
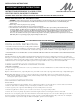
PREPARATION
Clean, level, and prepare the floor for installation.
Place the unit in the exact installed position on the floor
and trace the outline of the bath with a pencil or any
erasable marking (Figure 1). Templates for Freestanding
bathtubs come with the tub.
Determine the location of the drain pipe, on the floor
by taking measurements of the drain and waste location
underneath the unit (Figure 2).
3
4
5
1
2
FIGURE 1
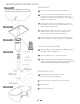
Using a blanket, cardboard, or other clean protective
surface, turn the unit on its side so that the unit is
properly supported during drain installation.
Clean the drain hole area in preparation of setting the
strainer. The area should be dry and free of any debris.
2
INSTALL DRAIN HARDWARE
Apply plumbers putty around the Drain Body and pass it
through the drain hole (Figure 3).
Slide the rubber washer over the drain body.
Attach the drain Body to the ABS/ PVC Shoe fitting and
tighten until the Gasket has created a seal with the bottom
of the bathtub. DO NOT OVERTIGHTEN (Figure 4).
6
7
8
9
FIGURE 3
PREPARE TAIL PIECE
Apply rubber gasket and slide it over the
bottom of the Drain Body (Figure 5)
Install 1 ½"rubber slip gasket over the drain body.
Thread in shoe.
Glue shoe to tail piece.
10
12
11
FIGURE 5
tail piece (shoe)
FIGURE 4
FIGURE 2