
Installation Guide


3
FIGURE 8
FIGURE 6
FIGURE 7
FREE STANDING TUBS
GENERAL INFORMATION
•
Rough In Dimensions – For critical dimensions, we suggest taking the measurements of the actual tub on site.
All printed specifications are +/- ½ inch and subject to change without notice.
•
Base –the tub must be level
BASIC INSTALLATION PROCEDURE
•
Determine final location of the tub. Tub will sit on top of finished flooring.
•
Ensure location is structurally sound, flat and level.
•
Align the tub in a manner that the drain lines up with the P-trap in the floor. DO NOT LET THE TUB REST ON
THE DRAIN PLUMBING.
•
Check the tub for level. It must be level end to end and side to side.
•
Caulk the gap between the skirt and the floor.
SUPPLEMENTAL INSTALLATION INFORMATION
TOWER
A Tower can be added to any of our
Maestro Bathtubs allowing you to
use traditional Roman faucets.
WASTE AND OVERFLOW
The Maestro Collection offers integral waste and overflow
on all models because of the the limited space between the
inner and outer tub shells. Use care when selecting your drain
kit. The Maestro Collection offers toe tap hardware standard.
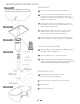
Then apply a bead of tub and tile caulk or silicone
around the edge of the base (Figure 8).
Adjust legs to a height of
1
/
8
" max below skirt.
COMPLETE BATHTUB INSTALLATION
Fill tub with water to the overflow and then drain the tub while
inspecting the waste connections below the floor for leaks.
Access from below will be necessary for this step (Figure 9).
Apply generous bead of adhesive or silicone to the
bottom of the tub supports and feet. (Figure 6).
Carefully set tub into position (Figure 7) and connect
the drain hardware (previously installed).
INSTALL BATHTUB
FIGURE 9
14
15
16
13
17