Part #2000/2100 Reference Guide and Step by Step Installation Manual Table of Contents SECTION 1: PROGRAMMING INSTRUCTIONS.......................................................................................................... 3 1-1: MAIN MENU .............................................................................................................................................................. 4 1-2: TUNING MENU ........................................................................................
Changing Options ......................................................................................................................................................... 24 Preset Tune ................................................................................................................................................................... 25 SECTION 3: TECHNICAL INFORMATION & TROUBLESHOOTING .................................................................
• • • during the programming process. (Refer to the vehicle owner’s manual for location of radio, remote start, and amp fuses.) Unplug all accessories from cigarette lighter or any other auxiliary power port on the vehicle BEFORE programming (cell phone chargers, GPS, etc.) Disconnect any mobile devices from the entertainment system BEFORE programming (Bluetooth, USB chargers, smart phones, etc.) Daytime running lights should be disabled before programming.
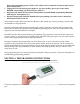
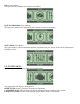
Make sure the cable is plugged in completely to ensure a good connection. DO NOT disturb the cable once it is connected to the diagnostic port. The programmer will power up, and display the startup screen. Turn the key to the Run position, and select “OK” using the middle bottom button. The Run position is the last key click before the engine will start.
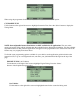
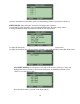
DTC’s (All Vehicles): This option checks for Diagnostic Trouble Codes (DTCs). QUICK COMMANDS (Some Vehicles): This option has selections for adjustable features that don’t require programming. SETUP INFO (All Vehicles): This option displays various information about the programmer and your vehicle. It also allows adjustments to the display screen. 1-2: TUNING MENU Press ‘Select’ to enter the Tuning menu from the Main Menu.
When using the programmer for the first time, select the CUSTOMIZE TUNE option. CUSTOMIZE TUNE Use the buttons to the right of the screen to highlight Customize Tune. Press the ‘Select’ button to display the Tuning Menu. NOTE: Some adjustable features listed below are NOT available for all applications. The year, make, model, and engine of the vehicle will determine the available features.
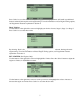
Press ‘Select’ to save the chosen tune. By selecting ‘Stock’, the programmer will install any additional features selected, but keep the stock engine tuning. For more information on Gas Engine Tuning options, see Programmer Features explanation in Section 4. Diesel Vehicles: Use the buttons to the right of the screen to highlight your choice of tunes; Stage 1, Stage 2, or Stage 3. Press ‘Select’ to save the chosen tune.
For more information on Engine Rev Limiter option, see Programming Feature explanation in Section 4. TOP SPEED (Most Vehicles) Use the buttons to the right of the screen to highlight Top Speed. Press the ‘Select’ button to adjust the top speed limiter. Use the buttons to the right of the screen to scroll up or down, and highlight the desired MPH. Press ‘Select’ to save the chosen value. Some applications allow the top speed limiter to be lowered from the factory setting.
Note: Raising the top speed limiter is not recommended for vehicles equipped with load rated tires. Serious damage or injuries could occur. For more information on the Top Speed Limiter option, see Programming Features explanation in Section 4. TIRE SIZE (Most Vehicles) Use the buttons to the right of the screen to highlight Tire Size. Press the ‘Select’ button to adjust the speedometer and odometer for non-stock tire size.
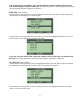
For more information on Gear Ratio option, see Programming Features explanation in Section 4. SHIFT POINTS (Most Automatic Transmission Equipped Gas Vehicles) Use the buttons to the right of the screen to highlight Shift Points. Press the ‘Select’ button to change the RPM at which the transmission shifts at wide open throttle. To adjust the shift points in all gears the same, select ALL from the Shift Points menu.
PER GEAR SHIFT POINTS: Use the buttons to the right of the screen to scroll up or down, and highlight the gear change to adjust. Press the ‘Select’ button, then use the buttons to the right of the screen to scroll up or down, and highlight the value to increase or decrease the shift points, in 100 RPM increments. Press Select to save the chosen value. Press the ‘Back’ button to go back to the Gear Shift menu. Repeat the procedure above for each gear change.
ALL SHIFT FIRMNESS: Use the buttons to the right of the screen to scroll up or down, and highlight the percentage to increase or decrease the shift firmness. Press Select to save the chosen value. PER GEAR SHIFT FIRMNESS: Use the buttons to the right of the screen to scroll up or down, and highlight the gear change to adjust. Press the ‘Select’ button, then use the buttons to the right of the screen to scroll up or down, and highlight the percentage to increase or decrease the shift firmness.
COLD AIR INTAKE (Some Vehicles) This feature will only be listed if your vehicle requires a custom tune when using an aftermarket cold air intake. Use the buttons to the right of the screen to highlight Cold Air Intake. Press the ‘Select’ button to install custom tuning for a specific aftermarket air intake. Use the buttons to the right of the screen to highlight the cold air intake installed on your vehicle. Select the Stock air intake if you have not installed an aftermarket air intake.
For more information on the Fan Temp option, see Programming Features explanation in Section 4. V4 Mode (Some 2007- up GM Vehicles) Use the buttons to the right of the screen to highlight V4 Mode. This option disables the Active Fuel Management (AFM) system. To completely disable the V4 Mode, use the buttons to the right of the screen to scroll down, and highlight Disabled. Press the ‘Select’ button to save this option.
0-60 RESTRICTION (Some Vehicles) Use the buttons to the right of the screen to highlight 0-60 Restriction. Use the buttons to the right of the screen to scroll down, and highlight Disabled. Press the ‘Select’ button to save this option. For more information on 0-60 Restriction option, see Programming Features explanation in Section 4. 1-3: SELECTION REVIEW & PROGRAMMING The Tuning Menu will display a + sign next to each option that you selected to change.
To accept all tuning options, press ‘Accept’ to begin the programming process. To make changes to any option, select ‘Change’. PRESET TUNE The programmer allows you to save up to 5 preset tunes. This feature will save a specific selection of programming options in the programmer memory. The preset tune can be selected from the Tuning Menu. If you wish to save the currently selected tuning options as a Preset Tune, select ‘Yes’. If you don’t want to save the selected options as a preset tune, select ‘No’.
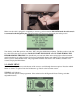
IS CONNECTED! If the unit stops programming or is interrupted, please make a note of any message(s) that appear on the programmer screen and call the provided tech service line. IMPORTANT NOTE: On certain applications, the instrument panel message center may light up, and random code information such as REDUCED ENGINE POWER, and other warning lights may display. This is a NORMAL step during the programming process for certain applications.
Once the programmer has completed the reading process, it will proceed to the Writing Vehicle mode. Continue to follow the messages on the screen. You may be prompted to turn the key to the ‘RUN’ and ‘OFF’ position during this process. After the programmer has successfully programmed the vehicle, follow the instructions on the screen until you see the Successful screen.
It is now safe to unplug the programmer from the vehicle and start the engine. Make sure the “Check Engine” light on the instrument cluster goes out (If it stays on or flashes, read out the DTC’s, and contact Hypertech tech support). Warm up the engine and make sure it is running smoothly.
Use the buttons to the right of the screen to scroll up or down and review each DTC. The programmer will display a description of the DTC. Once you have reviewed each DTC, you can clear them by selecting ‘Clear’. 1-5: QUICK COMMANDS From the Main Menu, press the left or right arrow buttons to scroll for the Quick Commands menu. Press ‘Select’ to enter Quick Commands menu from the Main Menu. The programmer will display the following menu.
Use the buttons to the right to raise or lower the minimum tire pressure to activate the TPMS alarm. Select ‘Flash’ to program the change. TPMS ENABLE (Most Vehicles) Press the button on the bottom to fully enable or disable the TPMS alarm. For more information on the TPMS option, see Programming Features explanation in Section 4. 1-6: SETUP/INFO From the Main Menu, press the left or right arrow buttons to scroll for the Setup/Info menu. Press ‘Select’ to enter the Setup/Info menu from the Main Menu.
DEVICE INFO Use the buttons to the right of the screen to highlight Device Info. Press the ‘Select’ button to display the Device Info menu. Use the buttons to the right of the screen to scroll up or down and review the device info. VEHICLE INFO Use the buttons to the right of the screen to highlight Vehicle Info. Press the ‘Select’ button to display the Vehicle Info menu.
SETTINGS Use the buttons to the right of the screen to highlight Settings. Press the ‘Select’ button to display the Settings menu. BRIGHTNESS & CONTRAST Use the buttons to the right of the screen to highlight the setting to adjust. Press the ‘Select’ button to display the selected setting. Use the buttons to the right of the screen to adjust the brightness or contrast of the display screen, from 1 to 10. Press the ‘Back’ button to return to the previous menu.
SECTION 2: PROGRAMMING VEHICLE BACK TO STOCK, CHANGING TUNING OPTIONS, AND SELECTING PRESET TUNES Reconnect the programmer to the vehicle as in Section 1, and follow the messages on the screen until the Main Menu appears. Select the Tuning option from the Main Menu. BACK TO STOCK To return the vehicle completely to factory stock settings, select ‘Uninstall Tuning’ from the Tuning menu. Follow the Programming instructions from Section 1.
programmed in the vehicle. You will need to select each option again, even if you aren’t making a change from the current setting. PRESET TUNE To flash a previously saved tune, use the buttons to the right of the screen to highlight Preset Tune. Press the ‘Select’ button to bring up a list of preset tunes. Use the buttons to the right of the screen to highlight a Preset Tune, and press ‘Select’. Use the buttons to the right of the screen to review the Preset Tune options.
in the programmer and reinstalled into the vehicle’s computer. This process returns the computer to factory stock and resets the programmer to allow the user to reprogram the vehicle AFTER repairs or service. Why Is It Necessary To Return To The Stock Tuning? The reason that this should be done is because the factory diagnostic equipment will only recognize factory calibration information.
ATTEMPTING TO PROGRAM A DIFFERENT VEHICLE Code 0125: VIN Mismatch will appear if attempting to program the computer in another vehicle without first programming the last vehicle it was used on back to stock. Return the previous vehicle back to stock, following the Back To Stock procedure in Section 2. UPDATE REQUIRED There are several instances where an update may be required to use the programmer. The following codes require an update. The programmer will display a message that it needs to be updated.
speeds, which can lead to better fuel economy. With the optimization focused on the specific fuel octane for each tune, you should see fuel mileage increases with all octane levels. TOWING All Hypertech tunes are optimized for towing. The Max Energy tuning is the only tuning on the market that doesn’t have to offer limited power tunes for fuel economy or towing levels. Our tuning is safe for hauling and towing the maximum weight designated by the vehicle’s manufacturer.
or Stage 2. The best way to determine the tune that will give you the best fuel economy is to try each setting. TRANSMISSION TUNING Allison Transmissions (2001-2007 LB7, LLY, LBZ): The Allison transmission and controller on the LB7, LLY, and LBZ GM diesel trucks is a very complicated piece of technology. The controller is constantly monitoring the transmission performance and adjusts the operating pressures in small increments to ensure the longevity of the transmission.
curve. When you extend the engine’s rpm range with the Max Energy 2.0, your engine has more power available after gear changes. And by keeping the engine in the “sweet spot” of its power curve, you can increase the average horsepower that accelerates the vehicle. TOP SPEED This feature lets you electronically raise your vehicle’s top speed limiter to match the speed rating of factoryapproved high-performance tires, or lower the top-speed limiter from 25 to 75 MPH.
These settings are totally subjective, and based on user feel, or by the time slip at the track. For shift point optimizing, test only one (1) shift point at a time until the best RPM shift point is found for each. The shift point adjustment range is +/-500 RPM in approximately 100 RPM increments for each of the shift points for the vehicle. If changes are made to the shift points, the rev limiter must also be adjusted accordingly (See chart below).
1. Install the Tuner Update Software. The Tuner Update Software can be installed on any Windows based PC from the same CD that these instructions are located, or it can be downloaded from the Hypertech website at the link below. Note: The Tuner Update Software is not compatible on Apple/MAC operating systems. http://www.webservice99.com/downloads/tunerupdateapplication/V2/Current/UpdateInstallV2.exe 2. Connect the programmer to the PC with the supplied USB cable. 3.
Note: The Max Energy 2.0 is designed to use on only one vehicle at a time. In order to use the programmer on another vehicle, the vehicle it is currently being used on must be returned to stock by following the Back To Stock procedure in Section 2. Once the programmer has been returned to stock, it can then be used on another vehicle, if that vehicle is supported by the programmer. The Max Energy 2.0 is limited for use on a maximum of three (3) vehicles.