
Counter Top Dispenser Product Manual


IOD16022
Installation: General IOD22030
Page 5
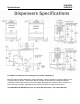
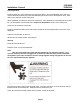
Drain Line Installation (Dispenser)
Connect a ¾” ID flexible drain hose to
the drain nipple located under the ice
storage bin. Clamp the hose in place
and insulate the hose to prevent
condensation.
Connect a ¾” ID flexible drain hose
to the drain tube at the back of the
drain pan. Clamp the drain hose
in place.
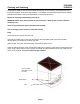
Dispenser Installation
If the dispenser is to be sealed to the
counter top, the drain tubing should be
available and planned such that the
connections may be finished after the
unit has been sealed to the counter.
Sealing may be accomplished by the
Use of RTV rubber sealant such as
Dow Corning 731.
With the unit located on the counter
as desired:
Tilt or lift the unit to expose the bottom
flanges of the base frame.
Apply the sealant to cover the bottom
Flanges of the base frame
Return the unit to the desired position
on the counter top.
Add sealant around the base frame and
Counter top to provide a seal with a radius
of ½ inch. Follow the sealant manufacturer’s
instructions on the package for working with
the sealant, and cleaning up.
Seal around all access holes in the counter
Top with Permagum or Mortite caulk
or an equivalent material.
Route the drain lines to the building drain.
The drain lines must be pitched and vented
to ensure proper flowage of the wastewater.