TOILET INSTALLATION & CARE GUIDE GUIA DE INSTALACIÓN Y CUIDADO GUIDE D'INSTALLATION For FREE installation guidance, please call Icera Customer Service at 855-444-2372 while your plumbing professional is on-site. © 2016 ICERA | ST.
TABLE OF CONTENTS BEFORE YOU BEGIN.........................................................................................................................................................................2 ANTES DE EMPEZAR AVANT DE COMMENCER FIRST STEPS......................................................................................................................................................................................2 PRIMEROS PASOS PREMIERS PAS TOILET MODEL GUIDE..............................
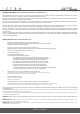
BEFORE YOU BEGIN/ANTES DE EMPEZAR/AVANT DE COMMENCER Please read these instructions carefully to familiarize yourself with the required tools, materials, and installation sequences. This will help you avoid costly mistakes. In addition, read all operating and safety instructions. Por favor, lea estas instrucciones para familiarizarse con las herramientas requeridas, los materiales y la secuencia de instalacion. Además, lea todas las instrucciones operativas y de seguridad.
FIRST STEPS/PRIMERO PASOS/PREMIER PAS (continued) WARNING: Risk of external leakage. The fill valve nut has been factory-tightened to design specifications. If retightening is required, tighten one turn past finger tight with a wrench. ADVERTENCIA: Riesgo de fuga externa. La válvula de llenado ha sido apretada por la fábrica a especificaciones de diseño. Si es necesario re-apretar, apriete una vuelta a la vez. ATTENTION: Risque de fuite externe.
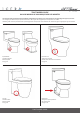
TOILET MODEL GUIDE GUIA DE MODELO DE INODOROS/GUIDE DES MODÉLES Use the guide below to determine which installation configuration corresponds to your toilet model. Use the guide pages the type of your toilet. Use esta guía para determinar qué tipo de inodoro tiene. Use las guías de las páginas que correspondan a su inodoro. Utilisez le guide ci-dessous pour déterminer quelle configuration correspond à votre modéle de WC. Utilisez les pages de guidage du type de votre WC.
TOOLS, MATERIALS, AND PARTS CAUTION: Ensure that the water supply pressure is a minimum of 35 PSI (2.5 kg/cm). The toilet will not function properly without minimum pressure. PRECAUSION: Asegúrese de que la presión del suministro de agua es de un mínimo de 35 PSI (2.5kg/cm). El inodoro no funcionara correctamente sin presión mínima. ATTENTION: Assurez-vous que la pression d’eau est un minimum de 35 PSI (2.5 kg/cm). Le WC ne fonctionnera pas correctement sans pression minimum.
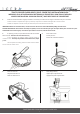
TOILET: EXPOSED FLOOR BOLTS / BOLT COVER TILES INSTALLATION GUIDE INODORO: GUIA DE INSTALACIONS DE TORNILLOS EXPUESTOS O CON TAPA DE AZULEJO GUIDE D’INSTALLATION: BOULONS EXPOSÉ / AVEC DES TUILES DE COUVERTURE 1. Install or relocate the water supply and outlet as necessary to conform to the rough-in dimensions of your new toilet. Instale o localice el suplemento de agua y el drenaje conforme a la medida de desagüe de su nuevo inodoro.
6. Install floor mounting kit as shown below. DO NOT OVERTIGHTEN! Instalar los tornillos como de demuestra abajo. ¡NO LOS APRIETE DEMASIADO! Installez le montage comme illustré ci-dessous. NE SERREZ PAS TROP! 7. Cut excess from the bolt and affix bolt cap. Corte el exceso del perno y fije la tapa de perno. Coupez l'excédent du boulon, et montez le bouchon de boulon. 8. TANK INSTALLATION - ONLY APPLICABLE TO TWO-PIECE TOILETS. Install the gasket at the bottom of the water tank.
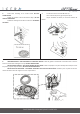
. ONLY APPLICABLE TO TWO-PIECE TOILETS. Mounting bolt tabs must contact bowl for proper gasket compression. SOLO PARA INODOROS DE DOS PIEZAS. Los pernos deben ponerse en contacto con el tazón para que haya compresión adecuada con el empaque. ¡NO LOS APRIETE DEMASIADO! SEULEMENT APPLICABLE AUX TOILETTES DEUX PIÈCES. Montage des pattes des boulons doit contacter le bol pour la compression du joint. 10. Connect the water supply line and turn on the water. Flush several times and check for leaks.
12. Install the tank lid and seat per the seat instructions provided. Use the supplied seat bolts and washers. Check for leaks over the next several days. Instale la tapa del tanque y el asiento de acuerdo a las instrucciones provistas. Use los pernos y tapas proveidas. Compruebe que no haya fugas en los proximo dias. Installez le couvercle du réservoir et le siège. Utilisez les boulons et rondelles fournies. 13.
TOILET: CONCEALED BOLTS INSTALLATION GUIDE INODORO: GUIA PARA TORNILLOS OCULTOS GUIDE D’INSTALLATION: BOULONS CACHÉS 1. Install or relocate the water supply and outlet as necessary to conform to the rough-in dimensions of your new toilet. Instale o localice el suministro y salida del agua si es necesario para ajustarse a las dimensiones necesitadas por su inodoro. Installez ou déplacez la vanne d’arrêt que nécessaire pour les dimensions de votre WC. 2.
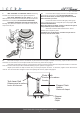
6. Install the mounting brackets as shown below. Instale los soporte L como se enseña abajo. Installez les supports de montage. 7. Install the outlet seal on the flange. Apply sealant around the edge of the toilet’s baseplate facing the wall. Instale el sella y la brida. Aplique sellador alrededor del borde de la base de la taza del baño. Installez le joint sur la bride. Appliquez du mastic sur le bord.
8. Apply weight evenly. Aplique peso uniformemente. Appliquez le poids uniformément. 9. 10. Insert the bolts into the bracket and tighten evenly. DO NOT OVERTIGHTEN! Then affix bolt caps. Inserte los tornillos en el soporte y apriete uniformemente. ¡NO LOS APRIETE DEMASIADO! Ahora coloque tapas de los pernos. Insérez les boulons, et serrer uniformément. Montez les casquettes des boulons. Carefully lower toilet over the mounting brackets. Cuidadosamente ponga el inodoro so bre los soporte L.
11. Connect the water supply line and turn on the water. Flush several times and check for leaks. Conecte la línea de suministro de agua y abra el grifo. Correr el agua varias veces y comprobar que no haya fugas. Raccordez la conduite d’alimentation d’eau. Rincez plusieurs fois et vérifiez les fuites. 12. Check that the chain lever is taut without any excessive slack and adjust as needed. If necessary, adjust the water level in the toilet tank.
TOILET: BACK-OUTLET INSTALLATION GUIDE INODORO: GUIA PARA DESAGUE POSTERIOR GUIDE D’INSTALLATION: WC ARRIÈRE-SORTIE 1. Install the closet bolts on the flange. Slide them into place parallel to the floor and 6” (152mm) apart. (Use putty to hold them in place, if needed.) Then, drill the 2 mounting pilot holes into the floor, as shown. Instalar los pernos de ajuste en la brida. Deslice paralelo al suelo y 6” (152mm) de distancia. (Use masilla para mantenerlos en lugar, si es necesario).
3. Install toilet on the wall flange so that the flange bolts project through the mounting holes. Loosely install the retainer washers and nuts on the wall bolts. Position the toilet against the wall and carefully push the bowl against the seal and flange. Alternately tighten the nuts until the toilet is firmly mounted to the wall. DO NOT OVERTIGHTEN the nuts or the ceramic base may be damaged.
6. TANK INSTALLATION - ONLY APPLICABLE TO TWO-PIECE TOILETS. Install the gasket at the bottom of the water tank. Insert the bolts into the brackets and tighten evenly. DO NOT OVERTIGHTEN! INSTALACION DE TANQUE – SOLO PARA INODOROS DE DOS PIEZAS. Instale el empaque en la parte de abajo del el tanque. Inserte los pernos y apriete uniformemente. ¡NO LOS APRIETE DEMASIADO! INSTALLATION DU RESERVOIR – SEULEMENT APPLICABLE AUX WC DEUX PIÈCES. Installer le joint au fond du réservoir.
9. Check that the flapper chain is taut without any excessive slack and adjust as needed. If necessary, adjust the water level in the toilet tank. For instructions on how to adjust the fill valve in the tank, please refer to page 23. Comprobar que la cadena este firme, y ajuste según sea necesario. Ajustar el nivel de agua en el tanque del inodoro si es necesario. Para instrucciones sobre el ajuste del a válvula de llenado, por favor refiérase a la página 23.
FILL VALVE ADJUSTMENT INSTRUCTIONS INSTRUCCIONES PARA AJUSTAR LA VALVULA DE LLENADO AJUSTEMENT DE LA VANNE DE REMPLISSAGE Identify your valve model in the table below and follow the corresponding instructions to adjust your fill valve float and the water level in your tank. Identifique el modelo de la válvula en su tanque en el cuadro de abajo y siga las instrucciones correspondientes para ajustar su válvula de llenado y el nivel de agua en su tanque.
PRODUCT CLEANING & CARE CUIDADO Y LIMPIEZA DEL PRODUCTO SERVICE DU PRODUIT □ Do not use in-tank cleaners in your toilet. Products containing chlorine can seriously damage fittings in the tank. This can cause leakage and damage. No use limpiadores dentro del tanque de su inodoro. Los productos que contienen cloro pueden dañar seriamente los accesorios del tanque. Esto puede causar fugas y daños. N’utilisez pas des nettoyants dans le reservoir de votre WC.
TROUBLESHOOTING GUIDE GUIA PARA RESOLVER PROBLEMAS GUIDE DE DÉPANNAGE PROBLEM RECOMMENDED ACTION Poor Flush Descarga ineficiente La chasse d’eau est faible • Adjust the tank water level to match the waterline. Ajuste el nivel de agua del tanque para que coincida con la línea marcada en el tanque. Réglez le niveau d’eau du réservoir à la ligne. • Fully open the water supply shut-off valve. Abra completamente la válvula del suministro del agua. Ouvrez complètement l’alimentation en eau de vanne d’arrêt.
IMPORTANT CONSUMER INFORMATION □ □ □ □ □ □ □ □ □ □ Consumer Responsibilities Responsibilidades del Consumidor Responsabilités des Consommateurs If you live in a hard water area, make certain that the holes in the toilet rim are kept clean to ensure proper bowl flushing. Si usted vive en una zona de agua con minerales, asegúrese de que los agujeros en el borde del inodoro se mantengan limpio para asegurar que la taza descargue adecuadamente.
LIMITED LIFETIME WARRANTY Icera | St. Thomas Creations provides a LIMITED LIFETIME WARRANTY for its Icera and St. Thomas Creations branded vitreous china and fire clay plumbing fixtures to be free of defects in material and workmanship. This warranty is extended only to the original purchaser and installer of the product. This warranty is non-transferable. Icera | St.