
Installation guide


6. (Tempstar only) Insert Face Plate on the designated holes
on the front of the door.
7. Install Hole Plugs (2) on faceplate.
8. (Tempstar only) Place Trim Strips (2) along the front side
edge of the door.
9. Insert door screws (2) into screw holes located at the front
bottom of the door.
10. Install the door on the furnace.
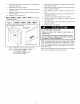
Model: N9MP2, *9MPD, *9MPT, *9MPV (SeeFigure3)
* Denotes Brand
Figure 3 N9MP2, *9MPD, *9MPT, *9MPV
_ \_ _ / (3) asshown ///
1. Place one Wiring Label on the inside of the door.
NOTE: :Part1014484forN9MP2,*9MPD
Part 1014485 for *9MPT
Part 1014486 for *9MPV050F12
Part 1014487 for *9MPV
2,
3.
4.
5.
6.
7.
8.
9.
Place seal strips (2) along the side edge on the inside of the
door and trim to length.
Place another seal strip along the top edge on the inside of
the door and trim to length.
Place Warning Label part 1013810 on the outside of the
door.
(Tempstar only) Insert Face Plate on the designated holes
on the front of the door.
(Tempstar only) Install Hole Plugs (2) on faceplate.
(Tempstar only) Place Trim Strips (2) along the front side
edge of the door.
Insert door screws (2) into screw holes located at the front
bottom of the door.
Install the door on the furnace.
CUTS AND ABRASION HAZARD.
Failure to follow this caution could results in
bodily injury.
Sheet metal parts may have sharp edges or burrs.
Use care and wear appropriate protective clothing
and gloves when handling parts.
NOTE: If replacing blower door with machine thread thumb-
screws, drill new door screw holes from 1/8" diameter to 1/4" diam-
eter before inserting thumbscrews. Use machine thread thumb-
screws from original (old) door. Discard black door screws in-
cluded with this kit.
If door screws from original door are not available, use 10-32 UN F
thread screws available at local hardware stores.
-2-