User Manual Kiosk III 80136500-001
ViVOpay Kiosk III User Manual Copyright Copyright© 2014, International Technologies and Systems Corporation. All rights reserved. ID TECH 10721 Walker Street Cypress, CA 90630 USA This document, as well as the hardware and software it describes, is furnished under license and may only be used in accordance with the terms of such license. The content of this paper is furnished for informational use, subject to change without notice, and not to be construed as a commitment by ID TECH.
ViVOpay Kiosk III User Manual FCC Regulatory Compliance Notices Class B Equipment This equipment has been tested and found to comply with the limits for a Class B digital device pursuant to Part 15 of the FCC Rules. These limits are designed to provide reasonable protection against harmful interference in a residential installation.
ViVOpay Kiosk III User Manual Table of Contents 1 Overview ...................................................................................................... 5 1.1 1.2 1.3 2 Features...............................................................................................................5 Valid Card Types .................................................................................................5 Kiosk III Specifications ....................................................................
ViVOpay Kiosk III User Manual 1 Overview The ViVOpay Kiosk III is a compact stand-alone contactless reader designed to support contactless transactions based on ISO 18092, ISO 14443 Type A/Type B/MiFare compatible cards, fobs and tags as well as NFC phones. The ViVOpay Kiosk III is comprised of a compact controller module and an antenna module packaged individually.
ViVOpay Kiosk III User Manual 1.3 Kiosk III Specifications Hardware MTBF 500,000 hrs based on Telcordia Technologies SR-332 modeled at 40° C. Transmitter Frequency 13.56 MHz +/- 0.01% Transmitter Modulation ISO 14443-2 Type A Rise/Fall Time: 2-3 µsec. Rise, < 1 µsec fall ISO 14443-2 Type B Rise/Fall Time: < 2 µsec. each; 8% - 14% ASK ISO 18092 Receiver Subcarrier Frequency 847.
ViVOpay Kiosk III User Manual Transit Humidity 5% to 95% non-condensing, duration 1 week Operating Environment Water resistant for indoor and outdoor use Controller Operating Temperature 5° C to 50° C (41° F to 122° F), max change of 10° C per hour Storage Temperature -10° C to 50° C (14-° F to 122° F), duration 3 months Transit -40° C to 60° C (-40° F to 160° F), duration 1 week Operating Humidity 5% to 90% non-condensing, Storage Humidity 10% to 90% non-condensing, duration 3 months Transit
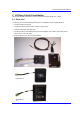
ViVOpay Kiosk III User Manual 2 ViVOpay Kiosk III Installation This section provides information on how to install the ViVOpay Kiosk III on a kiosk. 2.1 Parts List Verify that you have the following hardware for the installation of the ViVOpay Kiosk III: • ViVOpay Kiosk III Controller • ViVOpay Kiosk III Antenna (either square or angle bezel) • Antenna LED power and data cable • ViVOpay Kiosk III to ECR/POS cable (customer supplied). This USB or serial cable varies based on the host to be used.
ViVOpay Kiosk III User Manual 2.2 Mounting the ViVOpay Kiosk III External Antenna Use the following instructions to mount the antenna on the exterior of the kiosk: Note: Verify the orientation of the ViVOpay Kiosk III Antenna before marking and drilling the holes. The two larger holes should be located towards the top of the mounting location to ensure that the ViVOpay Kiosk III Antenna is oriented correctly with the LEDs at the top. 1.
ViVOpay Kiosk III User Manual 7. Align the four screws with the mounting holes and attach the ViVOpay Kiosk III to the outside surface. Make sure that the cable is not pinched or binding. Square Bezel Angle Bezel 8. Use the four nuts to secure the ViVOpay Kiosk III to the outside surface of the kiosk. Make sure to tighten the nuts securely so that the ViVOpay Kiosk III does not move on the outside surface of the kiosk. If you are installing the Angle Bezel Antenna, tighten the nuts to 5-7 in/lbs.
ViVOpay Kiosk III User Manual 10. Attach the RJ45 connector coming from the ViVOpay Kiosk III Antenna to the RJ45 receptacle on the 220-2457-00 cable. 2.2.1 Flush-Mounting the Square Bezel Antenna The RF field of the antenna is sensitive to the proximity of metal. If you are flush-mounting the antenna in a metal surface or bezel, you have three options: • Mount with the RF emitting surface of the antenna at least 1cm forward of any metal.
ViVOpay Kiosk III User Manual 2. Locate the four 4.4mm (0.173 inch) mounting holes by holding the ViVOpay Kiosk III Controller in position and mark the holes. The following diagram shows the spacing on the holes to be drilled for mounting the ViVOpay Kiosk III Controller. 63.50 [ 2.500 ] 3. Drill the four 4.4 mm (0.173) mounting holes using a number 17 drill bit. 4. Use four screws and nuts to mount the ViVOpay Kiosk III Controller to the kiosk surface.
ViVOpay Kiosk III User Manual 2. Attach the other end of the cable (220-2457-00) from the antenna to the ViVOpay Kiosk III Controller. Note: Verify that the polarizing lug on the end of the data cable is facing towards the top of the ViVOpay Kiosk III Controller (away from the mounting plate) before inserting the cable. If the cable is installed incorrectly (upside-down), it will apply the wrong polarity to the LEDs and damage them. 2.
ViVOpay Kiosk III User Manual 2.6 Connecting to the Data Port The Kiosk III has two data connections options: USB through the USB connector and RS-232 through the 14-pin Molex connector. USB Port RS-232 Port The USB port uses a standard USB connector and pinouts. The RS-232 port has the following pinouts. Pin 1 Description Power ground Pin 2 Description +7.5v to 45VDC 3 Power ground 4 +7.
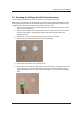
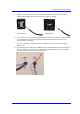
ViVOpay Kiosk III User Manual 2.7 Using the ViVOpay Kiosk III to Make a Purchase 2.7.1 Presenting Cards, Fobs, or NFC Phones Your new ViVOpay Kiosk III allows for credit/debit card purchases using the new contactless technology. Present the card/fob/phone in close proximity to the front portion of the antenna module. Present the card/fob/phone so that maximum surface area is parallel to the antenna module as shown below.
ViVOpay Kiosk III User Manual • Test the ViVOpay Kiosk III installation using a test card to perform an end-to-end transaction (the same as an actual purchase on the Kiosk). The kiosk control panel should display "Requesting Authorization". Even if the transaction is declined (as it should be with a test card), it will prove connectivity all the way through the system.
ViVOpay Kiosk III User Manual 5 Troubleshooting We need update the trouble shooting, we will provide the draft for the trouble shooting later. The ViVOpay Kiosk III readers are reliable and easy to troubleshoot. The components that may require troubleshooting include the power module (if applicable), the reader, and the serial cable. Symptom Possible Cause Remedy • Reader not powered on or incorrect voltage. • Improper use of internal power supply provided by the kiosk. • Check cable connections.
ViVOpay Kiosk III User Manual Some cards/fobs/phones read, but not all. • Possible bad card/fob/phone. • Unsupported card used. • Wrong firmware (contact your local support representative). • Check to see if card/fob/phone is damaged. • Verify that phone cover is correctly attached to phone. • Verify that correct firmware is loaded on reader (local support representative only). • Faulty or incorrect cable connections. • Check that the cable connection is secure and in the correct port on the kiosk.
ViVOpay Kiosk III User Manual 6. Press the button “Load” to load the firmware on the reader (the progress will be displayed). 7. Disconnect power and the serial dongle (if connected). 8. Connect power to the Kiosk III and connect the standard data cable (if disconnected).